
Although you have seen the plethora of options included in the FL Studio channel settings, sending a channel to a mixer slot will allow superior control over your sound. The FL Studio Mixer will allow you to use gain, equalization, compression, reverb, delay, and a multitude of other FL Studio factory effects or third-party effect plugins. When you want to group instruments together, you can send them all to one mixer slot, thereby creating common gain control. Equalization is very important because you can add (boost) or subtract (cut) certain frequencies to make certain elements of your song stand out and be clearer for your listeners. We will review this in detail in the Adding effects and your effect chain recipe in Chapter 6, Using the FL Studio Mixer and Recording Audio. The FL Studio Mixer will also allow you to view the level of all your pieces and parts in a more organized way.
You will want to have the step sequencer open so you can view your channels. To view the FL Studio Mixer, you may press F9. Alternatively, you may use the VIEW menu to select the Mixer option or click on the furthest symbol on the right, as shown in Fig 3.18. This icon represents the levels of your different channels / tracks / audio stems / FX slots in the FL Studio Mixer.
Fig 3.18
Let's have a look at the different methods to send a channel to a mixer slot.
- Standard method:
- Click on a channel in the step sequencer to open up Channel settings as shown in the following screenshot:
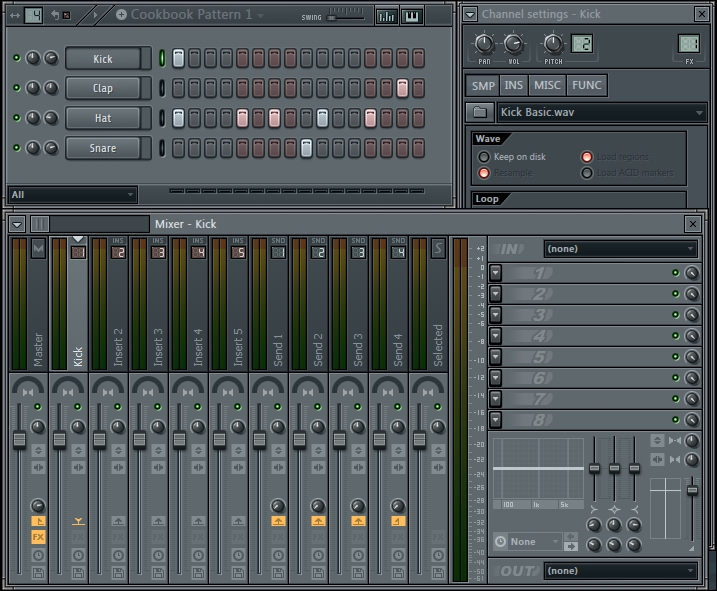
Fig 3.19
- Look to the upper right-hand corner of your given channel setting where you will find a small box labeled FX.
- Hover you mouse over the FX area, and click, hold, and drag up or down to adjust the number of the FX slot/number.
- In Fig 3.19, we adjusted the FX slot number to represent the number 1.
- The level/volume of the kick channel will now show up in the column Insert 1 of the FL Studio Mixer.
- Right-click on your column in the FL Studio Mixer, and select Rename to rename your FX slot as you see fit. We renamed Insert 1 to
Kickin Fig 3.19.Tip
A quicker shortcut for this whole process is to double-click and then hold the FX button, which will automatically pull up the FL Studio Mixer. At this point, you can drag the FX button to find an open slot. If your channel is already in a mixer slot, double-clicking the FX slot will allow you to quickly pull the channel up on the mixer.
- Click on a channel in the step sequencer to open up Channel settings as shown in the following screenshot:
- Alternate method – one channel at a time:
- Select the channel you want to send to the mixer by clicking on the channel Select (small green slit).
- Click on the mixer slot that you want the channel to be sent to.
- Hold down Ctrl + L to automatically send the channel to the mixer slot that you have selected.
- FL Studio will automatically give the mixer slot the same name as your selected channel.
- Alternate Method – multiple channels in succession for organization and quickness:
The following screenshot and the steps after it describe how to send multiple channels to the mixer at once:
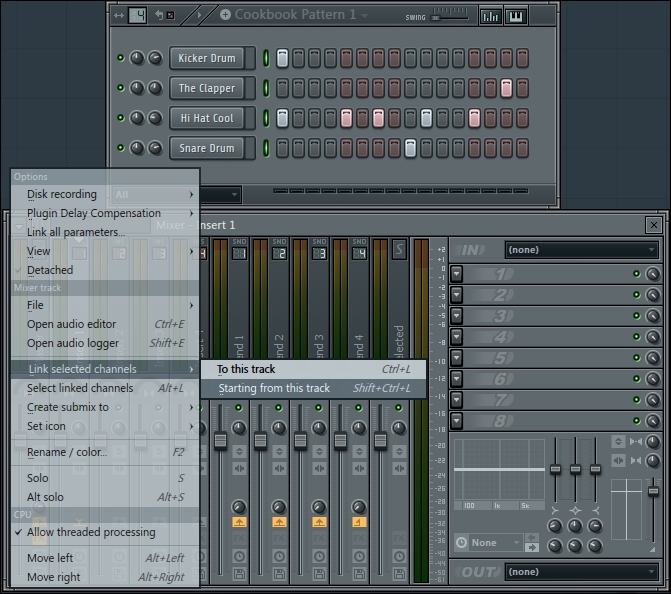
Fig 3.20
- Use the channel Select (small green slit) and highlight more than one channel by right-clicking on it.
- Click on the insert slot you want to start/match up your channels.
- Click on the small triangle in the upper left-hand corner of the FL Studio Mixer.
- Select Starting from this track and FL Studio will automatically add your selected channels in succession on the FL Studio Mixer.
- You may also use the Shift + Ctrl + L function, as shown in Fig 3.20, in lieu of using your mouse.
In Fig 3.20, we selected the four channels with the green slit and then clicked on Insert 1. When we use the Starting from this track option in Fig 3.20, FL Studio will automatically send the said channels starting at Insert 1. This means Insert 1 will be Kicker Drum, Insert 2 will be The Clapper, Insert 3 will be Hi Hat Cool, and Insert 4 will be Snare Drum. The succession of channels from top to bottom in the step sequencer matches the horizontal succession (left to right) in the FL Studio Mixer. If you haven't already renamed any insert tracks, the name of your channels will automatically be carried over to the FX slots in the FL Studio Mixer.
Sending a channel or channels to mixer slots allows you to control each part of your project more precisely. During the creative process, you may add lots of channels to the step sequencer and enter data inside the step sequencer steps or piano roll. Because the creative process happens very quickly, you may not have the time to separate each track in the FL Studio Mixer. This is where the Starting from this track functionality comes into play. It can come in very handy if you wish to consecutively send and automatically separate your channels when you are ready to send them to the mixer. The Starting from this track option does the "manual labor" out of sending one channel at a time to the FL Studio Mixer, but there are no true rules. The way you send channels to the FL Studio Mixer is based on your personal workflow.
If you know that your workflow usually follows the same trend, you can also save an FL Studio project as a file/template of your choice. In this manner, you can set up as many channels as you want and have them routed/sent to wherever you want in the FL Studio Mixer. You can then adjust the sounds you are using by changing/replacing them and then saving your project as a new name. This will result in a streamlined template for your workflow, but the actual music project will vary differently from project to project. A template will allow you to make a fundamental skeleton and could help aide in the process. You can save a template as an .flp file, like any other FL Studio project file.
If you like to use your mouse and scroll through the different numbers in your channel settings that match up / to the FX slots in the FL Studio Mixer, you will see the highlighted area (visual feedback) in the FL Studio Mixer change as you scroll your mouse on a given number. You will want to have both the Channels setting window and FL Studio Mixer open at the same time to view the visual feedback. Otherwise, you can use the quick tip of double-clicking on an FX button, which automatically brings up the mixer.
You can also click on the small triangle in the upper left-hand corner of the FL Studio Mixer, select Detached, and drag/move the FL Studio Mixer to a separate monitor/screen/TV/display. This will give you a large view of the FL Studio Mixer, and you will not have to open and close it within one screen any longer. This will help with your workflow and organization. In order to automatically assign your channel to an available mixer slot, click on the upper left-hand triangle (Channel options) on any channel settings window and select Assign free mixer track.