
Loud wars refer to the trend of increasing your songs main output. There are loud wars everywhere you look. If your YouTube video is not as loud as someone else's, the instant you press play, the average listener thinks it is not as good. When you are watching TV and a commercial comes on, it becomes much louder than the program you are watching. Anything that is streamed online must be extremely loud because your average listener truly believes that louder is better. Most producers and artists have to join this battle—if you can't beat them, join them.
The only issue with mastering is that the definition of mastering has changed dramatically over the years and it is still changing today, depending on who you talk to. In the 60s and 70s, when records were made on vinyl, you wanted your whole album to be uniform and flow smoothly from track to track in sequential order. Albums were like a story. They were there to be enjoyed. Mastering engineers, at the time, had the job of deciding which track went in what order, in addition to making sure that the levels and EQ flowed smoothly through the vinyl. This was still practiced with cassettes and CDs because these also told a story, and the mastering process involved picking the song order and making each song flow smoothly from one to the next.
The digital age, the Internet, iTunes, Napster, MP3 compressed files, and the release of singles instead of albums have changed the definition of mastering. Sure, it's awesome that everyone can share their songs worldwide through e-mail and the internet, but we are now dealing with MP3 files, which can be equated to compressed music. If you are simply releasing a single, you don't need someone to pick the album's song order. Picking the song order is irrelevant. Basically, when it comes down to it, your only concern is how loud your song is compared to other commercial releases.
While you don't have to be concerned with this, and you can do whatever you want with your music, loud wars put a good amount of pressure on artists, engineers, and producers. If you are producing pop, electronic, dance, or hip hop, you almost have to join the loud wars. This can be viewed as a good thing as well. This means that your track is loud, punchy, clear (yet hard hitting), and will hopefully include the many frequency ranges that are pleasing to listeners. Loudness while having clarity is what really wins the battle. It is extremely helpful to have a reference track close by, so that you can compare your song to a similar artist or genre you like, to note how the production quality differs.
To get started with mastering your project, it is imperative that you have your sequencing and mixing completely finished. During mastering it, you will only be dealing with the master track on the FL Studio Mixer, which is the first mixer track on the left-hand side. You want to make your complete production sound as good as is humanly possible, before you get to the mastering stage. Your levels, EQ, panning, sequencing, vocals, harmonies, and song arrangement should all be complete. You can also adjust the EQ when mastering, but it will only be adjustable on the master track. To bring up the FL Studio Mixer and the master track, you can press F9.
- Bring up the FL Studio Mixer (by hitting F9) and click on the track titled Master.
- While the master track is engaged, select Fruity Parametric EQ 2 in the effect's first slot. You can do this by clicking on the small triangle, hovering your mouse over Select or Replace, and selecting your plugin from the list as shown in Fig 6.18.
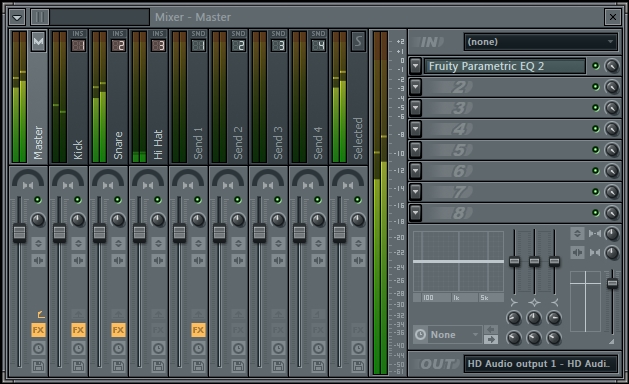
Fig 6.18
- The master volume slider at the top of your FL Studio project (the leftmost slider) should always be set at 100 percent, as shown in Fig 6.19. The same goes for your master track fader in the actual mixer as shown in Fig 6.18. This should always be at 100 percent. The reason for setting both of these at 100 percent is to avoid clipping. We will raise the volume through two effect plugins, not through these tools.
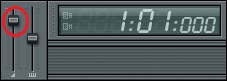
Fig 6.19
- Click on the Fruity Parametric EQ 2 effect name in the first effect slot to bring up the graphical interface. We will only be using this plugin to bring up the volume a little bit.
- In Fruity Parametric EQ 2, look at the column directly to the left of the purple column. Hover your mouse over the small box on this column, and note whether the FL Studio hint bar reads Main level.
- Click-and-drag this column up until you reach about +3 dB in the FL Studio hint bar. You can also use the graphical plugin dB numbers as a guide. In Fig 6.20, you can see that the first slider is around +3 dB. There is a straight, white line in the EQ section that represents the main level. Again, we are not using this plugin for any EQ purposes at this particular juncture. This is simply a trick to raise the main level.
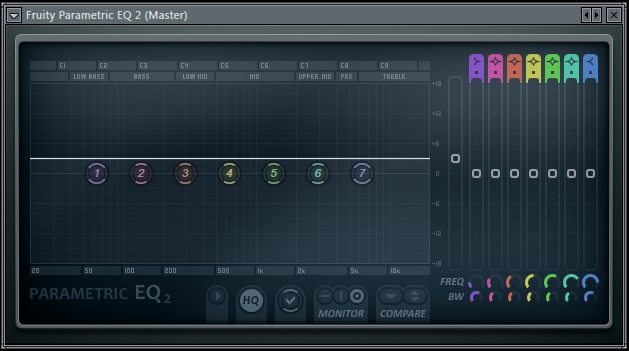
Fig 6.20
- Bring up the Fruity Compressor plugin, which is directly underneath Fruity Parametric EQ 2. This will be on the second effect slot in the master effect chain as shown in the following screenshot:
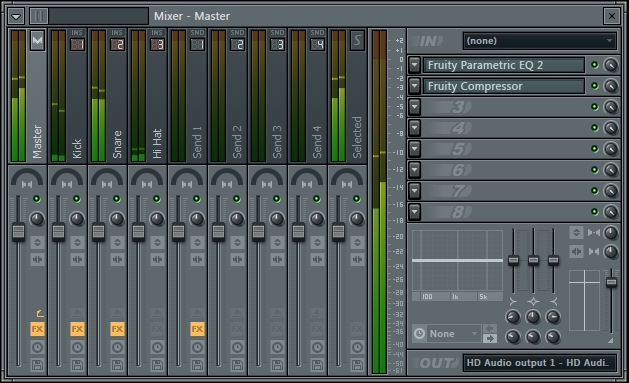
Fig 6.21
- Click directly on the Fruity Compressor name in the second slot to bring up the graphical parameters, as shown in Fig 6.22.
- For now, keep the Threshold and Gain knobs at 0.0. At the current juncture, this means that the Threshold knob will be turned all the way to the right and the Gain knob will be directly in the middle.
- Adjust your ratio to 3.0 : 1.
- Leave Type as Hard.
- Turn the Attack and Release knobs all the way to the left, which will result in an attack time of 0.0 ms and a release time of 1 ms.
- Press the Space bar to hear your project's playback. You will be using your ears during this process.
- Turn the Threshold knob until you reach about -4.0 dB (negative 4.0 dB).
- Turn the Gain knob slowly (while holding down Ctrl for smaller increments) until you hear the volume boost. This will be right around 4.0 dB or something close to it. This could be around 3.0 dB to 4.0 dB or slightly higher. Use your ears because you do not want to induce any distortion or clipping. You can experiment and move the Gain knob way past 4.0 dB to realize how far you can go without clipping.
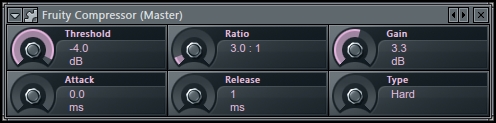
Fig 6.22
With regards to the threshold, values above the dB level of the threshold will be compressed in accordance with the ratio. The gain will boost the overall value of the ratio to compensate for the volume reduction. The amount of gain reduction is determined by the ratio. A ratio of 3:1 means that if your input level is 3 dB over the threshold, the output signal will be 1 dB over the threshold. It is the dBs your input signal will need to increase to produce a 1 dB gain in the output signal.
The Type tab affects how gradually compression kicks in above the threshold. The Attack tab refers to how quickly the signal triggers compression to kick in. The Release tab sets the time that the compressor takes to stop acting after the level has dropped below the threshold. This method described previously helps you join the loud wars. You will find that it works great once you export your project, burn a CD, and listen to it in the car while comparing it to other commercial releases. It will also sound great everywhere, including on entertainment systems, MP3 players, your studio monitors, and online streamed material.
What we have done is turned the Fruity Compressor effect into a brick wall limiter. (Generally, a ratio of 10:1 is considered for brick wall limiting, but the way we adjusted the attack and release times makes it function as a limiter.) Be mindful of your Peak meter option in the FL Studio Mixer. This shows your dB level on your master track, and it should not go past 0.0 dB. Dynamic processors such as compressors and limiters are devices used to control the volume of a signal. Some are used to bring loud signals closer to the volume of quieter signals. Others extend the difference between loud and quiet signals.
A limiter could be compared to a governor, where signal peaks do not exceed a certain value. Typically speaking, a ratio above 8.0:1 is considered to be limiting. Limiters typically employ very fast attack times with fast release times and high thresholds. We have shown an example using the 3.0:1 ratio to demonstrate how powerful this brick wall limiter can be, without having to use the 8.0:1 ratio. Feel free to experiment with different thresholds, ratios, and gain levels.
While mastering, you may also want to use EQ and adjust your frequency ranges. The high-shelving EQs do a nice job of opening up your track and letting air into the high-end spectrum. You may also want to test out multiband compressors; they allow you to focus on each band and then compress or limit as you see fit. Instead of one large compression on the entire song, you can focus on the bass and then compress, focus on the mid-levels and then compress, and finally, focus on the high end and then compress.
Remember that you may also want to master after you have rendered your completed music project, directly before mastering. This greatly helps your CPU load because your entire project will be rendered down to one WAV file. Then, you can close your project, open up a blank project, and import your WAV file into it. Your WAV file will be the only audio file in your entire project in FL Studio. At that point, you can use plugins to master your project.
The method we just used that involves Fruity Parametric EQ 2 (for the main level only) and Fruity Compressor (which was turned into a brick wall limiter) will hold its own against any mastering process out there. You can now win against any producer in the loud wars. You may also want to purchase plugins from www.waves.com, www.izotope.com, www.fabfilter.com, or http://mcdsp.com/. We will review how to install these types of plugins as well as free plugins found on the Internet in Chapter 1, Configuring FL Studio.