
In this recipe, you will come to understand the files and parameters within the FL Studio Browser. You can accumulate a wide range of sounds and build your own sound library. FL Studio also comes with its own factory sounds to get you started (25 folders in total in the factory Browser list, which also includes a plethora of presets and functions). This is also the area where FL Studio automatically keeps presets, projects, SoundFonts, automation curves, WAV files, the undo history button, the speech synthesizer, and the like. This is also where you can preview sounds while your mix is playing, so it is crucial to understand the Browser while building your track and adding additional sounds to it. When you add sounds from the Browser into the step sequencer, it automatically becomes a channel in the step sequencer, which is the building block of all the sounds in your given project.
In order to get started with using the Browser, you need to open up FL Studio and then push the F8 key to toggle the Browser. Additionally, you may go to the VIEW menu and then select Browser. When Browser is selected, you will see a small checkbox next to it. A third way is to simply click on the Browser symbol. Browser is the fourth button from the left, as shown in the following screenshot:
Fig 2.1
Find a folder in the FL Studio Browser that contains WAV or MP3 sounds. Click with your mouse to trigger the sound samples or scroll using your arrow keys on your computer keyboard. Adjust your volume or effect in your preview mixer track on the FL Studio Mixer; we will discuss this in the next lines.
When you left-click on the folders in the Browser section, it will automatically open up the files inside of it, which you can then left-click to preview the sound. Keep in mind that you will be previewing all types of sounds, including drum kicks, snares, hi hats, and all types of percussion, but when a sound in the Browser is longer than 5 seconds, clicking on it will only preview the first 5 seconds of it. There will be a small symbol that helps identify what each file means. A small orange box with a small .wav audio symbol means that the file is, indeed, a WAV file. There is also a label that says MP3 when it recognizes an MP3 file. When you click on a file with your mouse, it will be previewed through your sound card, headphones, or speakers. Once you have engaged a file, you may also use your arrow keys (the up and down arrows) that are part of your QWERTY keyboard.
When working on the FL Studio Browser and triggering with percussion, rhythm, hi hats, cymbals, kicks, snares, claps, and the like, you can actually use your mouse to play musical patterns. This means treating your mouse button like a drum pad, and with practice, it can inspire you to get better. For example, if you have a drum kit called APRIL Kit full of WAV samples in the Browser section (as shown in the following screenshot) and the kick, snare, and hi hat or shaker are close by in the list, you can play a decent riff with only your mouse button on the fly:
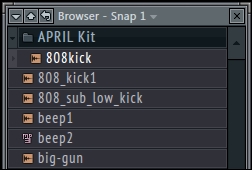
Fig 2.2
In this example, you can left-click on 808kick and then beep1 in order to form a percussion riff with your finger and mouse. Sure, this is not recorded anywhere and is only a preview, but you can certainly get a good rhythm groove going no matter your type of WAV samples or musical genre. As discussed earlier, the wave symbol is the orange icon on the left of each sample in the Browser section, and it also says MP3 for the MP3 file titled beep2, as shown in the preceding screenshot. You can create freestyle loops on the fly, which allow for immediate feedback and inspiration. The kick and snare are extremely important as the building blocks and foundation of your song. Use your mouse like you would your finger on a hard surface or table top. You can pulsate quickly or slowly.
The other method of previewing your WAV and MP3 files in the FL Studio Browser is using your up and down arrow keys. In this method, you can simply push the keys up or down, and it may feel easier than clicking on each sound with your mouse. The files in any given Browser folder are always listed in an alphabetical order (from top to bottom), so remember to scroll all the way down and start near the end of the alphabet to break the monotony of any given folder.
In order to optimize the way you use your Browser when previewing sounds, you will also need to set your Preview mixer track field to whatever track you desire in your Mixer. The FL Studio Mixer is reviewed in Chapter 6, Using the FL Studio Mixer and Recording Audio. In this way, you can adjust the volume of the sounds previewed in the Browser section and also set EQ, reverb, or any other effect desired. This is crucial when mixing and adding sounds to your project. The following screenshot shows the Mixer tab:
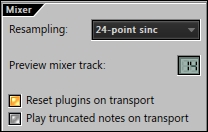
Fig 2.3
In the preceding screenshot, I have set Preview mixer track to 14. This is accomplished by going into the OPTIONS menu and clicking on Audio settings. In the bottom right-hand corner of Settings, there is a small area titled Mixer. It is here that you select Preview mixer track, which means any sound you preview in the Browser section will be funneled into your selected track on the FL Studio Mixer. You can simply drag the number up or down in order to reach the Mixer track you so desire to preview. This is one of the most important things to remember in FL Studio, because you can now add compression to the previewed sounds, add reverb, raise the volume, or lower the volume when previewing sounds in the Browser. When your music production is playing, this will help you see how your previewed sound could potentially be blended with your mix. You will learn how to add reverb and light compression to the preview Mixer in the subsequent chapters.
When mixing your song and having multiple instruments and harmonies playing at the same time, adjusting the volume of the Preview mixer track can help you decide whether you want to add a particular sound or discard it. Be cautious of this and set Preview mixer track to be at an optimal volume based on your other instruments and tracks playing in the mix simultaneously. Sometimes, the volume varies between folders, but generally speaking, you can set the volume and scroll through most sounds in any given kit adequately, especially if they have all been made by one manufacturer or sound designer.
When you find a sound that you like, you can left-click and drag with your mouse, and let go when you reach the lower part of an empty space on the step sequencer. The step sequencer can be opened by pressing F6, which we will review in Chapter 3, Working with the Step Sequencer and Channels, and is the main sequencing section in FL Studio. This will then make a new channel of the sound you desire to use in your project. Every sound you use (from either the Browser section or any recorded audio) in your project will have a dedicated channel in the step sequencer. When clicking-and-dragging, you can also replace an existing sound that is already its own channel. If you left-click and drag a sound from the Browser section and let go of it on an existing channel, it will light up in orange on the existing channel and subsequently be replaced. When you right-click on a sound in the Browser section, you will have additional options, as shown in Fig 2.4. The use of these actual channels will be covered in Chapter3, Working with the Step Sequencer and Channels.
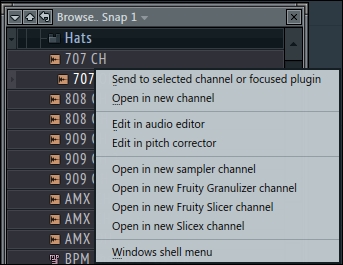
Fig 2.4
The sounds, plugins, presets, history, and parameters of your Browser are directly related to making music. Before recording these sounds into FL Studio, they will be placed as channels inside the step sequencer, and your music project will commence. We will discuss this music-making process in the next chapter. The Browser section is your library of WAV and MP3 sounds that differ from VSTs and virtual instrument plugins, which we will also examine later in the book.
Let's learn a few things about browsing extra search folders. In cases where you want to specify your own path, store sounds on a drive other than your main drive, or use an external hard drive, you can tell FL Studio to search for that particular path in your File settings. This is also a practice used in recording external audio, which we will cover in a later chapter. A widely used practice is to record your vocals and any other audio onto an external drive in order to save space on your computer. You can also use this method for any sounds or files, if you so desire. You will need to click on the OPTIONS menu and then go into File settings. You may also press F10 and then click on your FILE tab in order to reach the same File settings window in FL Studio. An additional way is to click on the small triangle (in the Browser options) in the upper left-hand corner of the Browser section and then select Configure extra folders. The following screenshot shows the Settings window:
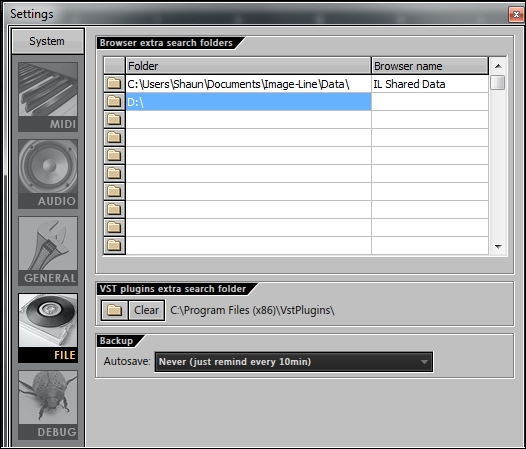
Fig 2.5
In the preceding screenshot, you can see the Browser extra search folders menu. The first row at the top shows automatically when you install FL Studio, as long as you have completed the standard installation. In this File settings window on FL Studio, you are able to specify more paths that tell FL Studio what areas to search on your computer in order to bring up the sounds into your project(s). I have added D: to the second row as an example. In this example, FL Studio will now search the D: drive in addition to any other locations that I specify. In order to actually specify a location for FL Studio, you simply need to click on the folder icon next to each row. Once you click on the folder icon, you will be able to select the path/folder to be added to FL Studio as an extra search folder.