
The basic knobs, sliders, buttons, and parameters equipped for automation include the step sequencer's panning and volume, all channel settings, and the FL Studio Mixer. We will illustrate a fundamental example on the Channel panning knob, which can be found directly next to each channel.
The steps that need to be performed to record automation are similar to the steps used before recording audio. However, in this case, we will be recording mouse movements as we click-and-drag a knob. If we wanted to use a physical MIDI control like a knob or slider, we can right-click on the function to be automated, select Link to controller, and then move the knob or fader you want to assign. This was reviewed in the Working with MIDI controllers and MIDI pads recipe in Chapter 4, Building Your Song. However, some third-party VST plugins don't allow that exact method, but there is a workaround. In cases where your plugin does not show any options after right-clicking on a parameter you wish to assign to a physical control, you can do the following:
- Click on your Plugin options drop-down box (the upper-left-hand corner triangle of your plugin window).
- Select the Browse parameter option and then right-click on the parameter you want to automate, which will be populated in the Browser window.
- You will then be able to select Link to controller. You can also click on plugin knobs and the pertinent parameter will be automatically focused on the Browser window.
Moreover, you may also simply click-and-drag a parameter you want to assign by going to the FL Studio TOOLS main menu, hovering on Last tweaked, and selecting Link to controller….
Let's commence recording automation with the Channel panning knob using the following steps:
- Highlight a section on the playlist. We have selected four measures as shown in the following screenshot:
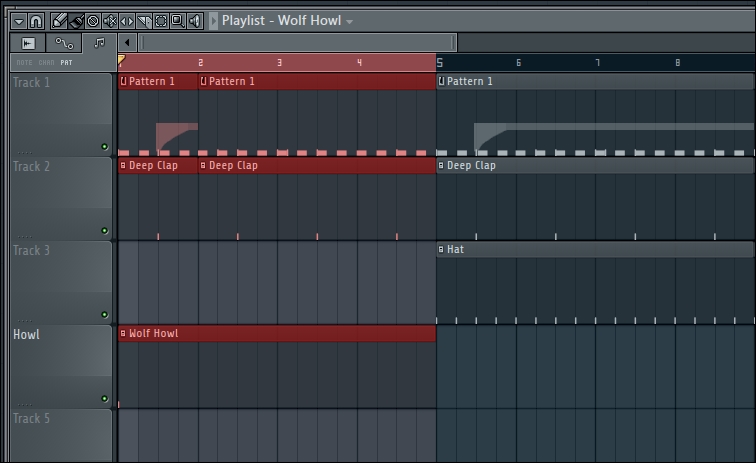
Fig 10.1
- Click on the record button on the transport controls on the main FL Studio window and then select Automation & Score, as shown the following screenshot:
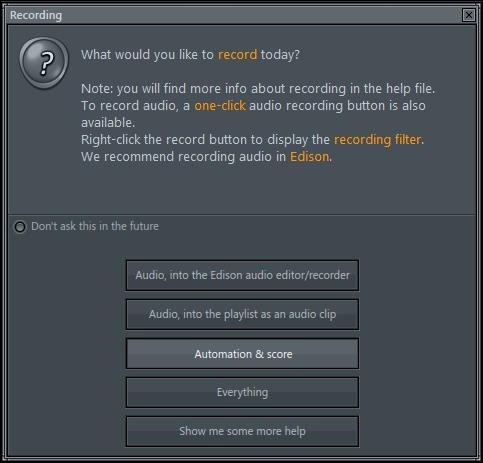
Fig 10.2
- Press the Space bar to begin recording. During your song's playback, adjust the Channel panning knob by clicking-and-dragging. In Fig 10.3, note that the Time panel at the top of the window is a little bit past bar 4 (4:10:014). At that particular moment in time, we have the panning knob pulled to the right. In this example, when the automation recording started, we began at the far left and then slowly moved the knob all the way to the right for a sweeping type of effect—from the left, up to the center position, and finally turning to the right. Remember, this example is a four-measure recording example. Have a look at the following screenshot:
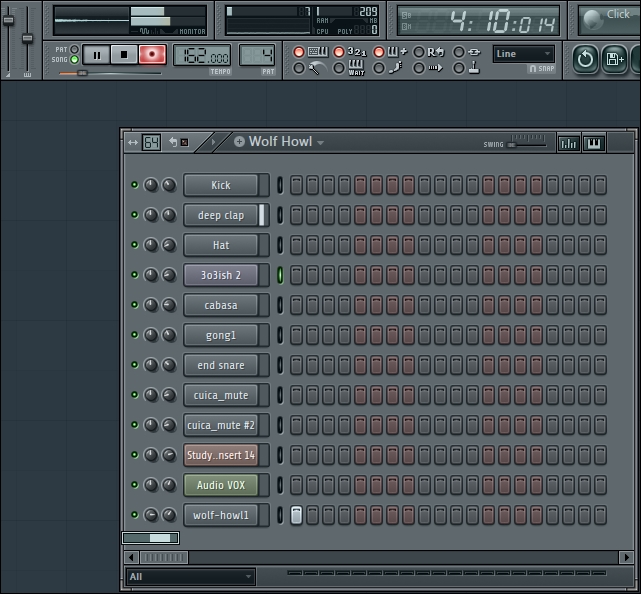
Fig 10.3
- Our recording will end based on our selection in the playlist. You may now look at the playlist to see the automation curve you made with your mouse on the Channel panning knob, as shown in the following screenshot. You can see that the graphical representation shows the gradual turn from left to right we did with our mouse. When you play your song back, the Channel panning knob next to the wolf-howl1 channel will be moving from the left to right like a ghost! This is playing back the exact movements we made during our automation performance.
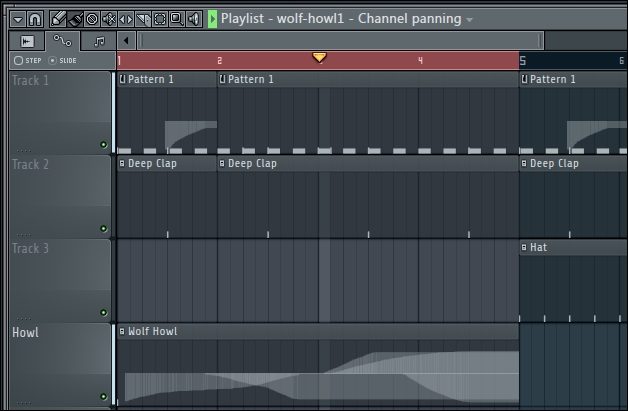
Fig 10.4
- Double-clicking on the Wolf Howl automation clip on the playlist will bring up the Event Editor menu. You may also click on the small box next to Wolf Howl and select Edit pattern to bring up the Event Editor menu. The Event Editor menu will enable you to edit your automation movement as per the following screenshot:
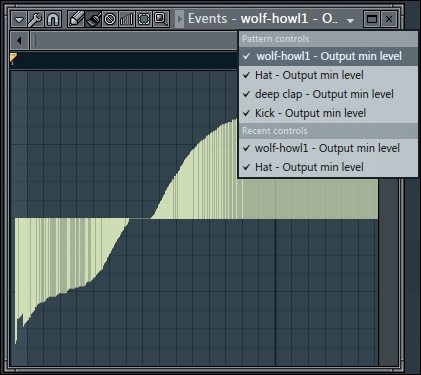
Fig 10.5
- While Event Editor is open, we may also use the options in the drop-down menu as per the preceding screenshot and choose different automation pattern controls.
In this example, we clicked-and-dragged our performance parameters with our mouse. You could very well have used a physical knob on a MIDI controller. It all depends on your individual preference. These parameters can also be mapped to a MIDI controller for greater control and for live performances. Be sure to review the Multilink to controllers function in the Working with MIDI controllers and MIDI pads recipe in Chapter 4, Building Your Song.
Also, we don't necessarily have to highlight a section in the playlist. We can simply record the automation and then turn any knob we want while the song is playing. While doing this, you can tweak multiple knobs during automation recording and all of the song's information will be saved and played back. The opportunity for creativity is boundless.
The same exact principles hold true with the knobs and parameters on virtual instruments and virtual effects. In a typical scenario, we would have recorded our harmony of the instrument on the Piano roll, though you could simultaneously use automation and note performance. The automation ability adds icing to the cake. We can tweak as many knobs as we want on any type of plugin. The same holds true for all effect plugins in the FL Studio Mixer effect chain. In the screen depicted in the following screenshot, we could use our mouse or MIDI controller knob/slider on the VCF, TUNE, and VOLUME controls in the lower-left-hand side of the TAL U-NO-60 virtual instrument plugin. As mentioned earlier, some third-party plugins require you to select Browse parameters (the dropdown on the upper-left-hand corner) and then right-click on a parameter in Browser. This is true for the TAL U-NO-60 plugin, as shown in the following screenshot:
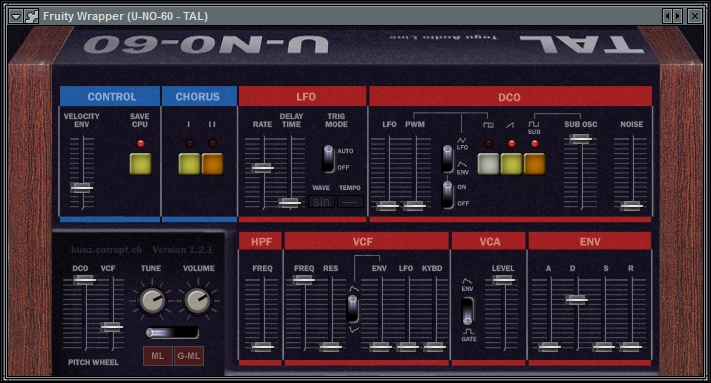
Fig 10.6
- The Building your digital audio workstation recipe in Chapter 1, Configuring FL Studio
- The Working with Browser recipe in Chapter 2, Using Browser
- The Working with MIDI controllers and MIDI pads recipe in Chapter 4, Building Your Song
- The Viewing the playlist recipe in Chapter 5, Using the Playlist
- The Adding effects and your effect chain recipe in Chapter 6, Using the FL Studio Mixer and Recording Audio