
Exporting your audio stems allows you to render your individual mixer tracks (FX/insert slots) as individual stems. The audio stems will track out as 16-bit WAV files and will span as long as your selection in the FL Studio playlist.
In order to export your mixer tracks as individual pieces, you will need to have your given channels sent to mixer/INS slots in the FL Studio Mixer. This was discussed in the Sending a channel to a mixer slot Chapter 3, Working with Step Sequencer and Channels, and Using patterns to build your song Chapter 5, Using the Playlist.
- Send your channels to the mixer slots in the FL Studio Mixer and paste your patterns into the playlist. An example of the patterns we are working with can be seen in the following screenshot:

Fig 8.6
- Right-click on the small green light located on the master track in FL Studio Mixer, which will mute all tracks except for the master. Then click on all the mixer tracks you want included in the export. The small green circle is the Mute / solo button.
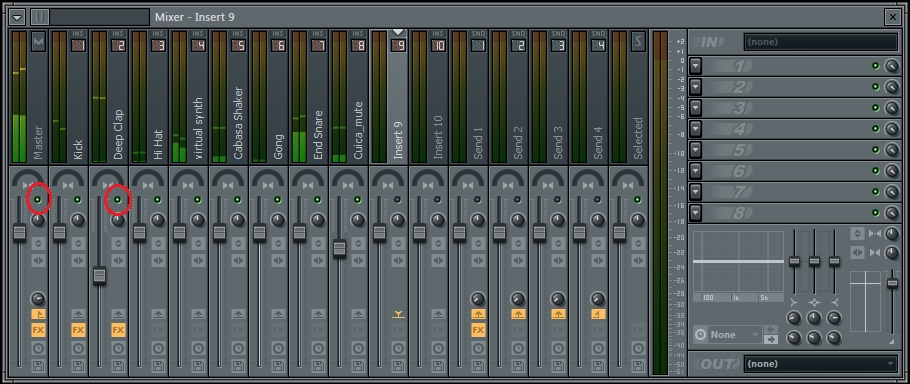
Fig 8.7
- From the topmost main window in FL Studio, go to FILE | Export | Wave file….
- You will now have the opportunity to save your stems to a folder or new folder you create, as well as name the root for each stem. In the following screenshot, we are saving our stems to a folder titled
Audio stem Export Cookbookand our root name isRecipe Man: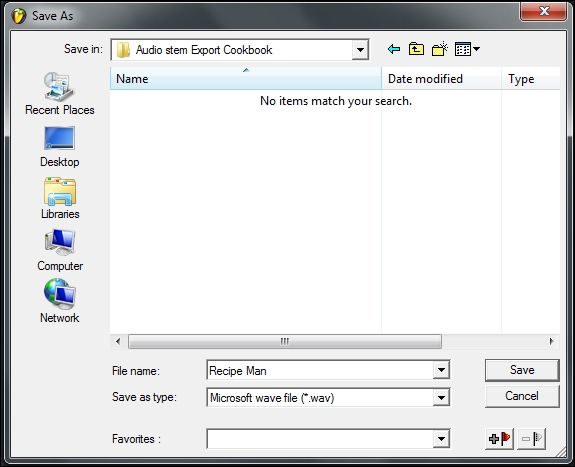
Fig 8.8
- Click on Split mixer tracks in the rendering box and then on Start to render your wave stems. Notice that when you hover your mouse on Split mixer tracks, the FL Studio hint bar reads Batch export mixer tracks into separate wave files. The following screenshot shows the rendering progress:
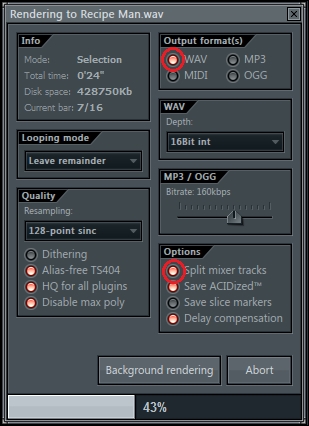
Fig 8.9
- Your audio stems will now be located in the folder you previously specified and will automatically generate an underscore and mixer track name (taken directly from your mixer slot names) for each file. Your root name will stay intact on every single file.
- When you preview each track and play it on your computer, you will find each track spans the length of your selection in the playlist.
Note that we have highlighted our selection by pressing Ctrl + A while on the FL Studio playlist, as shown in Fig 8.6. On the screen depicted in Fig 8.7, we are double-checking our mixer slots and making sure all of our channels from the step sequencer are sent to a mixer slot. We have also renamed eight of these mixer slots. INS 1 is Kick, INS 2 is Deep Clap, INS 3 is Hi Hat, INS 4 is Virtual Synth, INS 5 is Cabasa Shaker, INS 6 is Gong, INS 7 is End Snare, and INS 8 is Cuica. The track names seen in Fig 8.6 in FL Studio Playlist have no bearing on any of this. You can, of course, rename the track names that are located on the playlist on the screen depicted in Fig 8.6, but it will only be for your own organizational purposes. When we export mixer tracks, they are correlated with channels sent to an FX / mixer / INS slot in the mixer slot and the length of time associated with each one.
Clicking on the Split mixer tracks button in the rendering box tells FL Studio that you will be exporting each mixer track in the FL Studio Mixer as separate files (all of the ones with a green light on the Mute / solo button). You can then take your stems to an engineer, save them on a USB or thumb drive, store on a CD, use them in remixes, share in collaborations, and so on.
If you forget to specify the exact mixer tracks you want in the export, your export will have all 99 mixer slots rendered. If necessary, you can delete the ones you don't want. Sometimes, your selected slot (the lone track to the right of your send tracks) will be exported with your stems. This is due to the fact that it still had a green light engaged on the Mute / solo button. If you don't want to include it, click on the green light to deselect it.
You can send more than one channel to the same mixer slot; just know that when you render your audio stems in this fashion, both channels will be rendered into one stem. This technique is very useful for a musician who would rather layer, mix, and compress their kicks/percussion before handing out a final mix of stems to a mastering engineer.
It is also up to your own workflow and creative end vision if you want to include any effects on the mixer effect chains. If you leave everything completely dry, with no effects whatsoever, it gives your engineer the opportunity to make your mix outstanding. Other times, you might want to include some effects because you like your mix a certain way. The engineer's job is to then polish, complement, and enhance your sound. Generally, you will want to leave headroom for your mastering engineer so he or she can significantly increase your song's volume (if you are joining loud wars!).
Exporting stems can help with backing up your audio files in case your computer goes bad or your hard drive corrupts. Try to back up everything three times. Better safe than sorry!
- The Exporting an MP3 or WAV file recipe
- The Rendering files recipe
- The Sending a channel to a mixer slot in Chapter 3, Working with the Step Sequencer and Channels
- The Using patterns to build a song recipe in Chapter 5, Using the Playlist
- The Adding effects and your effect chain recipe in Chapter 6, Using the FL Studio Mixer and Recording Audio