
The adding of effects in your effect chain takes place in the FL Studio Mixer. The purpose of an effect is to monitor or tweak your audio signal. When you engage each Insert slot in the mixer, you have the option to add up to eight effects in your chain. You can always add more effects by creating submixes to further mixer channels.
In order to start using effects on your mixer tracks, you have to have your audio signal sent to actual mixer inserts. This is reviewed in the Sending a channel to a mixer slot recipe in Chapter 3, Working with Step Sequencer and Channels.
- Send a channel in the step sequencer to a mixer slot by double-clicking on the FX box (upper right-hand corner) in your Channel settings. This was reviewed in the Sending a channel to a mixer slot recipe in Chapter 3, Working with Step Sequencer and Channels.
- Press F9 to bring up the mixer.
- Press the Space bar to start your project's playback.
- Click on a mixer slot to engage the slot/column of the mixer. In Fig 6.10, we have engaged INS slot 1, which we renamed as Kick, and it is faintly highlighted. Shift + click on a slot to quickly rename it.
- When you have your mixer slot engaged (it will be faintly highlighted), the mixer vertical hierarchy on the right of the mixer will correlate directly to the audio signal you engaged.
- Click on the small, drop-down triangle next to the slot you want to enter an effect on.
- Hover your mouse over Select to select the effect you desire. It will say Replace if an effect currently exists. It will populate a list for you, as shown in Fig 6.10.
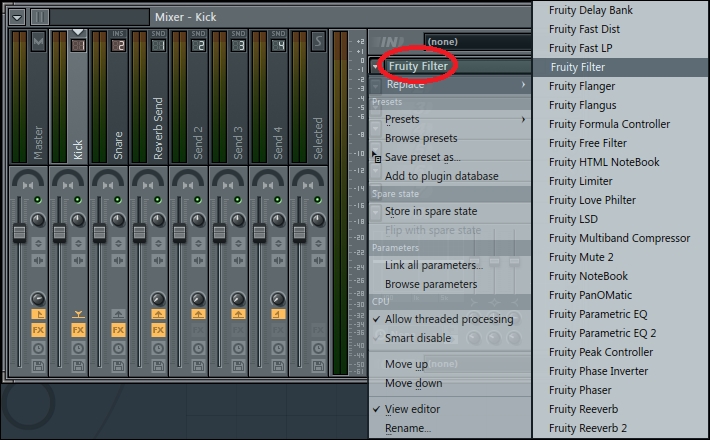
Fig 6.10
- Click directly on the name of the effect, which is now in the slot you selected, to bring up the vast parameters of the effect.
- When you click on the name of the effect in your slot, it will bring up the graphical plugin you added. In this case, we have added the Fruity Filter plugin, which will adjust the frequency ranges of your given sound.
- Click on the small arrows on the upper right-hand side of your plugin while looking to the hint bar or right-click on the arrows to bring up the list of presets. Fig 6.11 shows that we are on the preset Party next door, which is number 2 out of the four available presets. Presets are like a collection of parameters named by the plugin designers. From that point on, you can still tweak your parameters and save them as your own preset.

Fig 6.11
- Add more effects within the same mixer slot/effect chain if you desire. We are still engaged on INS 1, which was renamed to read Kick. Fruity Filter is the topmost effect that we choose, as shown in Fig 6.12, and we now have the option to add 2 through 8. The same principles apply to every insert slot on the FL Studio Mixer. They are all independent from one another. Be cautious as to which mixer slot is currently engaged/faintly highlighted because the vertical hierarchy of each chain will only apply to the slot that is engaged.
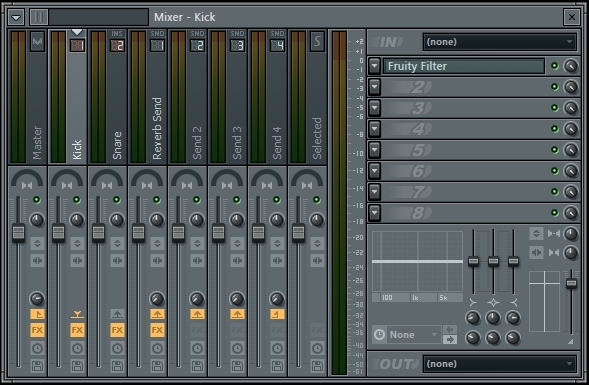
Fig 6.12
When working with our effect chain, we are affecting the exact mixer slot that is engaged. This is completely different from what we reviewed regarding the four send tracks in the mixer. You may have a better understanding of how send tracks work now, because when you work with independent mixer slots, they all have eight effects in their respective chains. With send tracks, you can send a little bit of your effect to whichever slots you desire.
When you are working on each mixer track, like we did in this recipe, each added effect will add to the workload of your computer. Also note the green mute button and knob directly to the right of each effect slot. The mute button will turn the effect on and off, and right-clicking on it will enable you to automate the muting. We will review automation in more detail in Chapter 10, Recording Automation. The knob to the right of the mute button will adjust the level of your effect. This can go from 0 to 100 percent. You can also automate any of the parameters within your graphical effect plugin by right-clicking on any knob in the plugin and selecting Create automation clip. In Fig 6.11, you will be able to automate the Cutoff freq, Resonance, Low pass, Band pass, High pass, and x 2 buttons. Please remember that your effect chain is directly affected by the slots below it. You need to be aware of this when adding effects beneath other effects.
Keeping with the principle that each effect is affected by what is beneath it, FL Studio allows you to move effects up or down in your chain. In Fig 6.10, after you click on the small triangle, you also have the option to move up or down. This can have a drastic effect on your audio signal. The best way to discover what happens when you move effects up or down is to experiment. Your ears will tell you what is likable versus what is unpleasant. If you have a weak processor on your computer and your project starts to pop, click, and glitch when you add a multitude of effects, you have one more option. You can highlight the section of your song with the effects in the FL Studio playlist and export that section only.
When you export something out of the playlist, it will render down all of the effects that are part of that sound. You will also want to mute all of the other channels or simply solo your mixer track that includes the effects. Once it is rendered down and exported into a WAV file, it will have the effects embedded inside of it and be one solid file. You can then import this file back into your project and remove the effects in your chain that were bogging down your computer. This can be a bit tedious but is sometimes the only way to help your computer process all of the information. It's important to ensure that memory-and CPU-hogging applications are not running concurrently with FL Studio.
- The Understanding master tracks and loud wars recipe
- The Exporting and re-importing a WAV file recipe in Chapter 8, Exporting and Rendering Your Project
- The Using automation for virtual instruments and effects recipe in Chapter 10, Recording Automation