
Time-stretching the samples you have used in Edison is arguably the most enjoyable and rewarding process, especially for remixers and mash-up producers. This doesn't necessarily have to be a sample from a commercially released song. You can also be working with percussion, drum, and audio loops of all sorts. Anything that has a detectable rhythm is fair game. The pitch of your sample, the embedded tempo of your sample, and the main project tempo in FL Studio are all related. This recipe will break down what this means.
To time-stretch your sample from Edison to your FL Studio project tempo, you must have your tempo embedded in your sample. Once this is done, you simply need to have your sample exist in a channel on the step sequencer. This is extremely vital to working with your sample and getting the best out of your project. If your tempo is not embedded in your sample, these steps will not work.
Let's study the steps required to time-stretch our sample to our FL Studio project.
- Get an audio sample from Edison into a channel in the step sequencer with your tempo information embedded.
- Go to the SMP tab in Channel settings, right-click on TIME, and select Autodetect as shown in the following screenshot:
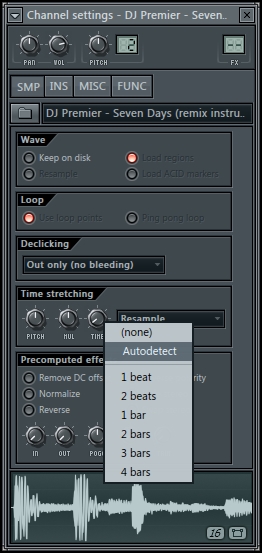
Fig 7.25
- The Tempo detection - DJ Premier - Seven Days (remix instrumental) window will appear. Click on the option that says 185 (embedded). This is basically telling you that there is a tempo embedded in the file. In this example, we want the 185 tempo because this is the work we previously did in the Edison Sample properties! The following screenshot shows the 185 (embedded) option in the tempo detection window:
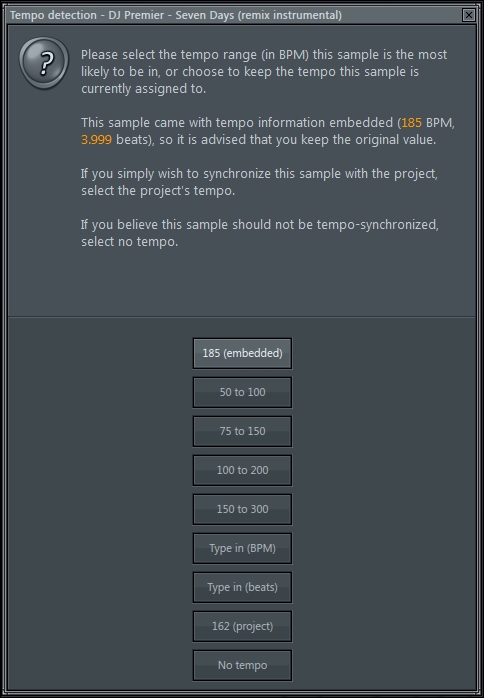
Fig 7.26
- Test out your sample by clicking on the first step on your given channel in the step sequencer. In the current situation, our tempo of 185 (embedded, in our sample) is stretching to the FL Studio project tempo of 144! The following screenshot shows the step sequencer with the new tempo settings:
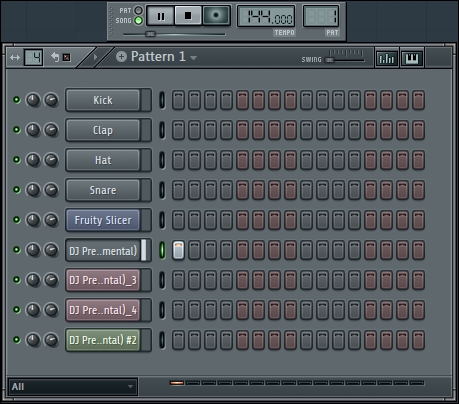
Fig 7.27
- Select Pro default from the drop-down menu next to TIME in order to keep the same pitch of your original Edison sample when your main FL Studio Tempo is adjusted. This is shown in the following screenshot:
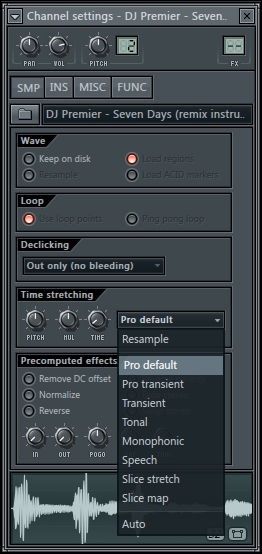
Fig 7.28
When you adjust your FL Studio project tempo as shown in Fig 7.26, your sample will stretch accordingly, but the pitch will change. This is because your drop-down menu next to TIME is still defaulted to Resample. The lower your project tempo, the lower in pitch your sample will become, but it will still stretch as much as it can. When working with a loop, you will notice the pitch of your sample (both the harmony and the percussion) will get very low when adjusting to a slow tempo. When you raise the tempo higher, your sample pitch will increase accordingly and simultaneously get faster.
Fig 7.28 shows different rules because we have changed our stretching method to Pro default. This means that our sample will keep the same pitch irrespective of our main project tempo. If we adjust the main project tempo very slow, our sample will be very slow, but it will maintain the same pitch as that of the original sample. If we make our tempo fast, our sample will get faster, yet still maintain the same pitch as the source audio sample from Edison.
There are different reasons for using both of the methods mentioned earlier. Sometimes, you want to keep the same pitch no matter what your project tempo is (using the Pro default method). At other times, you want to have a chopped and screwed type of effect, and that can be managed by keeping your stretching method as Resample.
Tip
When using this method or working with any type of audio samples in FL Studio, you may also drag your sample from the bottom of the SMP channel settings folder (where the waveform appears) directly into the FL Studio Playlist. This will create a second instance of the sample as an audio clip. You can then use the knobs in the Time stretching section and get super handy visual feedback by looking at how your waveform changes as you adjust the knobs. You may also press and hold Alt while moving samples in the playlist to toggle the grid on and off.
- The Finding a sample recipe
- The Obtaining a seamless loop recipe
- The Exploring Channel settings recipe in Chapter 3, Working with Step Sequencer and Channels
- The Sending a channel to a mixer slot recipe in Chapter 3, Working with Step Sequencer and Channels
- The Adding effects and your effect chain recipe Chapter 6, Using the FL Studio Mixer and Recording Audio