
The FL Studio Piano roll feature is very useful when crafting bass lines and melodies in your music production. When you open up Piano roll, you have a large graphical interface where you can see the beats, bars, measures, notes, and note durations of your given FL Studio channel. Although it is used for harmonies when working with synths, virtual instruments, pads, and so on, it is also useful for any sound in any conceivable channel including but not limited to hi hats, kick drums, and snares. The piano roll has a larger piano area where you can toggle between real-world piano note values or images of a keyboard. You can slice your notes and perform complex edits at the click of a button. This is sometimes preferred over the step sequencer and Keyboard editor, although a mixture of both can be a great music production tool.
In order to use the FL Studio Piano roll, you simply need to have a channel of any sound or virtual instrument inside of the FL Studio step sequencer.
Let's examine how to use the all-powerful FL Studio Piano roll.
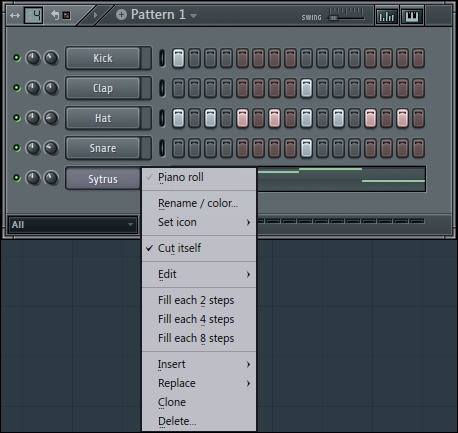
Fig 4.27
- Right-click on a channel in the step sequencer. In Fig 4.27, we have right-clicked on the Sytrus channel, which happens to be a virtual instrument. Next, select Piano roll.
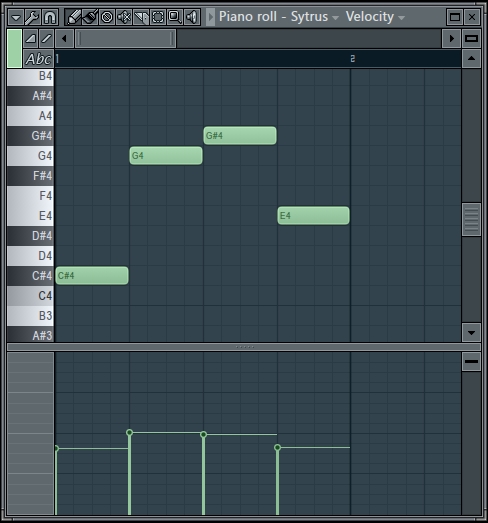
Fig 4.28
- Left-click on Draw (the pencil icon in the preceding screenshot) or Paint (the paintbrush icon in the preceding screenshot) in your notes for your channel to explore drawing or painting functions. Right-click to erase and remove notes.
- Adjust the length of notes by hovering your mouse over the end of your note until you see a horizontal adjustment mouse maneuver.
- Move notes up, down, left, or right by hovering your mouse in the center of your notes until you see a vertical and horizontal cursor icon.
- If you have a scroll wheel on your mouse, hover on top of the black bar next to Abc, as shown in Fig 4.28, and you will be able to zoom in or zoom out using your scroll wheel. This helps to focus the area you are working on. You may also have to adjust the horizontal scroll bar as shown in Fig 4.28 based on how you are zooming in or zooming out.
- Hover your mouse over any part of the Piano roll window's exterior in order to resize the piano roll graphical interface to your liking. You may hover your mouse over the top, right, bottom, or left hand sides as well as the top-left corner, top-right corner, bottom-right corner, and bottom-left corner in order to resize. The cursor icon will change based on how and where you want to resize.
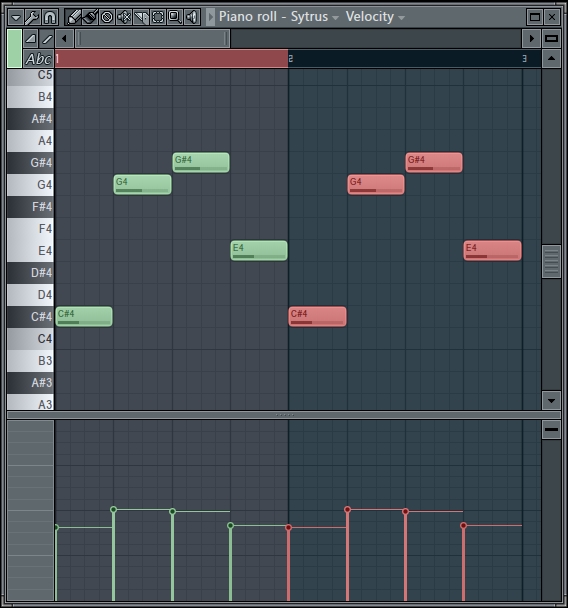
Fig 4.29
Now, let's try copying and pasting notes within the Piano roll feature. Perform the following steps:
- Press Ctrl + A to select all current notes.
- Press Ctrl + C to copy notes.
- Press Ctrl + V to paste notes.
- Hold Shift + right arrow key to move the notes to the right. Alternatively, once you have pasted the notes, you can use your mouse to hover over the notes and drag them to the right.
- The pasted material will show in red, as shown in Fig 4.29, until you click elsewhere.
Tip
A handy tip is to hold Ctrl and click-and-drag your mouse to select notes of your choice. Then hold Shift and drag the notes with your mouse and the area you have selected will automatically be copy-pasted. Clicking on an empty area will duplicate your last note length. Pressing Shift and clicking on an empty area will duplicate your last note value and simultaneously allow you to change its length. Holding down the Alt key will allow you to toggle the Piano roll grid on and off, allowing you to slide certain notes away from the grid if necessary. Click and hold the right mouse button in order to automatically bring up the Slice tool.
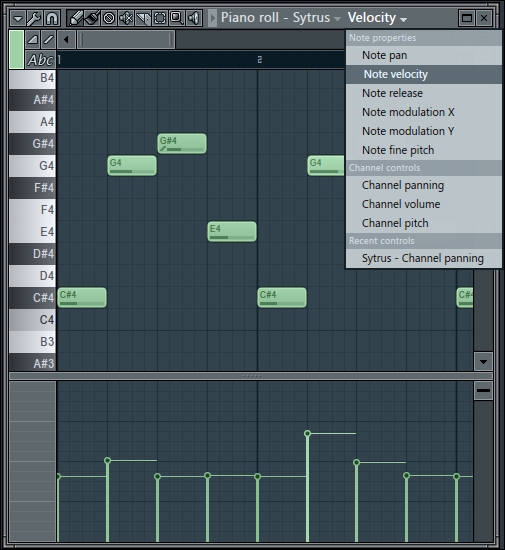
Fig 4.30
- The bars at the lower portion of the FL Studio Piano roll window correspond with each Note velocity (volume).
- Click on the bars and drag up or down to adjust the volume of the corresponding notes directly above them.
- Click on Velocity at the top of the Piano roll window to bring up additional options. You may select whatever option you need and then the bars will be engaged as per your selection and you can adjust them from there. You may double-click on any note in the Piano roll window to bring up options for your double-clicked note, as shown in Fig 4.31. We have double-clicked on C#4 in Fig 4.31. Make changes as you desire and click the space bar to preview those changes. Click on Accept to accept the parameters you have changed. This also works for any selection of notes. Select as many notes as you desire, double-click, and you will then be able to adjust their Note properties on a global scale/mass edit. The pop-out properties icon will then read Note properties – selection. Additionally, with chords, some notes can be excluded by keeping them out of your selection.
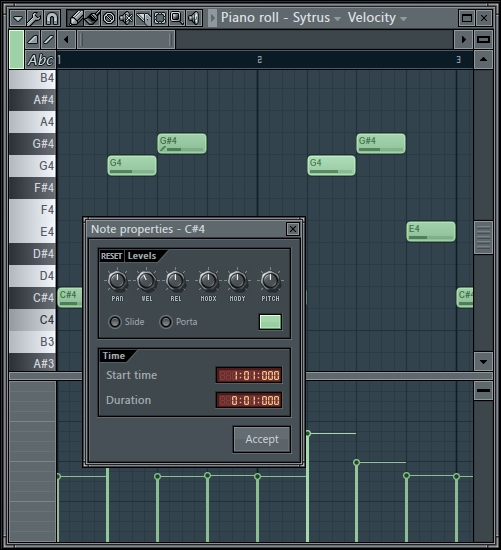
Fig 4.31
The Piano roll feature is a very powerful tool within FL Studio. It is styled after popular MIDI editors. You may draw or paint as many notes as you desire and copy and paste them, as shown in Fig 4.27. This can help when you want the exact same notes in the next measure or when you want a similar note pattern that you want to tweak a bit after copying and pasting. Please note that your Piano roll data can be expanded way past the length of your beats per bars in the step sequencer. This means you may want to move your Piano roll data to a separate, dedicated pattern and then use the playlist to arrange your pattern. Your Piano roll data can stretch as far as you like, so you can make changes and variations within one channel if you so desire.
You can also record piano roll data while in pattern mode. Sometimes, this is advantageous when making bass lines and harmonies. The way in which you use the FL Studio Piano roll is based on your own preferences. Some users like to keep adding notes in the Piano roll section past measure three or four and get all the way up to measure eight or longer. In this manner, you have your variations already set in place and you don't have to make new data in new patterns or copy and paste from pattern to pattern. The length on one single Piano roll can stretch to three or four minutes or longer. However long your piano roll stretches may be, it will be clearly represented when you paint your given pattern into the FL Studio playlist.
Once you right-click on a channel and open up the Piano roll feature, your channel data and graphical readout will change when viewing the step sequencer. It will no longer show steps in the step sequencer. It will show each note in your Piano roll as per the Sytrus channel in Fig 4.27. You can then simply click on the green lines (which are your notes) from the step sequencer to open up the Piano roll window. You can also copy and paste your Piano roll data between channels or between patterns. In this manner, you can copy your exact data into a new channel with a new sound and test options for how you want the mood of your song to progress. For example, let's say you made a great piano roll riff while using a synth patch. At that point, you can copy and paste the data and test out new sounds like a violin, piano, or any sound you think may enhance your project.
Please remember to experiment with the top three options in the upper-left-hand corner of the Piano roll window. These are Options, Tools, and Snap to grid. Look at the FL Studio hint bar when hovering your mouse over these options. There are a plethora of options here, including the FILE option, where you can import MIDI files. This means you can import note data from a variety of sources, including websites such as http://mididb.com/. The MIDI notes you import will be imported as note data in the Piano roll feature, and you can specify how you want them to sound by using virtual instruments in FL Studio. You can import popular songs to review the notes that were used and it can be a tremendous learning tool. You can also use this when composing cover songs and remixes. The possibilities for working with MIDI files and importing their data into the FL Studio Piano roll feature are enormous.
The Snap to grid option will adjust the length of your grid within the Piano roll window. The entries, drawing, and paint buttons will snap to the grid you specify here. This can be handy when you are working with percussion and hi hats and when you want to have them sound very fast. The way a rock drummer does triplets is the basis of how you can manipulate the Piano roll feature. This is almost like another adjustment of the beats per bar for this pattern on the step sequencer. The snap to grid within Piano roll tells FL Studio how to break down the pieces and parts of each beat. This can give you more control and tweaking ability. For example, when adjusting the Snap to grid option to 1/6 steps, you will find how small each step can be in Piano roll. This is not limited to hi hats and percussion; this is for any type of audio you have in Piano roll and the creative possibilities are endless. It can be a little bit tedious to paste in all of your notes on a 1/6 step, so you can copy and paste a small section then continually double your selection. You can also save the score as … in the FILE menu on the Piano roll window to save your particular note arrangement.
There are also many options within the Tools button, including but not limited to the Quick Chop and Chop… buttons. You may select any note on Piano roll or select all notes with Ctrl + A followed by any chop option to see how it adjusts your notes. This can be handy for hi hats in your music production. Another handy option is to explore the Chord option in the Piano roll options button. You can find these options by clicking on the Piano roll options button (a small triangle in the upper-left-hand corner) as shown in the following screenshot:
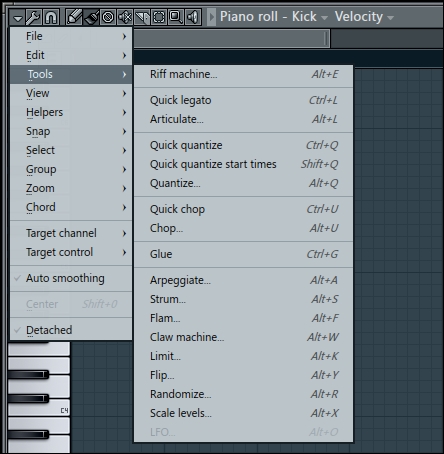
Fig 4.32
You can select the chord you want to use and with a single mouse click your chord will be pasted into the Piano roll window. The Strum option within the Tools options can humanize your chords. When you are physically playing your performance with a keyboard or MIDI controller, your performance may be a tad off in time due to human error or latency time on your computer. If you notice that your performance is a little bit shaky but the basic idea is laid down, you can use the Quantize… option. This will snap your performance back in time with your grid. Just like how some people enjoy using physical faders and knobs, using a MIDI keyboard is preferred by many people to record/play in their notes instead of clicking with a mouse. Please look at the many options to tweak your Piano roll data under the Tools button.