
Viewing the playlist is an organization tool that helps you to work on certain sections of your song. Generally, the more pieces and parts you have, the more often you will be resizing your playlist.
To start viewing the playlist and to change the vertical and horizontal zoom parameters, you simply need to have the playlist open with patterns inserted inside it. An easy way to bring up the playlist is to press the F5 key.
Let's look at how to zoom in and out of the playlist while looking from left to right:
- Using the horizontal scroll bar directly correlates with the amount of patterns that you can view from left to right. Fig 5.11 and Fig 5.12 show the same playlist window zoomed out and in, respectively.
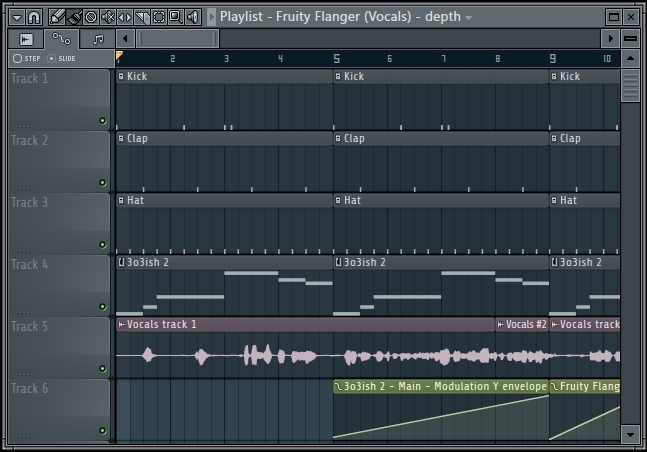
Fig 5.11
- To zoom in or out horizontally, hover your mouse over the left or right edge of the horizontal zoom bar. This zoom bar is directly above the bar count area. In Fig 5.12, you can see that you can hover your mouse over the area above bar 27. This is the right-most side of the zoom bar. Once you see the cursor change to an arrow, you will click-and-drag your mouse to change the zoom.
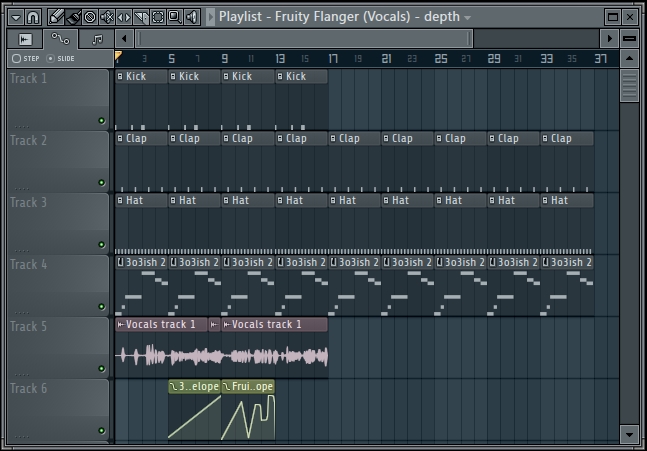
Fig 5.12
- Alternatively, you can zoom in or out using a scroll wheel on your mouse. You can do this by hovering your mouse in the black area with the numbers (bar count), scroll up to zoom out, and scroll down to zoom in. This is shown in the following screenshot. You may use this functionality once you have hovered your mouse over the bar numbers in the black area, and it will work when your cursor turns into a hand. The following screenshot shows the bars in the Playlist window:

Fig 5.13
Tip
A handy tip is to press Ctrl + Shift, click directly on the scroll bar, and then click-and-drag to the right or left. Also, try pressing Ctrl + Alt while clicking-and-dragging up and down directly on the scroll bar. The Alt method allows us to zoom the grid in when scrolling up and out when scrolling down.
Let's take a look at the vertical view of the patterns in the playlist using the following steps:
- To change the view of your playlist to vertical view, hover your mouse over the upper right-hand portion of the playlist, directly underneath the exit button.
- In Fig 5.14, we clicked-and-dragged the Change clip size functionality up, which makes each track and correlating pattern stretch vertically on a global level. We did this using the Change clip size functionality, which will be shown in the FL Studio hint bar. Also, in Fig 5.14, notice that the box (directly underneath the exit button) looks like a square now. To do this, we clicked-and-dragged the Change clip size functionality up. We can see up to Track 2 and a little portion of Track 3.

Fig 5.14
- In Fig 5.15, we did the exact same thing. However, we dragged the Change clip size box down this time. Now, in Fig 5.15, we can see up to Track 23 and all of our correlating patterns are vertically squashed. This allows you to see more patterns and increases the screen real estate of the playlist window. Notice that the Change clip size box now resembles a very thin line.
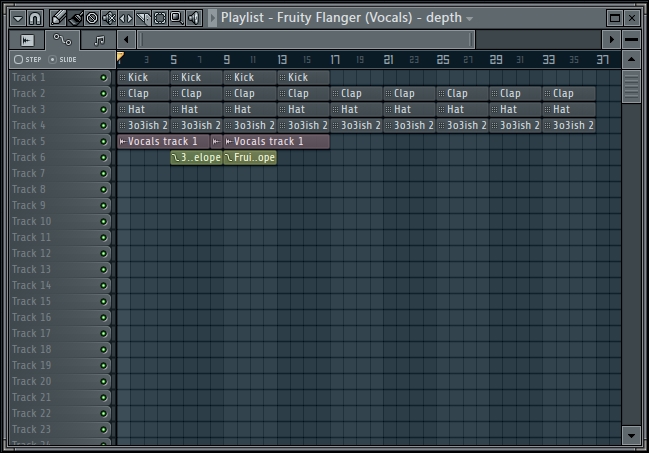
Fig 5.15
- When using the vertical zoom function, you can also look at the FL Studio hint bar. The numbers will change from Zoom level 0 to Zoom level 134. Fig 5.15 is actually at Zoom level 0. The following screenshot shows how the hint bar will look:

Fig 5.16
- Hover your mouse over any line that separates the track names on the left-hand side of the playlist. Your mouse will then turn into an up/down arrow selector, where you can adjust individual track sizes to your liking. The global box reviewed above will maintain your adjustments when stretching tracks up and down.
In Fig 5.11, we dragged the horizontal scroll bar to the left. Notice that the scroll bar in Fig 5.11 is smaller because we zoomed in. You can also see up to the bar 10. In Fig 5.12, we clicked-and-dragged the scroll bar to the right. We can now see more patterns and up to bar 37. The actual playlist window has not been adjusted or resized. We have simply used the horizontal zoom in (drag to the left) or zoom out (drag to the right) functionality. Pressing Ctrl + Shift or Ctrl + Alt is quick and super handy when dragging the scroll bar.
The examples that we just discussed show you how to use the horizontal and vertical zoom functionality. You can also highlight certain sections of your playlist by highlighting and dragging a selection on the bar count area. This selection will show up in red color, and you can now zoom in or out accordingly. Sometimes, you will be dealing with small parts of your song and focusing on one particular area. Other times, you will want to zoom out and get a feel of how things look for the entire arrangement. Like any window in FL Studio, you can also maximize the window or resize it by hovering your mouse over the top, bottom, on the left, right, or corners of the playlist window until you see your cursor change to an arrow.
As noted above in a tip, you can also change the vertical dimensions of individual tracks by hovering your mouse between each track on the left-hand side of the playlist. For example, if you hover your mouse between Track 2 and Track 3, your mouse will turn into an arrow and you can then resize Track 2 exclusively.
You may also mute certain tracks directly in the playlist by clicking on the small green circle next to each track name. Next, right-click on the green circle to solo the track. Right-click on a track name and select the Set icon to choose from a handy list of music-related symbols, which automatically label and rename your track.
Use the Playlist options drop-down box (upper left-hand corner), select Detached, and then drag your playlist to a separate computer monitor. This can help with organization and can give you a clear view of your playlist instead of the need to open and close the many parameters and windows of FL Studio. Detaching is also used with the FL Studio Mixer, reviewed in Chapter 6, Using the FL Studio Mixer and Recording Audio.