
Highlighting your song in the FL Studio Playlist allows you to render down and export your musical production.
To highlight your song (the highlighted section will turn red), open the FL Studio Playlist by hitting F5. You should have patterns and musical data that populate the playlist, unless you are actually recording an external audio such as vocals, violin, guitar, or turntables. Highlighting your song can serve two very different purposes: getting ready to export, or getting ready to record a specific chunk of time for vocals or instruments.
- Click inside of the playlist and hold Ctrl + A and you will see a window as shown in Fig 8.10. It will turn red in the selected area. You also want to have your snap settings set to Cell, as shown in the following screenshot:

Fig 8.10
- Go through the same steps as discussed in the Exporting an MP3 or WAV file recipe of this chapter. Have a look at the Looping Mode drop-down box, shown in the following screenshot:
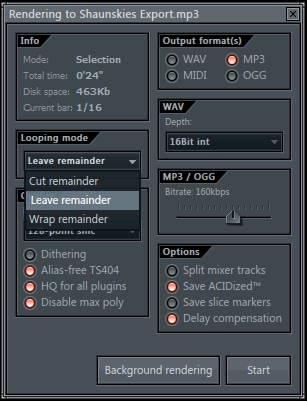
Fig 8.11
- The following screenshot shows what the looping mode section signifies:
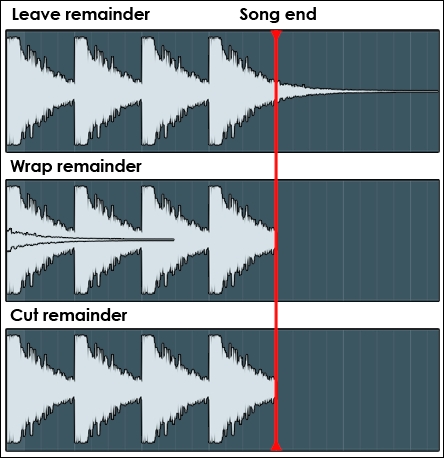
Fig 8.12 – Picture courtesy FL Studio help file
- Name your music file, specify your file location, and click on the Start box on your rendering dialog box.
The Leave remainder portion is the default setting that allows your reverb or instruments to tail off past the final bar or cell in the playlist. Wrap remainder wraps any decaying sound at the very end of the song onto the beginning. Wrap remainder is good for loops with effects. Cut remainder cuts your song off at the final cell, bar, beat, column, or measure.
In Fig 8.10, the track ends directly before bar 17, hence it is 16 bars. Remember that you can use the FL Studio Playlist to cut your audio samples, data, and patterns. In fact, many people like to produce, slice, and edit their playlist audio as opposed to their step sequencer data.
You may do this by selecting Slice tool at the top of the Playlist window, having a proper snap setting, and slicing down, as shown in Fig 8.13. The blue slice is directly correlated with your Snap to grid setting and will form a perfect vertical line on the columns inside of your playlist, which are the columns of your Snap to grid setting and how close or far you choose to zoom. The columns in the following screenshot are your beats per bars:
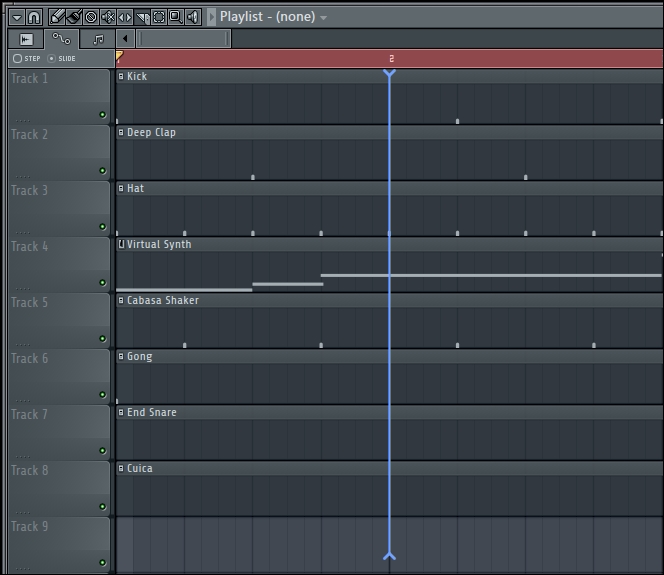
Fig 8.13
Once you let go of the blue slice line, it will slice the audio or pattern data in your playlist. You can then use the Paint or Draw tool next to each little button on a pattern. In Fig 8.14, we clicked on the dot next to the Cuica pattern. When slicing audio files, selecting Make unique will make a new channel in the step sequencer. When slicing patterns and selecting Make unique, it will make a new pattern.
This is also a great way to slice and delete things you do not want included in your song, as well as copy and paste patterns you want to repeat. It is for this reason that many people enjoy using the Slice tool in their productions—as a method to come up with creative ideas and experiments. As far as inserting silence, many radio-ready songs insert a quick silence at certain parts/beats/bars of the song. This acts like an effect that cuts out all audio, and adds emphasis to your vocal or groove.
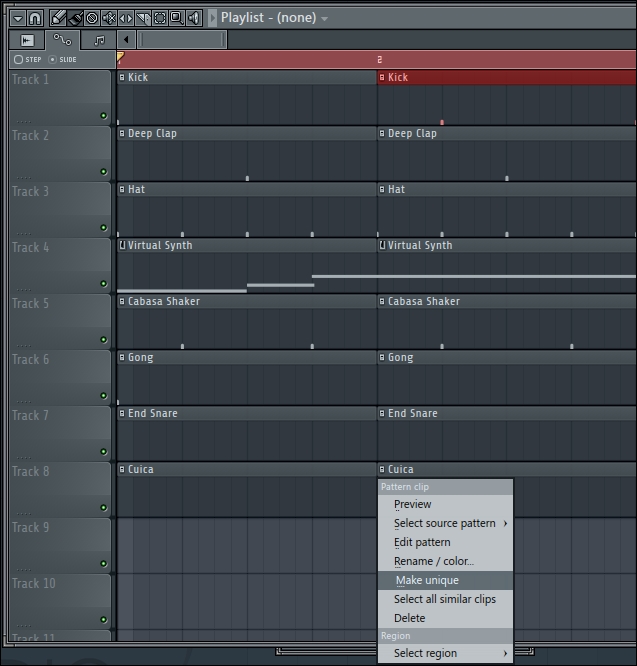
Fig 8.14
There are other ways to highlight your song in the playlist and they are listed as follows:
- You can also zoom in and select different Snap to grid settings. When you experiment with the snap settings, as shown in Fig 8.10, you will find the smaller the setting, the more the columns in the playlist cells get narrow, and you are then able to zoom in and select small durations of time.
- You can also highlight the sections you will be recording vocals onto. This is an invaluable tool that helps in selecting your recording length for an intro, verse, chorus, bridge, or outro.
- The Rendering files recipe
- The Exporting and re-importing a WAVE file recipe
- The Introducing the step sequencer recipe in Chapter 3, Working with Step Sequencer and Channels
- The Using patterns to build your song recipe in Chapter 5, Using the Playlist
- The Adding effects and your effect chain recipe in Chapter 6, Using the FL Studio Mixer and Recording Audio