
Automation clips are a great way of controlling synthesizer parameters (your software virtual plugin). For example, the pulsation virtual synth has elements such as chorus knobs, delay, distortion, filters, envelopes, LFOs, pulses, and so on.
Specifying shapes, curves, tensions, and drawings of automation clips enables powerful audio manipulation. We are able to have various automation clips, which are like directions for your plugin parameters. Generally, a 0 percent value is the minimum value of the clip and 100 percent is the maximum.
The previous recipe showed how to use automation with a knob or a physical MIDI device. This recipe is based on drawing inside automation clips and on your Snap to grid setting in the playlist. Automation clips help you specify precise values of parameters. Automation clips are also a way to automate the tempo of your project.
You may have any virtual instrument or effect open. We will be working with the software synthesizer pulsation in this example.
Let's take a look at the various ways to instruct FL Studio to create automation clips, using the following steps:
- By default, the automation clip spans the entire project. Select and highlight a specific length in the playlist if you only want a range. Right-click on a parameter you want to use automation on and select Create automation clip.
Tip
This method will work for native plugins (plugins that are manufactured/made by FL Studio). For third-party plugins, you may simply tweak the knob you want to create a clip for, go to the main Tools menu in FL Studio, hover your mouse on Last tweaked, and select Create automation clip. You may also use the triangle drop-down box on the left-hand corner of third-party plugins. You will then select Browse parameters and FL Studio will automatically open Browser. Click on any knob in your given plugin and FL Studio will lend a helping hand by highlighting the correct browser parameter. You can then right-click on it and select Create automation clip.
- Your clip(s) will now exist on the playlist and as a new channel on the step sequencer, as shown in the following screenshot:
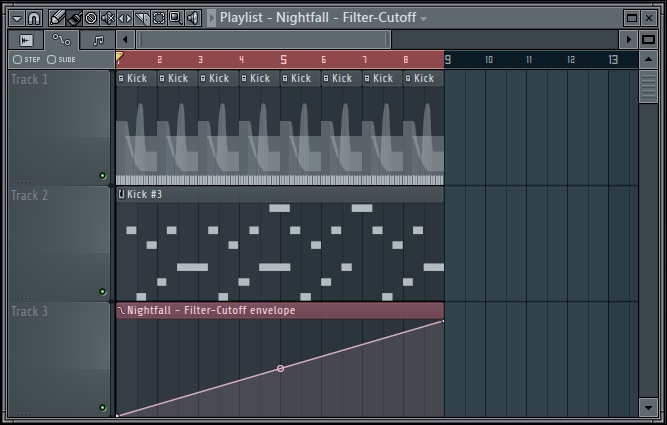
Fig 10.7
- In the screen depicted in the preceding screenshot, we selected eight measures, and then automation clip titled Nightfall – Filter-Cutoff envelope appeared. The default automation shape is a straight diagonal line, as shown in Fig 10.7, with two automation points on the either end and a tension knob in the middle. The point to the far-left bottom corner represents 0 percent. The top-right corner represents 100 percent, and is controlling the filter CUTOFF section of the pulsation parameter knob, as shown in the following screenshot:
Fig 10.8
In default mode, right-clicking on the automation line makes a new point and a regular click lets you drag points. Click-and-drag up and down on the middle tension knob to adjust the curve or shape of your line.
- Right-click on a rightmost point to bring up default options for the shape of your waveform. Also, you can right-click on a point to delete it.
- When dealing with a single curve, right-clicking on the tension knob returns it to its default position. The single curve is where the tension can adjust the shape and ramping up or down of the automation value.
Tip
Look at the upper-left hand corner of your playlist in Fig 10.7 that reads STEP and SLIDE. Click on the button to the left of the music note, which is the Focus: automation clips function on the FL Studio Playlist. With the STEP button enabled, you can now click-and-drag points on your automation line. In step mode, right-clicking and dragging the points will delete them. Turning off step and selecting slide will allow you to drag (slide) a point and all points to the right of it. Both the step and slide functions are locked to the Snap to grid setting, so you can hold down Alt and click-and-drag to create automation curves irrespective of the grid.
- Double-click on the automation clip in the playlist to bring up its Channel settings, as shown in the following screenshot:

Fig 10.9
- The MIN and MAX values in the Channel settings shown in the preceding screenshot are the values inside of the automation clip from bottom to top (defaults from 0 percent minimum to 100 percent maximum). If you find a specific range you want to focus on while tweaking a knob, you can specify the range with the MIN and MAX values. For example, you can set MAX to 50 percent instead of the default 100 percent, making your automation clip governed by and locked to that range. This way, you can find where the automation curve sounds best and focus around that so your movements or drawings have more effect and more control.
- Engage the LFO orange box in the Channel settings window to oscillate your given automation parameter. LFOs are generally used to modulate the value of a parameter repeatedly. Make sure you look at the playlist and your automation clip as you adjust your LFO values; it is very cool to visually see what happens to your waveform as you adjust the LFO knobs.
Tip
Engaging the LFO switch does not get rid of the main automation you previously drew in the automation clip, even though the original drawing will be invisible. It will be combined and multiplied with the LFO parameters when the Multiply switch is turned on. This means the LFO will provide amplitude modulation for the original automation. When the Multiply switch is turned off, the original automation and LFO parameters will be added together. Note that you can right-click on any of the LFO parameters and create an automation clip!
- In order to have a separate parameter or knob move in the exact same manner as your original automation curve, right-click on any parameter you desire and select Link to controller. This brings up the Remote control settings window. Open the drop-down box under the Internal controller section and select your original clip parameter; then click on Accept. These actions are shown in the following screenshot:
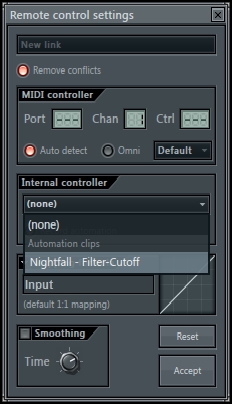
Fig 10.10
Tip
The Automation clips drop-down list will be populated in chronological order of when you made them an instance in FL Studio. Use the Mapping formula triangle drop-down to bring up default curves and options; in this manner, you can adjust the linked parameter to something slightly different. You can see the shape of any default curve selected in the graphical display next to Input. You may also type in equations in the Input text field. Engage Smoothing (left-hand side corner in the screen depicted in the preceding screenshot) when your automation has really sharp movements that may be clipping or approaching clipping.
Using automation clips is an extremely powerful tool because it enables you to precisely specify the parameters you want to affect and to what degree. Your creativity can definitely be taken to the next level when harnessing the power of automation clips. Using the LFO section in the Automation clips under Channel settings is also very powerful, and an example of how an LFO can potentially look is shown in the following screenshot:
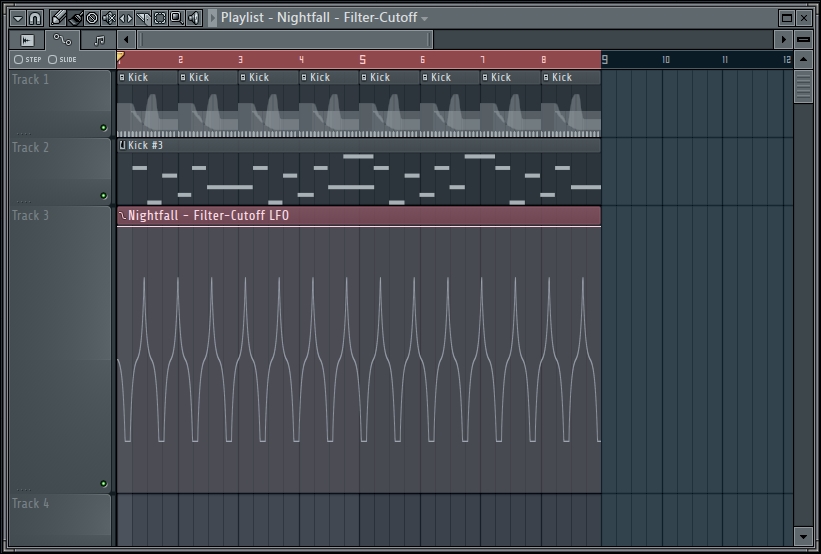
Fig 10.11
Generally, the most common uses for LFOs include the quiver and pulse types of effects. With regard to general automation clips, any parameter you believe will add a craftiness and creative angle to your mix can be automated. Other parameters can mimic the exact motion of your clips, as reviewed with the Link to controller function.
Sometimes, a third-party plugin will not show all the adjustable parameters on its plugin graphical interface. In these cases, use the Browse parameters function and scroll all the way down past the main parameter listing. You will then find the MIDI CC parameters, which include sustain, expression pedals, modulation wheel, and a plethora of other options. You can then right-click on a parameter to create an automation clip. For example, a sustain pedal can help in cases where you are using a piano sound on a virtual instrument.
Click on any area at the top of the FL Studio Playlist to specify clip sources you want to paste into the playlist. You can also right-click on the top of the playlist header to bring up PROJECT PICKER.
- The Exploring Channel settings recipe in Chapter 3, Working with Step Sequencer and Channels
- The Working with MIDI controllers and MIDI pads recipe in Chapter 4, Building Your Song
- The Viewing the Playlist recipe in Chapter 5, Using the Playlist
- The Adding effects and your effect chain recipe in Chapter 6, Using the FL Studio Mixer and Recording Audio