
The most crucial part of wireless testing is to ensure the correctness of the tester's wireless setup. Extensive configurations are required for a proper testing environment, plus the user should have a decent knowledge of wireless communication protocols. One of the core components on which the entire testing is based is the wireless adaptor. The wrong wireless adaptor can foil the entire testing activity. The dependency is on software, and a major role is played by the aircrack-ng suite designed for wireless testing. The compatibility list for wireless adaptors can be found at https://www.aircrack-ng.org/doku.php?id=compatibility_drivers . For our demo purposes we will be using the ALFA card model name ALFA AWUS0360H ; it supports the b and g protocols. Some wireless adapters supported by Kali are:
- Atheros AR9271
- Ralink RT3070
- Ralink RT3572
- Realtek 8187L (Wireless G adapters)
While choosing a Wi-Fi card, the following can be kept in mind for better selection:
- 802.11a-5 GHZ rate: Up to 54 Mbps
- 802.11b-2.4 GHZ rate: Up to 11 Mbps
- 802.11g-2.4 GHZ rate: Up to 54 Mbps
- 802.11n-2.4 GHZ rate: Up to 300 Mbps
- 802.11ac(draft)-5 GHZ rate: Up to 1.73Gps!!!
We will be performing wireless testing via a Kali machine hosted on a virtual machine. To set up the wireless network we will need a Kali OS, wireless adaptor, and a target wireless connection. Once these are available we can begin our pen test phase.
- To set up the card on to a virtual machine, we will have to ensure that the option Automatically connect new USB devices is turned on in the edit virtual machine settings of VMplayer, as shown in the following screenshot:

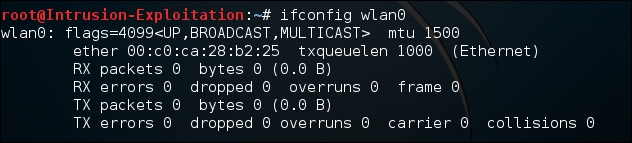
Once the device has been detected, check it with the following command:
ifconfig wlan0The output will be as shown in the following screenshot:
- Let's check if we can enable the monitor mode. Monitor mode allows a computer with a Wireless Network Interface Controller (WNIC) to monitor all traffic received from the wireless network:
airmon-ng start wlan0The output will be as shown in the following screenshot:
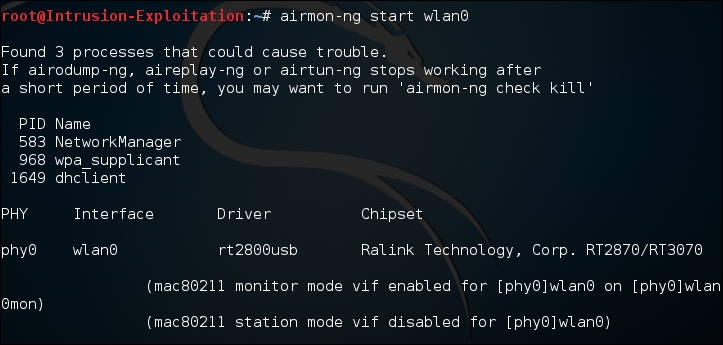
- As we see some potentially troublesome services are running; we will have to disable them. We can do so by killing the process using the
killcommand and the process ID (PID) mentioned in the preceding screenshot:airmon-ng stop wlan0mon kill ( PID's)
The output will be as shown in the following screenshot:

- Now we can begin to check if Monitor mode can be turned on:
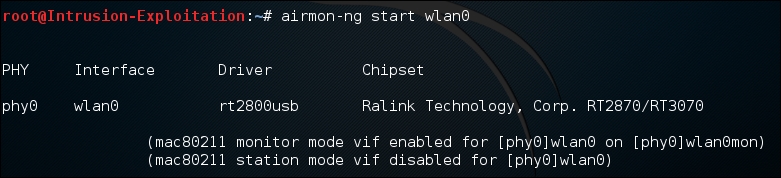
- We were able to set up our adaptor and turn on Monitor mode. We can now begin the exercises.