
In this recipe, we will introduce you to the System Center 2016 Service Manager Authoring Tool, which we will use for subsequent recipes in this chapter.
The System Center 2016 Service Manager Authoring Tool is a separate product that is part of the System Center 2016 Service Manager Component Add-ons and Extensions. The Authoring Tool can be obtained as a free download from the following URL:
https://www.microsoft.com/en-us/download/details.aspx?id=54059.
You can install the Authoring Tool on Windows 8.1 and Windows 10, or on Windows Server 2012 R2 and Windows Server 2016. The Authoring Tool has some prerequisites that need to be installed prior to installing the Authoring Tool itself:
- .NET 3.5 framework
- .NET 4.5 framework
- Microsoft Visual Studio Shell 2008: https://www.microsoft.com/en-us/download/confirmation.aspx?id=19670
- Microsoft Visual C++ 2012 Redistributable (x86): https://www.microsoft.com/en-us/download/details.aspx?id=30679
Follow these steps to install the Authoring Tool:
- Download the System Center 2016 Service Manager Authoring Tool, Visual C++ 2012 Redistributable, and Microsoft Visual Studio Shell 2008 from the preceding links.
- Install Visual C++ 2012 redistributable (x86) and Microsoft Visual Studio Shell 2008.
- Run SC2016_SCSM_Auth.exe and click Next on the Welcome page.
- Check I accept the agreement and click Next.
- Specify the folder to where you would like to extract the files and click Next followed by Extract. Click Finish when the extract is completed.
- Navigate to the directory you extracted the files to, right-click Setup.exe, and click Run As Administrator. Verify that you would like to run the installation as administrator by clicking Yes on the question that appears.
- Click Install the Service Manager Authoring Tool to initiate the installation.
- Enter your Name, Organization, and check "I have read..." to accept the EULA. Click Next.
- Select an installation location and click Next.
- Verify that you meet all the prerequisites and click Next.

- Click Install to install the product and when the installation is completed, click Close.
To understand and work with the Authoring Tool, we will now walk you through the different areas of the user interface.
The user interface is made up of various areas that you will use while authoring your management packs. Please note that you can rearrange and group the areas within the user interface by using the drag-and-drop feature. This allows you to tailor the user interface to your personal preferences. If any of the marked areas are missing, you can display them through the View menu.
The following screenshot shows a typical layout of the Authoring Tool user interface:
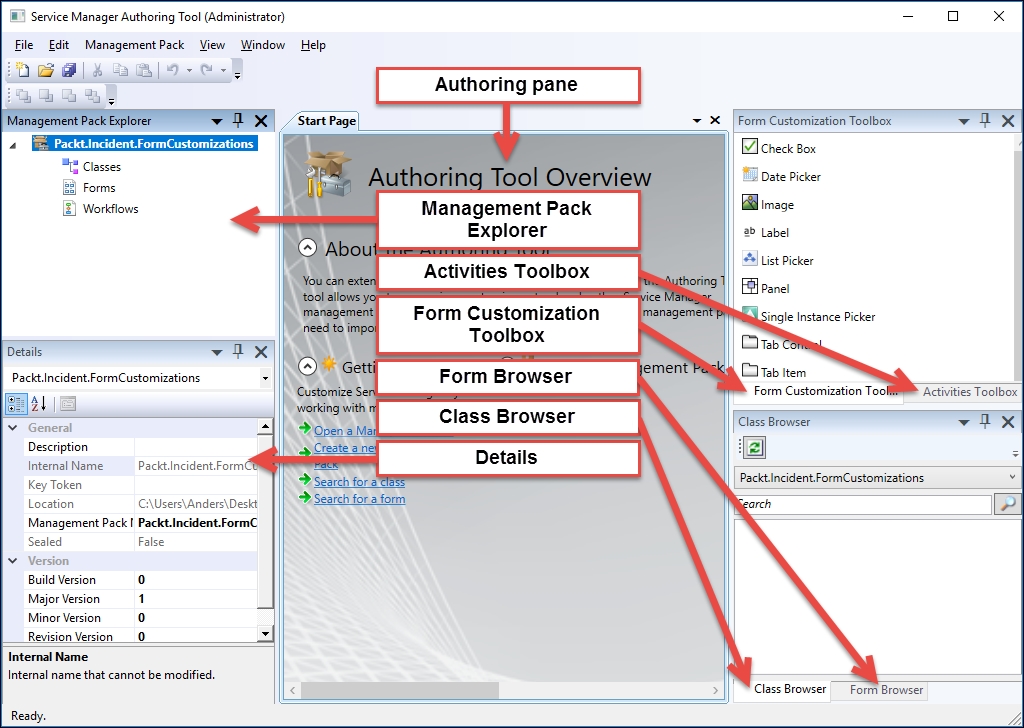
The Authoring Tool is made up of the following panes:
- Authoring Pane
- Management Pack Explorer
- Activities Toolbox
- Form Customization Toolbox
- Form Browser
- Class Browser
- Details
The following is a detailed explanation of all the panes:
- The Authoring Pane is the work area where you perform your customizations. The user interface will be different based on the type of object that you are working with: classes, forms, or workflows. You can open several objects and switch between them using the tabs at the top of the Authoring Pane.
- The Management Pack Explorer displays all the management packs that are part of the solution you are working on. You can view the classes, forms, and workflows that are included in each management pack. When you click on an object, such as a class, in Management Pack Explorer, you can view and edit its properties in the Details pane.
- The Activities Toolbox contains all out-of-the-box activities that you can use in custom workflows that you build using the Authoring Tool. The Activities Toolbox can be extended by custom Activities that you create using the Windows Workflow Foundation, which is part of the .NET Framework.
- The Form Customization Toolbox contains all controls that are available for being added to form extensions or newly created forms. Controls can be added to the form in the Authoring Pane by using the drag-and-drop feature.
- The Form Browser displays the forms available in all the management packs that are in the
Libraryfolder or from custom management packs that you have opened. You can narrow down the list of classes by filtering by management pack (using the pull-down menu), or by entering a search term in the Search field. The Form Browser is your starting point for form customizations. - The Class Browser displays the classes available in all the management packs that are in the Library folder or from the custom management packs that you have opened. You can narrow down the list of classes by filtering by management pack (using the pull-down menu) or by entering a search term in the Search field. When you expand a class by clicking on the plus sign next to it, you will be able to see all properties of the class.
- The Details pane allows you to view the properties of the selected object. Also, you can use the Details pane to modify properties of the currently selected object. The Details pane is updated every time you select an object in Management Pack Explorer, the Authoring Pane, Class Browser, or Form Browser pane.
The System Center 2016 Service Manager Authoring Tool is built on the Visual Studio integrated development environment framework. Service Manager leverages core functionalities of the .NET Framework, such as the Windows Presentation Foundation (WPF) Framework and the Windows Workflow Foundation (WF) Framework to allow for extensive customizations to the product.
Any customizations that you perform using the Authoring Tool are stored in a management pack XML file. You can then import the XML file into Service Manager to apply the customization to your Service Manager environment.
Refer to the following section for more information on how to work with management packs:
- The Creating management packs to save your SCSM personalization recipe in Chapter 2, Personalizing SCSM 2016 Administration
Creating workflows with the System Center 2016 Service Manager Authoring Tool is covered in two recipes of Chapter 12, Automating Service Manager 2016:
- Creating a custom workflow in the Authoring Tool - exporting your unsealed management packs
- Autoclose resolved incidents with SMLets and a custom workflow