 Creating a configuration item group
by Dieter Casser, Steve Buchanan, Steve Beaumont, Andreas Baumgarten, Anders Asp
Microsoft System Center 2016 Service Manager Cookbook - Second Edition
Creating a configuration item group
by Dieter Casser, Steve Buchanan, Steve Beaumont, Andreas Baumgarten, Anders Asp
Microsoft System Center 2016 Service Manager Cookbook - Second Edition
- Microsoft System Center 2016 Service Manager Cookbook - Second Edition
- Microsoft System Center 2016 Service Manager Cookbook - Second Edition
- Credits
- Foreword
- About the Authors
- About the Reviewers
- www.PacktPub.com
- Customer Feedback
- Preface
- 1. ITSM and ITIL Frameworks and Processes
- Introduction
- Understanding ITSM frameworks
- ITIL© processes
- Creating an Asset Management process
- Creating a Configuration Management System (CMS) process
- Creating a Service Request Fulfilment process
- Creating an Incident and Problem Management process
- Creating a Change and Release Management process
- Creating an IT Service Desk
- The Service Level Management process
- Dependencies and relationships between ITSM processes
- 2. Personalizing SCSM 2016 Administration
- Introduction
- Configuring how long to keep your SCSM data
- Configuring the Incident Management global settings
- Configuring the Problem Management global settings
- Configuring the Service Requests, Activity, Release, Knowledge, and Change Management global settings
- Configuring the behavior of child incidents when resolving, reactivating, and closing the parent incident
- Configuring the priority and urgency for your SLA targets
- Creating Management Packs to save your SCSM personalization
- Creating a configuration item group
- Creating a basic queue
- Creating SCSM console tasks
- Configuring global e-mail notification infrastructure settings
- Creating formatted e-mail notification templates
- 3. Configuring Service Level Agreements (SLAs)
- Introduction
- Creating priority queues
- Configuring business hours and non-working days
- Creating SLA metrics
- Creating SLOs
- Creating Incident Management SLAs
- Creating Service Request SLAs
- Viewing SLA warnings and breaches
- Setting up SLA notifications for warnings and breaches
- Creating repeated notifications before SLA breaches with escalation
- 4. Building the Configuration Management Database (CMDB)
- Introduction
- Adding configuration items manually
- Importing Active Directory configuration items
- Importing Configuration Manager configuration items
- Importing Operations Manager configuration items
- Importing Virtual Machine Manager configuration items
- Importing Orchestrator runbooks
- Using a CSV file to import items into the CMDB
- Creating a Business Service
- Personalizing and organizing configuration item views
- 5. Deploying Service Request Fulfilment
- Introduction
- Creating Support Groups for Service Requests
- Creating Service Request templates
- Creating Service Request activities
- Creating Service Offering categories
- Creating Service Catalog Request Offerings
- Creating Service Catalog Service Offerings
- Publishing Service Offerings and Request Offerings
- Working with Service Requests in the Self-Service Portal
- Filling in the Service Request Description with User Input from the Request Offering
- Creating Service Request notifications
- 6. Deploying and Configuring the HTML5 Self-Service Portal
- Introduction
- Choosing the right deployment model
- Deploying the HTML5 Self-Service Portal
- Configuring permissions
- Configuring cache settings
- Customizing the Self-Service Portal
- Customizing the Self-Service Portal further
- Getting ready
- How to do it...
- Lower-left side of fly out menu
- Icons
- Side bar links
- Colors look and feel
- Custom error message
- 7. Working with Incident and Problem Management
- Introduction
- Configuring incident and problem lists
- Creating an incident template
- Creating a subscription to notify the affected user upon the creation of an incident
- Adding a task to the incident form
- Creating a view to display the problem records created in the last 30 days
- Configuring the Global Operators Group
- Downloading, installing, and configuring the Exchange Connector
- Making the description field in the incident form auto-grow
- Extending the Incident class with a new property
- Using Advanced Search to find very specific incidents
- 8. Designing and Configuring Change Management and Release Management
- Introduction
- Creating and configuring Change Request Templates
- Creating and managing Change Management Review Activities
- Creating Manual Activities for Change Management
- Creating and managing Dependent Activities in Change Management
- Creating and personalizing Change Management Parallel Activities
- Creating and personalizing Change Management Sequential Activities
- Creating and personalizing Change Management Activity notifications
- Creating and managing Build and Environment Release Records
- Creating and managing Release Record Templates
- Working with Change Requests and Release Records
- Filling in all related Activity Descriptions with Descriptions from parent Change Requests
- 9. Implementing Security Roles
- Introduction
- Viewing basic settings for Security roles
- Adding users to the End Users role
- Creating and managing Service Request roles
- Creating and managing Incident Management roles
- Creating and managing Problem Management roles
- Creating and managing Change and Release Management roles
- Creating hybrid roles
- Configuring the Self-Service Catalog security role
- Listing SCSM security role details with PowerShell
- Getting SCSM security roles of a specific user with PowerShell
- 10. Working with the Data Warehouse and Reporting
- Introduction
- Viewing SCSM reports
- Creating favorite and linked reports
- Understanding the Service Manager Data Warehouse data mart
- Creating reports with Report Builder
- Configuring report permissions
- Delivering reports automatically using report subscriptions
- Analyzing data with Microsoft Excel
- Using the Analysis Library to publish Excel reports
- 11. Extending SCSM with Advanced Personalization
- 12. Automating Service Manager 2016
- Introduction
- Routing incidents automatically using workflows
- Downloading and installing SMLets
- Using SMLets to delete a work item
- Exporting your unsealed management packs using SMLets
- Creating a custom workflow in the Authoring Tool - exporting your unsealed management packs
- Autoclosing resolved incidents with SMLets and a custom workflow
- Automating your request offerings with Orchestrator
- Creating new work items with SMLets
- 13. Whats New in SCSM 2016 and Upgrading from SCSM 2012 R2
- Introduction
- What's new in Service Manager 2016?
- Preparing for Service Manager 2016
- Upgrading to Service Manager 2016
- A. Community Extensions and Third-Party Commercial SCSM Solutions
- Introduction
- Cireson solutions for Microsoft Service Manager
- itnetX
- Provance
- Derdack
- Gridpro
- SCUtils
- Axians
- B. Useful Websites and Community Resources
You can use groups within Service Manager to logically group and manage configuration items (CIs). Groups can contain either CIs of the same class or mixed classes and can be either a static group (by manually adding certain CIs) or a dynamic group (by specifying the rules).
The following steps will guide you through the process of creating a CI group:
- In the Service Manager console, navigate to the Library workspace, expand Library, and click on Groups.
- In the task pane, on the right-hand side, click on Create Group.
- Review the information on the Create Group Wizard screen then click on Next.
- On the General screen, provide a name for the group and a description. For this recipe, name the group VIP Users and provide a description of All VIP IT Service Users.
- Under Management pack, drop the list down and select your custom management pack to store this group in, and then click on Next.
- If you wish to manually specify any specific objects, on the Included Members screen, click on Add. For this recipe, simply click on Next on the screen to skip.
- On the Dynamic Members screen click the ... button next to the box under the text Specify the class and add criteria to build your query.
- On the Select a class screen that opens, filter the list by typing in the box and select the User class. Click on OK.
- Use the filter box under Available properties to find Department, select it, and click on Add. Then alter the Criteria to contains and type Management:
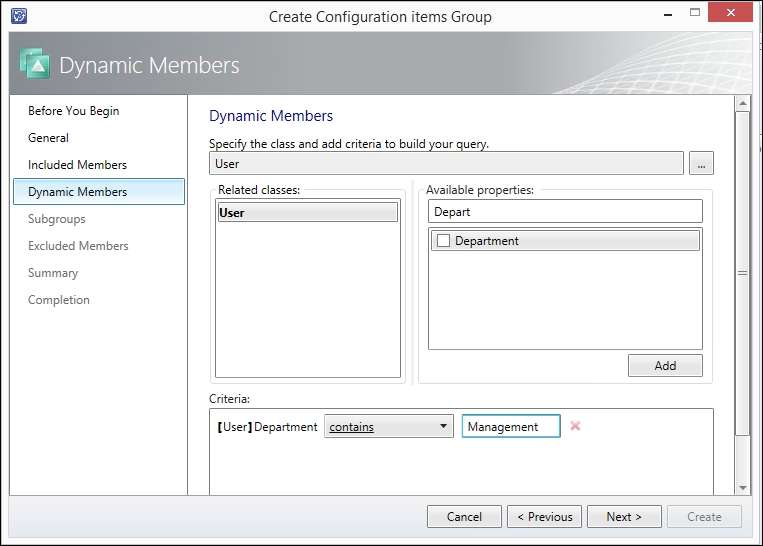
- Click on Next.
- On the Subgroups page, you can specify other groups that already exist to combine them into one group. For example, if you had two separate groups, one for the senior managers and one for the line managers, you could create an all managers group and use this to simply add both the groups without having to use the dynamic members section. For this recipe, just click on Next to skip the screen.
- On the Excluded Members screen, you can choose objects to specifically exclude from the list that might get picked up by any dynamic rules or other groups that you don't want in this list. For this recipe, just click on Next to skip the screen.
- Review the information on the Summary screen then click on Create.
- Once the Completion screen shows that the group has been created successfully, click on Close.
A group is a logical grouping of configuration items stored within the CMDB. Once you have created a group, you can use it within security roles to restrict access, as criteria for notification subscriptions, or even as criteria for reports.
This recipe showed how to create a group containing users, but you can create groups for other CIs too.
You can use this recipe and change the object type to select anything stored within the CMDB to build groups containing other Cis, such as a group to hold all the virtual servers, by varying Steps 8 and 9. Also, you can manually assign items by adding them in Step 6 and skipping Steps 7, 8, and 9 instead.
-
No Comment