
By following the instructions in all recipes so far in this book you have gained an insight of the vast personalization and extensibility options available to Service Manager.
But using the Service Manager console and the Authoring Tool are only two possible ways of customizing Service Manager. There are much more options available to customize Service Manager, for instance, by directly editing the XML code of your management packs.
It is beyond the scope of this book to cover all possible customization scenarios you can address by modifying the management pack XML. However, there are a lot of examples available in the community that you can apply to your environment. Refer to Appendix B for a list of some of the most important community websites to visit.
The goal of this recipe is to become familiar with the general process of modifying the XML code of a management pack.
In order to work with the XML code of management packs, you need to use software for opening and editing XML files. Even though you can use Notepad to edit XML files, it is recommended that you use a more advanced tool that offers color schemas and XML validation.
The first recommended choice would be to use the Visual Studio integrated development environment from Microsoft. Visual Studio is available in various commercial editions, and there is also two free editions named Visual Studio Express and Visual Studio Community.
If you are not into developing software, Visual Studio is not the best choice, as the user interface might be too complex for simple XML editing. One of the many alternatives is the free tool Notepad++ that you can download and install from the following URL:
In this example, we are going to create a new management pack that will hide the Extensions tab from the Windows Computer form. After we have extended the Windows Computer by following the instructions in the Extending Service Manager classes recipe, we have noticed that the Extensions tab, which displays the extended properties, has been added to the form. As we have later customized the form in the Customizing default forms recipe to include the extended properties in the General tab, we would now like to hide the Extensions tab from the Windows Computer form.
Note that it is required that the sealed management packs that you created in the Extending Service Manager classes and Customizing default forms recipes are available and imported into Service Manager:
- Open the Authoring Tool, go to File, and click Open. Locate and open the sealed management pack that includes the Windows Computer form extension from the Customizing default forms recipe, Packt.WindowsComputer.FormCustomization.mp.
- Click on the management pack in Management Pack Explorer, and then, in the Details pane, write down the values of the following properties:
- Internal Name
- Key Token
- Version (in the form: Major.Minor.Build.Revision)
- In Management Pack Explorer, expand the Forms node, click on the Custom Windows Computer Form, and then, in the Details pane, write down the value of the Internal Name property.
- Click on Close Solution from the File menu.
- Go to File and click New to create a new management pack. Give this new management pack the name Packt.WindowsComputer.HideExtensionsTab.xml.
- Save the management pack using the Save All option from the File menu, and then close the Authoring Tool.
- Use the XML editor of your choice to open the management pack XML file (we will be using Notepad++ in this recipe).
- First, we will need to add a reference to the management pack that hosts the actual Windows Computer form extension. The management pack references are always in the beginning of the XML and is listed between the
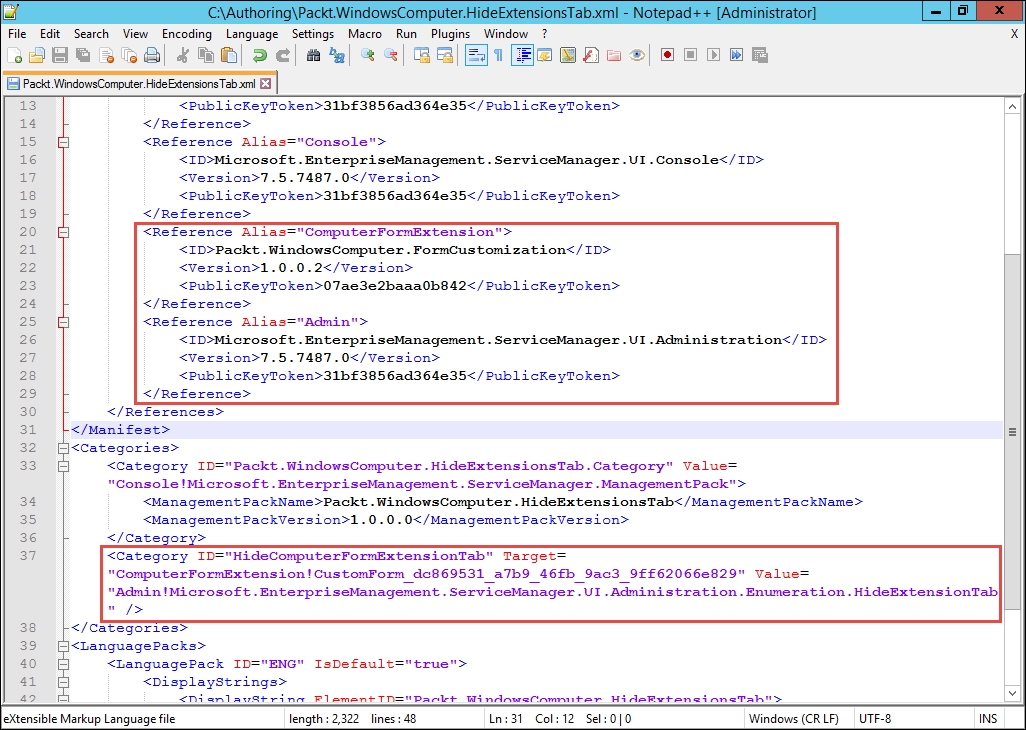
<References>tag. Add the following code to the References section just before the</References>tag (the easiest way is to copy an existing reference and edit the values):<Reference Alias="ComputerFormExtension"> <ID>Custom.ConfigurationItems.ComputerFormExtension</ID> <Version>1.0.0.1</Version> <PublicKeyToken>249f95ca48020739</PublicKeyToken> </Reference>
- Replace the values for
ID, Version,andPublicKeyTokenwith the corresponding values you wrote down in Step 2. - Next, we will need to add another reference to the UI Administration management pack. Add the following code to the References section just before the
</ References>tag:<Reference Alias="Admin"> <ID>Microsoft.EnterpriseManagement.ServiceManager.UI. Administration</ID> <Version>7.5.7487.0</Version> <PublicKeyToken>31bf3856ad364e35</PublicKeyToken> </Reference>
- Now locate the
<Categories>section, and add the following just before the</ Categories>tag:<Category ID="HideComputerFormExtensionTab" Target="ComputerFormExtension!CustomForm_dc869531 _a7b9_46fb_9ac3_9ff6 2066e829" Value="Admin!Microsoft.EnterpriseManagement. ServiceManager.UI.Administration.Enumeration.HideExtensionTab" /> - Replace the
CustomForm_dc869531_a7b9_46fb_9ac3_9ff62066e829string in the Target with the internal name of the form you wrote down in Step 3. - Save the XML file and import it into Service Manager. When you now open the Windows Computer form, the Extensions tab will no longer be displayed. Please note that you might need to restart the Service Manager console for the changes to take effect.
The final code should look similar to the following screenshot. The only thing that could be somewhat different are the values that you wrote down in Step 2 and 3. (Please note that Word Wrap has been enabled just for the sake of fitting all code into the screenshot!)
The following section gives you information about where you can find the XML Schema Definition (XSD) for Service Manager Management packs.
Microsoft has released the XML Schema Definition (XSD) of the management pack XML structure used in Service Manager. The schema allows for better understanding of the content of the management pack XML code and enables schema validation when you work with management pack XML files.
The XSD file is part of the SCSM Job Aids that can be downloaded from the following URL: