
Customizing the portal consists of officially supported customizations, and customizations that can be done, but are not officially supported. In this recipe, we will cover both.
The main difference between the officially supported customizations and other types of customizations is that the official ones are guaranteed by Microsoft and will stay intact through updates and upgrades. Any customizations not on the official supported list may not survive an update or upgrade; therefore it is critical to back them up.
Here is a link to Microsoft's blog on the officially supported customizations:
Now let's explore some recipes on customizing the HTML5 portal.
Make sure that Service Manager is up and running, the HTML5 portal is installed, and that you are using an account that has the administrator role in Service Manager as well as a local administrator on the web server.
There are many customizations you can make to the new HTML5 portal. This recipe will show some different customizations that can be done within different areas and using different methods.
To change the lower-left side of the menu shown in the following screenshot, above and beyond simply editing the values in web.config, try the following:

- Navigate in Windows Explorer to
c:inetpubwwwrootSelfServicePortalViewsShared(assuming the portal is installed in the default location). - Open the
Sidebar.cshtmlfile in Notepad or a code editor. - Find the following section:
<div class="side_nav_bottom"> <div class="side_nav_report"> <div>@Resources.SelfServicePortalResources.PoweredBy : </div> <img src="~/Content/images/msft_logo.png" alt="Microsoft" style="max-width: 12em;" /> - Modify the
<img src="~/Content/images/msft_logo.png" alt="Microsoft" style="max-width: 12em;" />line to reference a logo image file of your choice, for example,<img src="~/Content/images/logo1.png" alt="Private Cloud" style="max-width: 12em;" />.
The Powered By: logo image works best as a 36×26 image.
All images are stored in: c:inetpubwwwrootSelfServicePortalContentimages if using the default installation path.
- Find the next two lines within this same code section:
<div>@Resources.SelfServicePortalResources .CantFindSolution</div> <div>@Resources.SelfServicePortalResources .ContactUs</div> - Comment them out by adding <!-before the line and --> after:
<!--<div>@Resources.SelfServicePortalResources .CantFindSolution</di v>--> <!-- <div>@Resources.SelfServicePortalResources .ContactUs</div>- -> - Add your own descriptive text to be displayed instead, for example:
<div>Service Desk Contact Info:</div>

- Save the file and reload the website to view the changes.
To modify icons do the following:
- Go to
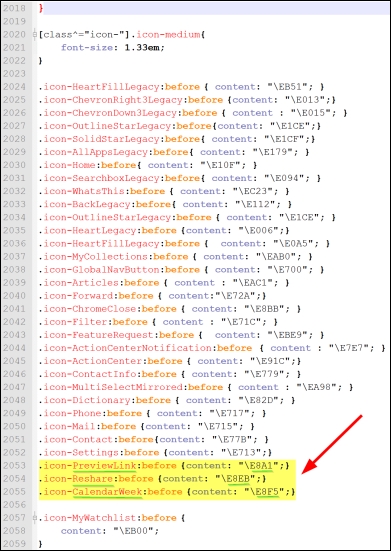
C:inetpubwwwrootSelfServicePortalContentCSSand edit themain.cssfile. - In this file, search for the
[class^="icon-"].icon-medium{section. - Here you will see all the font icons. You can add the font icons you want to be available for use in the portals CSS. You can find icons that will work with the portal here: http://modernicons.io/segoe-mdl2/cheatsheet.
- In the following screenshot, you will see an example of icon fonts that have been added, they are highlighted in yellow:
To add side bar links, do the following:
- Go into
C:inetpubwwwrootSelfServicePortalViewsSharedand modify theSidebar.cshtmlfile. - In this file, under
<div class="side_nav_bar col side_menu">, add something like the following:<!- Custom side bar link Begin -> <div class="row side_nav_IT Mission" accesskey="I" tabindex="4″ data-toggle="tooltip" > <a href="http://portal.domain.com" target="_blank"> <font color="white"> <span class="icon-PreviewLink icon icon-pos icon-medium"></span> </font> </a> </div> <!- Custom side bar link End ->
Microsoft has a method for modifying the look and feel. Here we will show you another way to modify the look and feel.
The Microsoft method is to modify the main.css file, and it can be found here: https://blogs.technet.microsoft.com/techlazy/2016/03/13/service-manager-new-html5-portal-basic-customizations-35-colors-and-tiles/
- Create a new file named
custom.cssinC:inetpubwwwrootSelfServicePortalContentCSS(assuming the default portal installation location). - Add the following code in the
custom.cssfile:.top_bar { background :black } .top_bar .anouncement_count { width: 1.5em; background-color: #d2d2d2; height: 1.5em; border-radius: 50%; position: absolute; top: 5px; right: 6px; text-align: center; } .btn:hover { background-color: green; cursor: pointer; } /*media all*/ .btn { background-color: black; border: none; color: white; padding: 0.625em 2em; margin-right: 1.5em; font-size: 1.25em; } /*media all*/ [class^='icon-'].icon-fill { color: #f00; } .vertical_list .list_header, .my_reg_container .list_header{ background: black; } /*@media screen and (min-width:1024px)*/ /*.main_body .side_nav_bar .row, .main_body .side_nav_bar_expand .row { height: 4em; position: relative; background-color: red !important; }*/ /*@media screen and (min-width:1024px)*/ .main_body .side_nav_bar .row:hover, .main_body .side_nav_bar_expand .row:hover { cursor: pointer; background-color: #777!important; } div[style*="background-color: rgb(37, 95, 133)"] { background-color : blue !important; } - Save the CSS file.
- From an elevated Command Prompt run IISReset to restart the self-service portal.
Something else that might come in handy is to have the portal produce a custom error when an error occurs. For example, you could display the service desk info with the actual error message. To show a custom error you need to modify the Error.cshtml file in inetpubwwwrootSelfServicePortalViewsShared:
<hgroup>
<h1>Error.</h1>
<h2>An error occurred while processing your request. For further help contact the service desk at [email protected].</h2>
</hgroup>