
In Chapter 5, Deploying Service Request Fulfillment, we discussed how to create a Service Catalog and present your service offerings and request offerings on the self-service portal. This is great and allows the end users to report incidents and register service requests from the portal whenever they like. To make this even better we can automate the actual request by utilizing System Center Orchestrator.
Tip
This recipe involves working in System Center Orchestrator and has some requirements within that product, which we don't have room to discuss in this book. For more information regarding System Center Orchestrator, see the official documentation on TechNet: https://technet.microsoft.com/en-us/system-center-docs/orch/orchestrator.
The whole process of creating automated request offerings can be summarized in these steps:
- Create a Runbook in System Center Orchestrator.
- Sync the Runbook to Service Manager through the Orchestrator connector.
- Create a Runbook Automation Activity template-based on the Runbook created in step 1.
- Create a Service Request template-that includes the Runbook Automation Activity created in Step 3.
- Create a Request Offering based upon the Service Request template created in Step 4.
- Add the Request Offering to a Service Offering and Publish these.
- Test and verify.
- Place into production.
This might seem like a lot of work to do, but the fact is that this is the easy job and once you get the hang of it you will be able to do it pretty quickly. The largest, most time consuming, and most important job is to get your idea documented and well thought through before starting these steps. Poor preparation leads to a bad result.
It's also important to test your automated request offerings in a test environment before publishing them to your end users in a production environment to make sure they are working as planned.
Make sure you have System Center Orchestrator up-and-running, that you have sufficient privileges to create new Runbooks and that you have the Integration Packs for Active Directory and System Center 2016 - Service Manager deployed.
In Service Manager you need to have the Self-service Portal installed and working properly as well as the System Center Orchestrator connector. You will also need Administrator permissions to perform the following recipe.
See the Importing Orchestrator Runbooks recipe in Chapter 4, Building the Configuration Management Database (CMDB), on how to configure the Orchestrator connector and Chapter 6, Deploying and Configuring the HTML 5 Self-Service Portal for instructions on how to deploy the self-service portal.
In this recipe, we will create a fully automated request offering to create new users in Active Directory. As stated earlier, we will be working with Orchestrator, but won't have the opportunity to discuss Orchestrator in too much detail here.
- Launch the Orchestrator Runbook Designer.
- Expand Runbooks on the left-hand side and create a new Runbook in a suitable place.
- Check Out the Runbook and change the name to New AD User.
- Expand the Runbook Control integration pack on the right-hand side. Now drag the Initialize Data activity onto the workspace.
- Double-click on the Initialize Data activity on the workspace to open the properties of it. Add two new parameters by clicking on the Add button. Rename one of the properties to Firstname and the other one to Lastname. Click on Finish
- Drag the Create User activity from the Active Directory integration pack onto the workspace and place it on the right side of Initialize Data. Connect Initialize Data to this activity by dragging the small arrow next to Initialize Data to Create User.
- Double-click on Create User to open its properties and click on the Browse button marked with ... to select your Active Directory connection and click on OK.
Tip
The connection must be configured in Orchestrator for the Integration Pack, otherwise this menu will be empty. For more information on how to do this, please see this link to TechNet: https://technet.microsoft.com/en-us/system-center-docs/orch/manage/active-directory-integration-pack.
- Click on the Optional Properties button and add Display Name, First name, Last name, Password, and SAM Account Name, and then click Ok.
- Configure the properties like the following and click Finish:
- Common Name =
<Firstname from Initialize Data><Lastname from Initialize Data> - Display Name =
<Firstname from Initialize Data> <Lastname from Initialize Data> - First name =
<Firstname from Initialize Data> - Last name =
<Lastname from Initialize Data> - Password =
P@ssw0rd - SAM Account Name =
usr_<Firstname from Initialize Data>
- Common Name =
- Add the Enable User activity from the Active Directory integration pack to the workspace. Connect Create User to this activity and double-click on it to open its properties.
- Click on the Browse button marked with ... select your Active Directory connection and click on OK.
- In the field for Distinguished Name, add the Distinguished Name from the Create User activity by subscribing to the database. Click on Finish.
- Our simple Runbook is now complete and should look something like the following:
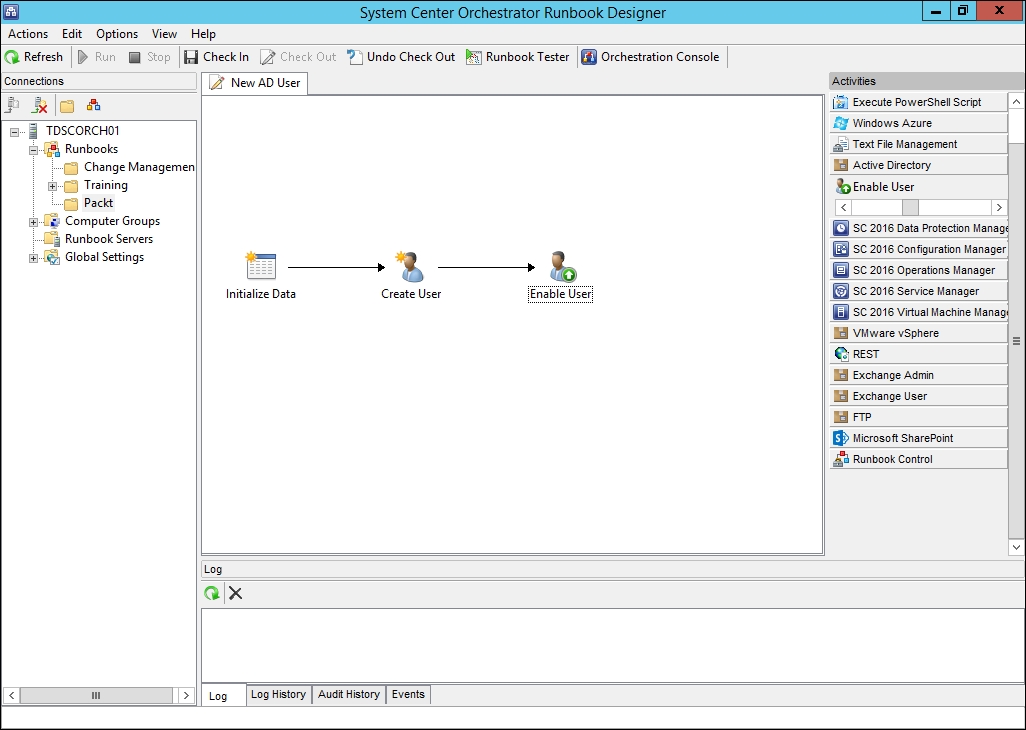
- Verify that the Runbook is working properly in the Runbook Tester. Once this is verified remember to Check In your Runbook!
- Start the Service Manager console and go to the Administration workspace.
- Go to Connectors, select your Orchestrator connector, and click on the Synchronize Now task.
- Give the connector a couple of minutes to run, then go to the Library workspace, and select Runbooks.
- Confirm that the New AD User Runbook we just created is listed.
- Select the New AD User Runbook and click on the Create Runbook Automation Activity Template task.
- Give the template a name, such as RBA - New AD User, select an existing management pack or create a new one to store this template in. Click on OK.
- As the title of our Runbook Automation Activity enter
New AD Userthen make sure to check the checkbox that says Is Ready For Automation in the top right corner. - Go to the Runbook tab and take note of how the Parameter mapping is done. By default, our properties should be mapped to Text1 and Text2, as seen in the following screenshot:
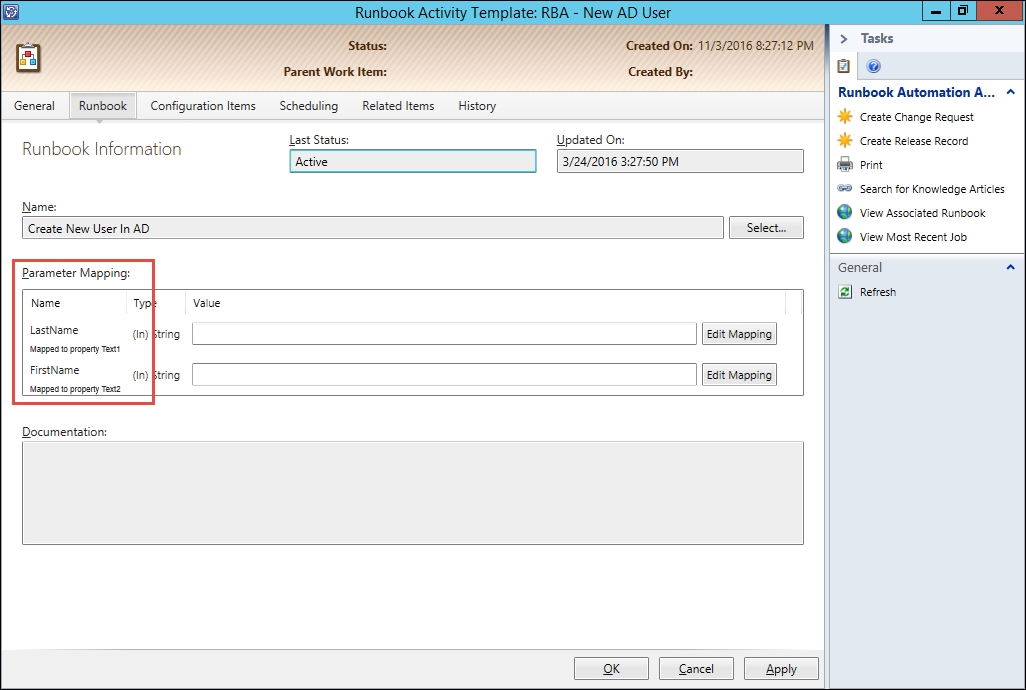
- Click on OK to save the Runbook Automation Activity Template.
- Next we need to create a Service Request template to use in our Request Offering. Go to Templates under the Library workspace.
- Click on the Create Template task to create a new template.
- Give it the name SSP - New AD User and use the Browse... button to select the Service Request class. Choose a management pack to store the template in and click OK.
- Enter the following information on the General tab:
- Title = Request of new Active Directory user account.
- Description = The Affected User has requested a new Active Directory user account. See User Input for details.
- Urgency = Low.
- Priority = Low.
- Source = Portal.
- Area = DirectoryAccount Management.
- Go to the Activities tab and add our Runbook Automation Activity named RBA - New AD User. Click on OK when the Runbook Automation Activity opens.
- Click on OK to save our Service Request template.
- Now we will have to create a Request Offering to use when the end user request a new AD user account.
- In the Library workspace, expand Service Catalog and select Request Offerings.
- Click on the Create Request Offering task.
- Click on Next in the Before You Begin step.
- Enter Request a new user account as the title of the Request Offering. As the Description, enter
Use this Request Offering to request a new Active Directory user account. - Click on the Select Template button, select the template that we just created called SSP - New AD User, and click on OK.
- Select a Management Pack to store this Request Offering in and click on Next.
- In the User Prompts step add two text prompts. One prompt called Please enter the first name of the new user and the other one called Please enter the last name of the new user. Click on Next.
- On the Configure Prompts page you can apply certain configurations to the prompts, but in our case we will skip this. Click on Next to move to the next step.
- We will now get to an important step for the automated request offering scenario-Map Prompts. In order for Service Manager to pass the parameters to Orchestrator once calling the Runbook, we need to map our parameters to the same properties that we configured the Runbook Automation Activity to pass to the Runbook in Part 3 - Creating a Runbook Automation Activity template, Step 4.
- To do this, mark the New AD User - (Runbook Automation Activity) in the object picker and map the Firstname prompt to Text2 and the Lastname prompt to Text1. Click on Next.

- On the Knowledge Article step, click on Next.
- Set the Offering Status to Published. Click on Next followed by Create and Close.
- Select Service Offerings underneath Service Catalog in the Library workspace.
- Click on Create Service Offering. Click on Next on the Before You Begin page.
- Give the service offering the name Account and Access management. As the Overview and Description, enter
Includes Request Offerings such as Request New User, Request Group Membership etc. Select a management pack to store the service offering in and click on Next. - Skip the Detailed Information, Related Services, and Knowledge Articles pages, by clicking on Next on each page.
- In the request offering page, click on the Add button, locate and select our Request Offering called Request a new user account. Click on Add followed by OK.
- Click on Next to get to the Publish page. Change the Offering Status to Published. Click on Next, followed by Create and Close.
- Open the Self-service Portal and make sure that you can see our Service Offering called Account and Access management.
- Click on Account and Access management and then click on Request a new user account, which is the request offering we also just created.
- This will take you directly to the form where you should see our two prompts. Enter a first name and a last name and click on Submit.
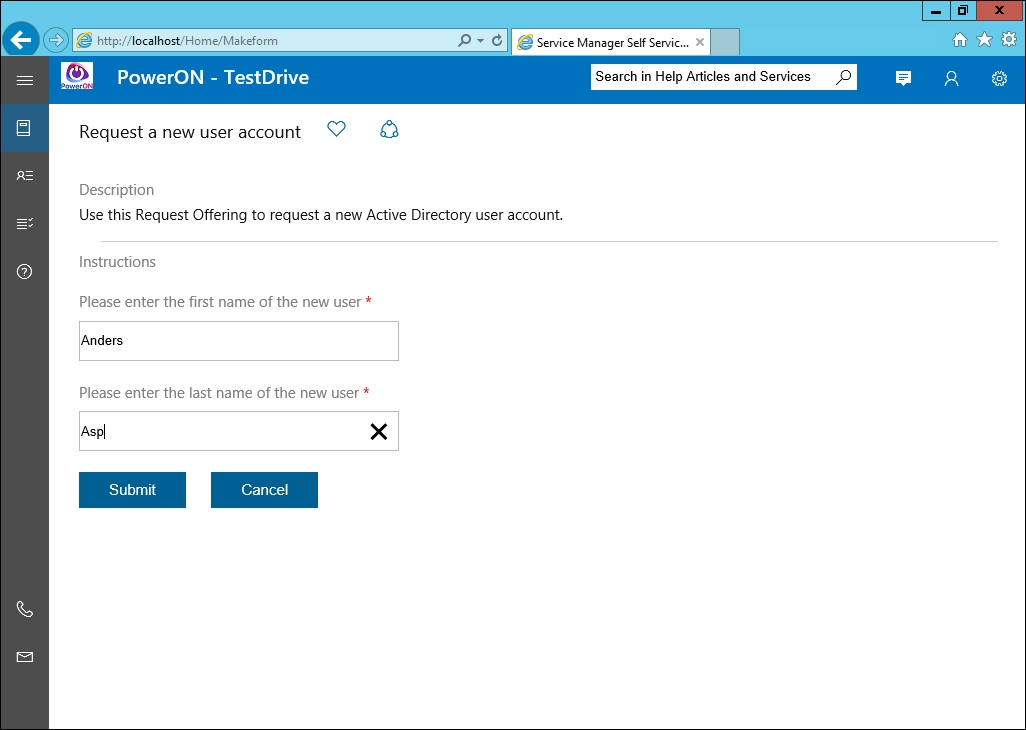
- The service request will now be created and the Service Request ID will be shown in the blue header that is displayed for a short while. Take note of this ID.
- Go to the Work Items workspace in the Service Manager console. Expand Service Request Fulfillment and select the All Open Service Requests view.
- Locate and open the service request with the ID we noted in Step 4 above.
- Verify that the information in the User Input section is correct and that the New AD User activity is In Progress.
- Once you've verified that everything seems okay in Service Manager, open an Active Directory Users and Computers to see if the User account has been created.
- When the account is created and the Runbook is finished, the Runbook Activity and the service request itself should change status to Complete.
When you've created your Runbook in Orchestrator it can be synced to the Service Manager CMDB through the System Center Orchestrator connector in Service Manager. This Runbook object in Service Manager contains the information needed to trigger the Runbook through the Orchestrator web service, such as the Runbook GUID and required input parameters. From this Runbook object you can create a Runbook Automation Activity template to use in your different Work Items. Whenever this activity is used and the status of it is set to In Progress, Service Manager will call the Orchestrator web service and trigger the related Runbook together with the parameters mapped in the Runbook Automation Activity (as seen in Part 3 - Creating a Runbook Automation Activity template, Step 4).
This was a very basic example of an automated request offering and as stated earlier you will need to plan and build all of this in more detail. There are many things to consider before you can create fully automated request offerings. Here are a few questions that might be good asking yourself when designing the automated request offerings:
- What do we want to achieve?
- How do we want it to be executed?
- Who is going to use this request offering?
- What kind of input do we need from the end user requesting this request offering?
When you have the answer to these questions the risk of having to redo the design of your automated request offering due to forgetting some details is much more unlikely.
A Runbook that isn't Checked In cannot be triggered from Service Manager. This means that the Runbook Automation Activity within Service Manager will fail if it tries to trigger the Runbook.
It's pretty common that you need to go back to improve your Runbook or add new features to it, but be careful! If you edit or add new parameters in the Initialize Data activity, the Runbook object within Service Manager will be marked as Invalid. This means that it won't be able to trigger the Runbook ever again. The only fix for this is to delete the Runbook object and re-import it. This also mean that you have to redo everything that is based upon this Runbook object, such as Runbook Automation Activity templates, service request templates that includes the Runbook Automation Activity, and request offering based upon that template!
Unfortunately, Service Manager does not have a connector to either of the newer automation engines from Microsoft. However, there are ways you can use these tools anyways by calling them from PowerShell workflows, or you can use a third-party software that has custom created connectors for this.
- For more information regarding request offerings, service offerings, service request, and the Self-Service Portal, please see Chapter 5, Deploying Service Request Fulfillment.
- For more details on how to create automated request offerings, take a look at the following blog posts on the official blog for Service Manager:
- http://blogs.technet.com/b/servicemanager/archive/2011/11/09/ demo-automating-service-request-fulfillment-from-the-scsm-service-catalog-with-orchestrator.aspx
- https://blogs.technet.microsoft.com/hybridcloud/2011/11/04/introduction-to-service-manager-2012-service-catalog-part-1/
- https://blogs.technet.microsoft.com/servicemanager/2011/11/08/request-offering-wizard-overview/