
In this recipe, we will take a look at extending the incident class with a new property. This can be done when you want to keep track of something that isn't available by default. You might want to keep track of the incident discovery date, for instance. That's not a property of the incident class by default, so if you would like to do so, you will have to extend the class, as described in this recipe.
Make sure you have downloaded and installed the Authoring Tool. Note that the version of the Authoring Tool has to match the version of your Service Manager installed.
Download the Service Manager Authoring Tool available at https://www.microsoft.com/en-us/download/details.aspx?id=54059
- Start the Service Manager Authoring Tool.
- Locate Class Browser and click on the Reload Content button to load the list of all classes in SCSM.
- Enter Incident in the Search field and hit Enter.
- Locate the Incident class, right-click on it and select View.
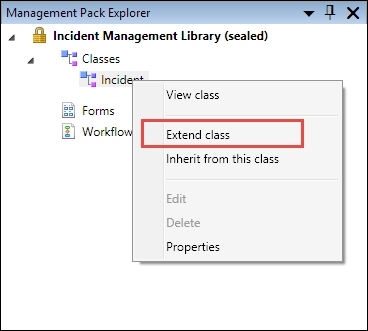
- The incident class should now be displayed in a read-only mode. In order to extend the incident class, right-click on the Incident class in the Management Pack Explorer and select Extend class:
- You will now be asked in which management pack you want to store your class extension. Click on New... to create a new management pack to store it within.
- Give it a proper name, such as
Packt.Incident.ClassExtension, and click on Save. - Make sure your new management pack is selected in the Target Management Pack dialog and click OK.
- To add a new property to the incident class, click on the Create property... button located right above the list of all properties.
- Change the Internal name to IncidentDiscoveryDate (without spaces) and click on Create.
- With the new property selected, go to the details window and change the name to Incident Discovery Date (with spaces). This is actually the Display String of our new property and what we will see in the console later.
- Then change the Data Type from String to Date Time.
- Save your management pack by going to File and select Save All.
- Next, we should actually seal the management pack, but as we will look into what that is and the requirement for doing so in later chapters of this book, we will skip that in this example. Instead, we will go on and import this unsealed management pack into Service Manager.
- Open the Service Manager console and go to the Administration workspace.
- Go to Management Packs and click on the Import task.
- Browse to the management pack we just created and click on Open.
- In the Import Management Packs dialog, click on Import.
- For now, ignore the warning about the management pack not being sealed and click on OK.
After you have imported the management pack created in the Authoring Tool, the incident class has been extended with a new property. This new property is available under the Extensions tab in the incident form:

This is a simple way of extending an existing class in Service Manager with new properties that you might need. Even though you haven't modified the form, SCSM has made it possible to enter data in this field by presenting it on the Extensions tab. The next step would be to add a field for the new property on the actual form to avoid people forgetting to enter the information.
All management packs that include class extensions should be sealed before they are imported into SCSM. There are a few reasons for this, but the main ones are as follows:
- You want to protect your management pack from being modified
- Only sealed management packs are copied to the data warehouse
- You are not able to reference unsealed management packs from other management packs
To get a grasp of the properties of each class, you could use the Authoring Tool to locate each class and then display it. You might be surprised that the property you want to extend your class with already exists, it's just not displayed on the form. But an even better way to get an understanding of the SCSM class hierarchy and model would be to take a look at the System Center Common Model for Service Manager Visio drawing. Unfortunately, this Visio drawing hasn't been updated since SCSM 2010, but is still a very good foundation to get an understanding of the classes. This Visio is included in the Service Manager Job Aids package for SCSM 2012 and is downloadable from Microsoft at http://www.microsoft.com/en-us/download/details.aspx?id=27850.
Besides properties, classes can also have relationships to other classes. In this way, we can connect two or more objects with each other to create a richer experience for the analysts working in the system and to make powerful reports. A good example of a relationship is the Affected User relationship in the different work item classes. This relationship is used to connect the actual user object in the CMDB with the work item in which they are the affected user.
New relationships can be created in the Authoring Tool in the same way as we added a new property in this recipe, but unlike new properties, new relationships will not show up on the Extensions tab.
- For more information about sealing a management pack, please see the Sealing management packs recipe in Chapter 11, Extending SCSM with Advanced Personalization
- For more information regarding the Authoring Tool and how to use it to customize and extend SCSM, see the Using the SCSM Authoring Tool recipe in Chapter 11, Extending SCSM with Advanced Personalization