
- My New iPad
- Acknowledgments
- Introduction
- I. Basic Training
- 1. Turning Your iPad On and Off
- 2. Charging and Conserving iPad Battery Power
- 3. Using Your iPad's Physical Controls
- 4. Controlling the iPad User Interface
- 5. Using and Customizing the Virtual Keyboard
- II. Customizing Your iPad
- 6. Customizing the Home Screen
- 7. Using Parental Controls
- 8. Protecting Your Privacy
- 9. Setting the Date and Time
- 10. Restoring and Resetting Your iPad
- 11. Setting Up an Internet Connection
- 12. Installing (and Uninstalling) Apps
- III. Getting on the Internet
- 13. Browsing with Safari
- 14. Using Bookmarks with Safari
- 15. Filling Out Forms Automatically in Safari
- 16. Setting Up and Customizing an Email Account
- 17. Reading, Writing, and Organizing Email
- IV. Sharing Data with Your iPad
- 18. Transferring Photos, Movies, Music, TV Shows, and Podcasts to Your iPad
- 19. Transferring Ebooks and Audiobooks to Your iPad
- 20. Transferring Contacts, Appointments, Mail, Notes, and Bookmarks
- 21. Transferring iTunes University Courses from a Computer to Your iPad
- V. Video, Music, and Ebooks
- 22. Shopping on iTunes and the iBook Store
- 23. Listening to Music and Other Audio Files
- 24. Watching Videos
- 25. Watching YouTube Videos
- 26. Reading Ebooks
- 27. Viewing Photographs
- 28. Using and Sharing Photographs
- VI. Organizing Yourself
- 29. Jotting Down Notes
- 30. Viewing Contact Information
- 31. Tracking Appointments on a Calendar
- 32. Viewing a Map
- 33. Finding Places and Getting Directions with Maps
- 34. Searching Your iPad with Spotlight
- VII. Additional Tips
- 35. Updating the iPad Operating System
- 36. Making an iPad Accessible
- 37. Using Foreign Languages
- 38. Transferring and Editing Microsoft Office Documents
- 39. The Best iPad Apps
- A. The Next Step
- Index
- About the Author
- Updates
Your iPad can automatically set up most popular email accounts, but if you need to set up an email account that isn't from one of the more popular providers, then you'll need to type some additional information such as your incoming and outgoing mail server settings. (If you have no idea what these settings are, you'll need to get them from your email provider or your Internet service provider.)
To set up an email account manually, follow these steps:
From the Home screen, tap Settings. The Settings screen appears.
Tap Mail, Contacts, Calendars. The Mail, Contacts, Calendars settings screen appears (shown earlier in Figure 16-1).
Tap Add Account. The Add Account screen appears (shown earlier in Figure 16-2).
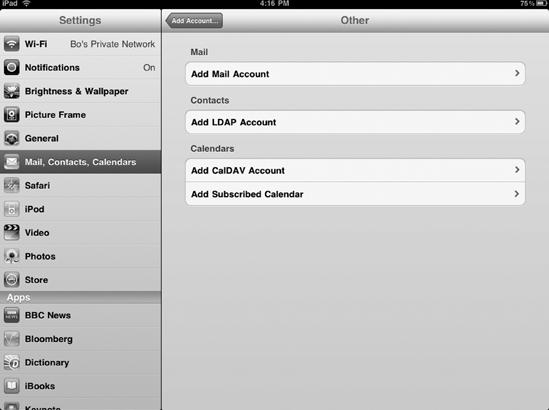
Tap Other. The Other screen appears, as shown in Figure 16-4.
Tap Add Mail Account. A New Account window appears with the virtual keyboard.
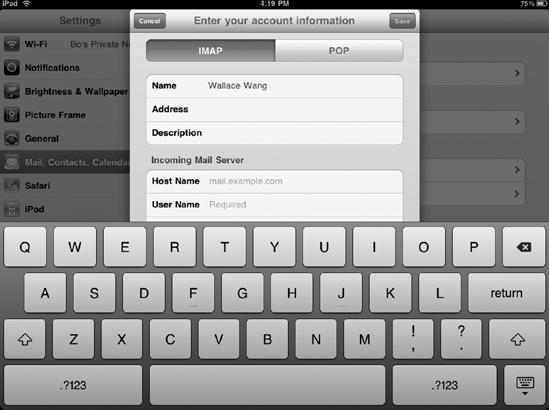
Type your name, email address, password, and description of your email account, and tap Save. The Enter your account information window appears, as shown in Figure 16-5.
Scroll down and type your host name, username, and password for your incoming and outgoing mail servers.
Tap Save.
Press the Home button. The Home screen appears.
Tap Mail. If you're currently connected to the Internet, your iPad will retrieve any messages for that email account.
-
No Comment