If you started your Web page from a blank Web page, as described at the beginning of this section, all you have to do to save it is press ⌘-S or choose File → Save or Save As. However, you can also save a standard Word document or template as a Web page, like so:
Choose File→ “Save as Web Page”.
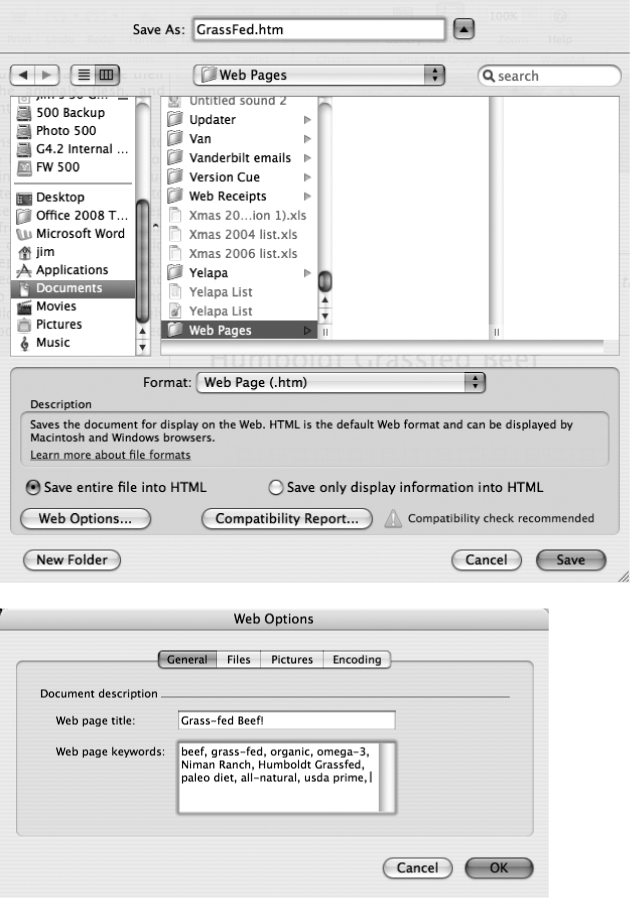
The Save dialog box opens, as shown in Figure 9-10
Click one of the radio buttons depending on how you’d like to save the file.
The Save entire file into HTML option creates a dual-purpose document. It stores the information both for display on the Web and for returning to it as a Word document. Such word processor–only elements as headers and footers, comments, page numbers, and page breaks will reappear when you open it again in Word.
Figure 9-10. Top: When you choose File → “Save as Web Page”, a Save dialog box opens, all set to save the document in HTML format. When you post the resulting files and folders online, be sure to preserve their folder structure on your Web server. For example, don’t dump your HTML file into the folder containing your graphics. Create a matching folder online to hold the graphics. Bottom: The Web Options dialog box is the same one that opens if you click Web Options on the Word → Preferences → General tab. There you can add keywords so that Web search engines like Google and Yahoo have a better chance of finding your page among the millions of others.
Save only display information into HTML saves only the document attributes that work in a Web browser. Other information, such as page and section breaks, columns, and headers and footers will be lost. This option makes a smaller, more compact HTML file, which is a good thing if your Web service provider charges based upon how much server space you use.
Click Save.
Word takes longer than usual to save the document. When it’s finished, you can switch to Web Layout view (if you weren’t already there) to see the Web page as it will appear online.
When you click Web Options in the Save dialog box (see Figure 9-10), you can specify special Web features that would normally require mucking around in HTML code.
The Web page title you enter on the General Tab appears in the title bar in a Web browser. The Web page keywords are the terms that search engines like Google and Yahoo spot when searching. (In HTML, these words are known as meta tags.)
“Update links on Save” in the Files tab comes already turned on. If you’ve changed or moved any of your Web page’s supporting files, such as bullets, graphics, or background patterns, Word updates the links so the page will work when you reopen it. The “Save only display information into HTML” checkbox turns on the corresponding radio button in the Save dialog box (see above).
Checking “Enable PNG as an output format” on the Pictures tab saves all the images in your Web page in Portable Network Graphics format, as described on Photos. The “Screen size” pop-up menu shows just about every screen size and resolution combination your Web page visitors are likely to have. 1,024 X 768 is the smallest screen most people use today, and therefore a pretty safe bet.
The “Pixels per inch” box, is another vestige of the olden days of Web browsers. Leave it set at 72 and forget about it.
The menu on the Encoding tab displays all the foreign languages and browser formats Word can use for saving your Web page. If your page contains text in a different alphabet system (such as Cyrillic or Japanese), choose it from this menu.
Tip
As you complete your Web page, consider testing it in different Web browsers. Text may wrap differently, colors and graphics may look different, and movies and marquees may not operate the same way, if at all, in different browsers.
If you have a copy of the America Online program, for example, open your page using its File → Open command. Try the same experiment in Firefox. You’d do well to also check your Web page on a Windows PC running Internet Explorer.
Despite all its Web-savvy trappings, Word, when you get right down to it, isn’t actually an HTML editor. The Web pages it creates capture the spirit of the original Word document you prepared, but not the letter, since you lose quite a bit of its look in the conversion to a Web page. Among the casualties: text boxes; fancy text effects like embossed type, shadow, and strikethrough; drop caps; page numbering; margin settings and page borders; headers and footers; multiple columns; and styles. All of these Word features drop out when the document is converted to HTML. Fields (see Fields) sort of carry through; the resulting Web page shows the field information (such as the date), but it’s no longer self-updating. Tabs aren’t reliable, either, since Word converts them into HTML tabs, which, in some Web browsers, turn into spaces. (Use tables wherever you’re inclined to use tabs.) Footnotes, on the other hand, perform beautifully. The superscript numbers turn into hyperlinks that scroll to the notes at the bottom of the page.
Creating HTML documents is only the first step in establishing a Web presence. The final step is uploading them to a Web file server—a computer that’s always on and connected to the Internet. You have several options:
Use your own Mac. If you have a full-time connection (cable modem or DSL) and a static IP address (which you usually have to pay extra for), you can use the built-in Web Sharing feature of Mac OS 9 or Mac OS X to make your Web site available to the Internet at large. Your Web address won’t be very memorable (along the lines of http://192.168.34.2), the speed won’t be great, and not very many people can visit your site at once, but the price ($0) is right. The Mac’s online help and Mac OS X: The Missing Manual have instructions.
Use your ISP. Most Internet service providers (ISPs) give you somewhere between 10 megs and 1 gig of free space to hold your Web pages as part of your monthly fee. Into that space, you can upload your Web pages directly, making them available for public browsing. Your ISP takes care of keeping its computer up, running, and connected to the Internet.
Use the Apple HomePage feature. Apple gives every Mac fan 10 GB of Web space, for a $100 yearly fee, in the form of the Sites folder on your iDisk—a virtual hard drive. (Visit www.mac.com for details.) Just put the HTML documents you’ve created—name your home page index.html for best results—and graphics into the Sites folder of your iDisk. (Don’t bother using the Mac HomePage-building tools; Web pages you’ve designed using Word don’t show up. But if you just drag them into your iDisk’s Sites folder, they’re instantly available on the Internet.)

