Sometimes, it is necessary to quickly retrieve detailed information from one or more ledgers that may contain hundreds of thousands to many millions of records. The Query object is the perfect tool for such a data selection as it is totally scalable and can retrieve selected fields from multiple tables at once. The following example (using Cronus data) will show the aggregated quantity per bin of lot-tracked items in stock. This query can be presented to a user by means of either a report or a page:
- We will define the logic we need to follow and the data required to support that logic, then we will develop the Query. It is necessary to know what inventory is in stock and contains a lot number. This is accomplished using the Item Ledger Entry table.
- However, the Item Ledger Entry record does not contain any bin information. This information is stored in the Warehouse Ledger Entry table.
- The Location Code, Item No., and Lot No. columns are used to match the Item Ledger Entry and Warehouse Ledger Entry records to make sure that the correct Items are selected.
- In order to determine which bins are designated as pick bins, the Bin Type records that are marked as Pick = True need to be matched with the bins in Warehouse Ledger Entry.
- Lastly, Quantity on each Warehouse Entry needs to be summed per Location Code, Zone Code, Bin Code, Item No., and Lot No. to show the amount available in each bin.
Now that we have defined the necessary logic and data sources, we can create the desired Query object as follows.
- The Query Designer is accessed from within the Development Environment through Tools | Object Designer | Query. The Query Designer can be opened either for creation of a new query by using the New button or for editing an existing query by highlighting the target object, then clicking the Design button.
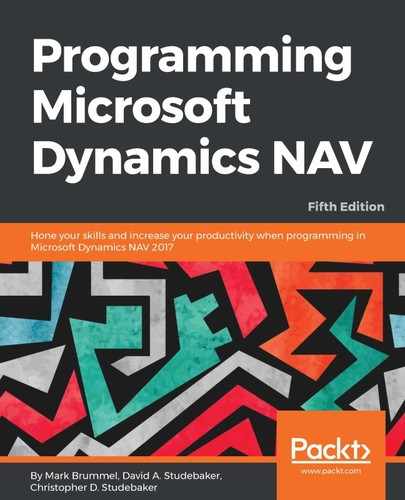
- Now define the primary DataItem in the Data Source column. The first DataItem is the Item Ledger Entry table. We can either type in the table name or the table number (in this case, table number 32). The Query may select from multiple tables (as we do in this example). All DataItems except the first must be indented. Each successively indented DataItem must have a link defined to a lesser-indented DataItem (because Union joins are not supported).
- After defining the first DataItem, we will move focus to the first blank line, and the Type will default to Column. Column is a field from the DataItem table that will be output as an available field from the query dataset. The other Type option is Filter, which allows us to use the source column as a filter and does not output this column in the dataset. Use the Lookup arrow or the Field Menu to add the two following fields under Item Ledger Entry: Item No. and Lot No., as shown in the following screenshot:

- The next DataItem we need is the Warehouse_Entry table. We must join it to the Item Ledger Entry by filling in the DataItemLink property. Link the Location Code, Item No., and Lot No. fields between the two tables, as shown in the following screenshot:

The following steps will define the rest of the DataItems, Columns, and Filters for this query:
- Select Entry No., Location Code, Zone Code, Bin Code, and Quantity as Columns under Warehouse Entry DataItem.
- Add Bin table as the next DataItem.
- Set the DataItem Link between the Bin and Warehouse Entry as the Bin table Code field linked to the Bin Code field for the Warehouse Entry table.
- Add the BinType table as the last DataItem for this query. Create a DataItem Link between the Bin Type table Code field and the Bin table's Bin Type Code field.
- Set the DataItem Filter as Pick = CONST(Yes) to only show the quantities for bins that are enabled for picking.
- For the dataset returned by the Query, we will only want the total quantity per combination of the Location, Zone, Bin, Item, and Lot number. For the Column Quantity in the Warehouse Entry DataItem, set the Method Type column to Totals. The Method will default to Sum and the columns above Quantity will be marked with Group By checked. This shows the grouping criteria for aggregation of the Quantity field, as shown in the following screenshot:
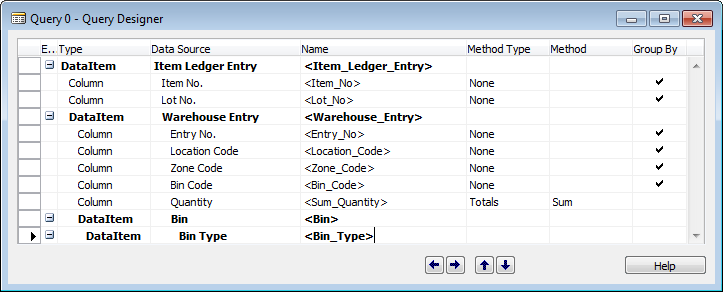
- Once the DataItems and Columns are selected, the Query can be compiled and saved in the same manner as Tables and Pages are compiled and saved. The Query can be tested simply by highlighting it in the Object Designer and clicking on Run. Number and name the Query object, as shown in the following screenshot:
This query can be utilized internally in NAV 2017 as an indirect data source in a Page or a Report object. Although DataItems in Pages and Reports can only be database tables, we can define a Query as a variable, then use the Query dataset result to populate a temporary Sourcetable. In a page we define the SourceTableTemporary property to Yes and then load the table via C/AL code located in the OnOpenPage trigger, or in a report we might utilize a virtual table, such as the Integer table, to step through the Query result.
In our example, we use the Warehouse Entry table to define our temporary table because it contains all the fields in the Query dataset. In the Page Properties, we set the SourceTableTemporary to Yes (if we neglect marking this table as temporary, we are quite likely to corrupt the live data in the Warehouse Entry table). In the OnOpenPage trigger, the Query object (LotAvail) is filtered and opened. As long as the Query object has a dataset line available for output, the Query column values can be placed in the temporary record variable and be available for display, as shown in the following screenshot. Because this code is located in the OnOpenPage trigger, the temporary table is empty when this code begins execution. If the code were invoked from another trigger, the statement Rec.DELETEALL would be needed at the beginning to clear any previously loaded data from the table:

As the Query dataset is read, the temporary record dataset will be displayed on the page, as shown in the following screenshot:

When a Query is used to supply data to a Report, an Integer DataItem is defined to control stepping through the Query results. Before the report read loop begins, the Query is filtered and invoked so that it begins processing. As long as the Query object continues to deliver records, the Integer DataItem will continue looping. At the end of the Query output, the report will proceed to its OnPostDataItem trigger processing, just as though it had completed processing a normal table rather than a Query created dataset. This approach is a faster alternative to a design that would use several FlowFields, particularly if those FlowFields were only used in one or two periodic reports.
A similar approach to using a Query to supply data to a report is described in Mark Brummel's Blog Tip #45 (https://markbrummel.blog/2015/03/24/tip-45-nav2015-report-temporary-property/).