WDTU subscribes to a service that compiles listenership data. This data is provided to subscribers in the form of XML files. The agency that provides the service has agreed to push that XML data directly to a web service exposed by our NAV 2017 system. This approach will allow WDTU to have access to the latest listenership data as soon as it is released by the agency.
WDTU must provide access to the XMLport that fits the incoming XML file format. The handshaking response expected by the agency computer from our web service is a fixed XML file with one element (Station ID) and an attribute of said element (Frequency).
The first step is to build our XMLport. We access the XMLport designer through the Object Designer | XMLport button | New button. Define the new XMLport lines as shown in the following screenshot:

After we have the lines entered, we will click on Alt + F and then Save As.... Fill in the Save As screen as shown and click on OK to save and compile the XMLport without exiting the XMLport Designer:

Highlight the blank line at the bottom of the XMLport Designer screen and click on Shift + F4, the Properties icon, or right-click and then click on Properties to display the XMLport properties screen.
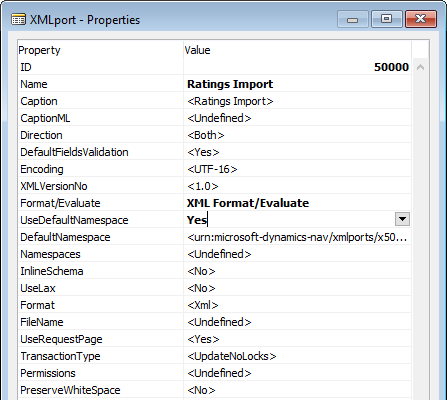
Set the Format/Evaluate property to XML Format/Evaluate. This allows Visual Studio to automatically understand the data types, such as integer, decimal, and so on, involved. Set UseDefaultNamespace to Yes, and the DefaultNamespace to urn:Microsoft-dynamics-nav/xmlports/x50000, which is the default format, or urn:Microsoft-dynamics-nav/xmlports/RatingsImport.
Even though we are using the XMLport as an import only object, make sure the Direction property stays at <Both>. When the value is set to either Import or Export, it is not possible to use the XMLport as a Var (by reference) parameter in the codeunit function, which we will expose as a web service.
Following is the XMLport 50000 Properties screen with those changes in place:
After we close the Properties screen for the XMLport, we can highlight the Root Element line and display its properties. Set the MaxOccurs property to Once, as shown in the following screenshot:

Close the Root Properties, highlight the RatingsData Table Element, and access its Properties screen. Set MinOccurs to Zero and make sure MaxOccurs remains at the default value of <Unbounded>, as shown in the following screenshot. Once that is done, close the RatingsData -Properties screen. As our XMLport matches the incoming data format from the listenership ratings agency, no C/AL code is necessary in this XMLport. Exit the XMLport Designer and save and compile XMLport 50000:

Now that we have our XMLport constructed, it's time to build the codeunit that will be published as a web service. Go to Object Designer | Codeunit button | New button. Then click on the menu option View | C/AL Globals | Functions tab. Enter the new Function name of ImportRatings and click on the Locals button.
In the C/AL Locals screen, enter the single parameter, RatingsXML, TypeXMLport, and a SubType of Ratings Import. Make sure the Var column on the left is checked. The C/AL Locals screen should then look like the following screenshot:

Now, click on the Return Value tab and set the Return Type value to Text and the Length value to 250. Exit the C/AL Locals and C/AL Globals screens, returning to the Codeunit C/AL Editor screen. Finally, we will highlight our new function in the Functions tab, and set the Local property to No so that we can access this function from Web Services, as shown in the following screenshot:

Before proceeding further, let's save our work. Just as in the XMLport Designer, we can save our work without exiting the Designer by clicking on File | Save As..., and then entering the designer object number (50001) and name (Ratings Webservice).
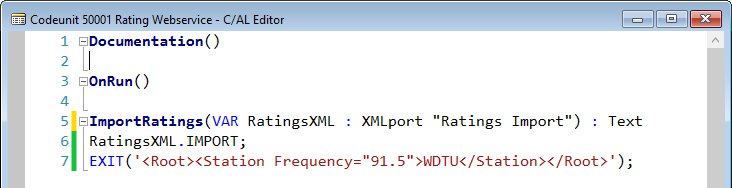
We only need two lines of C/AL code in the codeunit. The first line's task is to import the XML utilizing the XMLport parameter to cause the XMLport to process. The second code line's purpose is to send the required text response back to the external system, with the response formatted as XML data. In the C/AL Editor, that code looks as follows:
Exit Codeunit 50001 and compile and save it. Now, we will publish the codeunit that we just created.
Open the Role Tailored Client, navigate to Departments | Administration | IT Administration | General | Web Services (or just search for Web Services using the Search box), and invoke the Web Services page. Fill in Object Type of Codeunit, Object ID of 50001, Service Name of WDTU Ratings, and check Published:

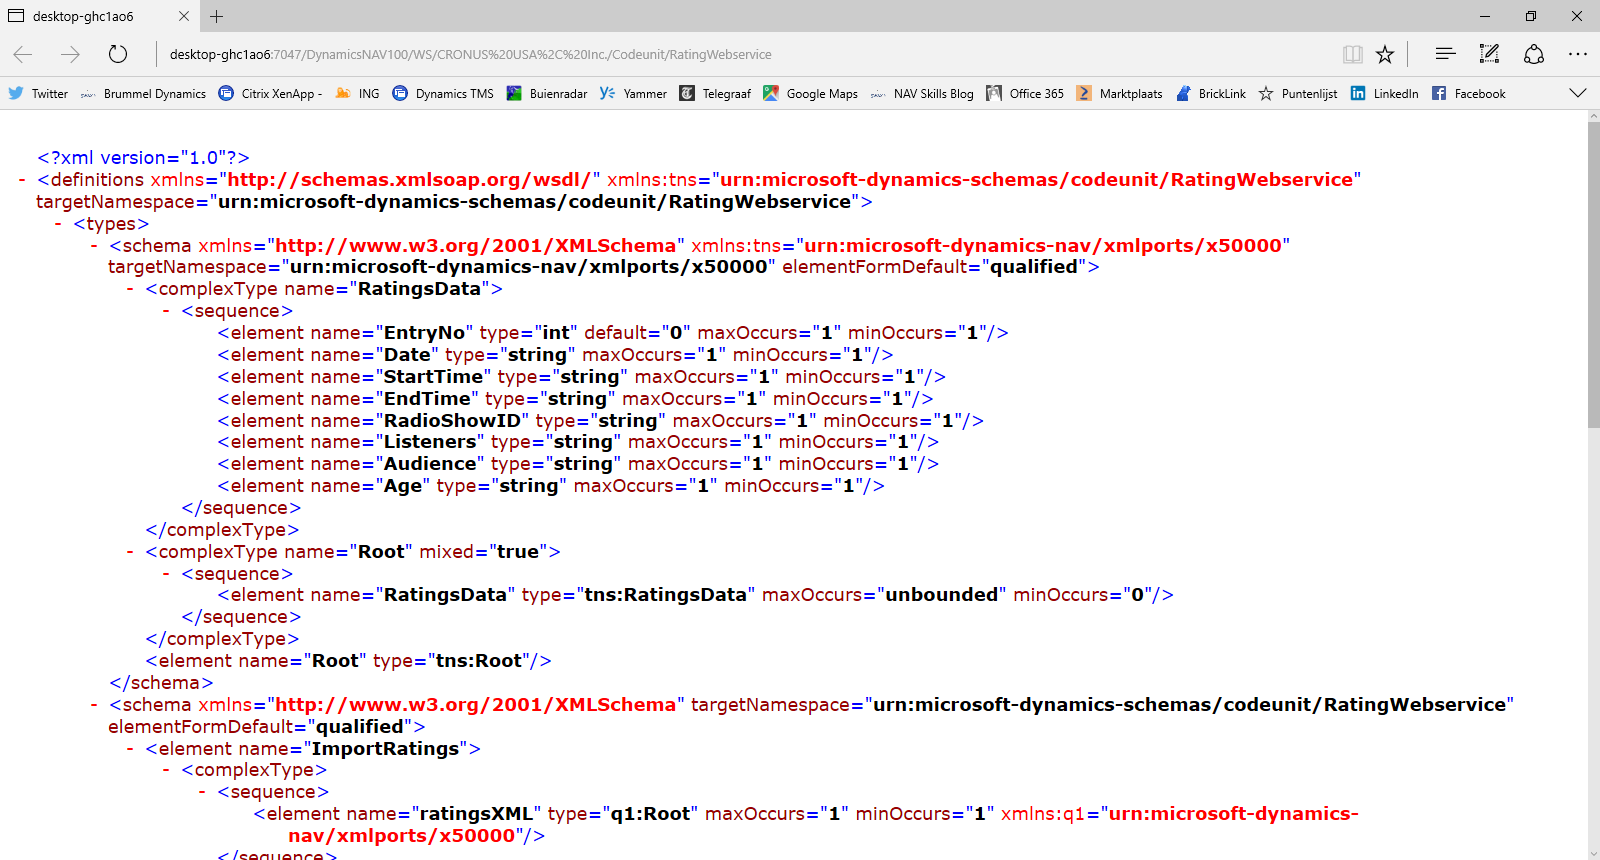
Now, to test what we've done, we need to open a browser and enter a URL in the following format:
http://<Server>:<SOAPWebServicePort>/<ServerInstance>/WS/
<CompanyName>/services
For example, more specifically, like the following URL:
http://localhost:7047/DynamicsNAV100/WS/CRONUS International Ltd/Codeunit/WDTURatings
Instead, for testing purposes, we could just click on the Web icon on the right-hand end of our new entry in the Web Services screen, as shown in the preceding screenshot. The result in our browser screen should look like the following screenshot, showing that we can connect with our web service and that our XMLport contains all the fields for the data we plan to import: