
The procedures and interface tools we use to do Configuration are also used by users to do Personalization. Both terms refer to revising the display contents and format of a Role Center as it appears to one or more users. As it says in the Help, Walkthrough: Configuring the Order Processor Role Center:
We could replace the WDTU Category assignments we just made using ActionGroups by defining Categories and assigning actions using Configuration. The result would look exactly the same to our users. However, instead, let's use Configuration to quickly restore the layout of the actions that were in Role Center Page 9006. We can run page 9006 to see what that layout is (or reference the earlier snapshot of the Page 9006 ribbon).
The following are a couple of important points:
- Configuration is tied to a specific Profile. Other Profiles using the same Role Center page do not see the same Configuration layout.
- Configuration can only be done by the Owner of a Profile. When we created our WDTU Test Profile, we did not assign an owner, so that will have to be done now.
- Profile setup can be accessed in the RTC in Departments | Administration | Application Setup | Role Tailored Client | Profiles. This can also be found by entering the word Profile in the RTC Search box. The Owner ID for a Profile can be updated there by an Administrator with sufficient Permissions.
A Role Center ribbon is configured by opening the Role Tailored Client in Configuration mode with the focus on the Profile we want to configure. Personalization doesn't require this step. This is done from the DOS Command prompt using a command line essentially similar to the following lines of code:
"C:Program Files (x86)Microsoft Dynamics NAV100
RoleTailored ClientMicrosoft.Dynamics.Nav.Client.exe"
 -configure -profile:"WDTU Test"
For additional information, refer to the Developer Help (in MSDN) How to: Open the Microsoft Dynamics NAV Windows Client in Configuration Mode.
Once the Role Center displays, click on the arrowhead to the right of the Microsoft Dynamics icon (1 in the following screenshot), then on Customize option (2 in the following screenshot), followed by the Customize Ribbon option (3 in the following screenshot):
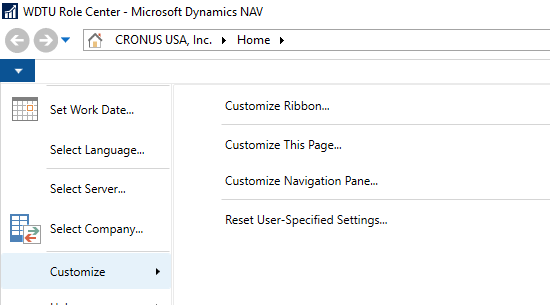
That will take us to the following screen:

As we can see, using the Customize Ribbon screen, we can Create Groups (referred to as Categories elsewhere), add new actions to those available on the ribbon, remove actions (that is, make them not visible), reorganize ribbon entries, even create new tabs, or rename existing items. In summary, everything that we've done so far to customize the Role Center Ribbon can be done through this screen. The big difference is that Customization in Personalization mode is specific to a single Profile, while the other modifications will apply to all profiles.
As part of our Personalizing, we might use the Create Tab, Move Up, and Move Down options to rearrange the actions on the ribbon, moving the WDTU actions to their own ribbon tab. When we are done configuring the ribbon for the WDTU Test Profile, the WDTU portion should look like the following screenshot:
