We’ve covered a lot of topics up to this point. Throughout the various chapters, you’ve looked at basic building techniques, like overlapping and stacking; you’ve looked at different types of LEGO elements and how best to use them; and you’ve looked at ideas, like scale and color. Now it’s time to put those skills to use. This chapter focuses on you, the builder, working toward designing the models you want to make. So, print out some Design Grids (see Appendix B), dump some bricks out onto your building table, and get to work!
The role of designer is one you take on the minute you step away from existing sets and instructions for building LEGO models. Whether you are working from a real life inspiration or creating something from your imagination—something that has never existed before—you are designing the model of what will be the final result. Part of the joy of LEGO elements is that they allow nearly limitless combinations and patterns. Therefore you, as the designer, have hardly any boundaries.
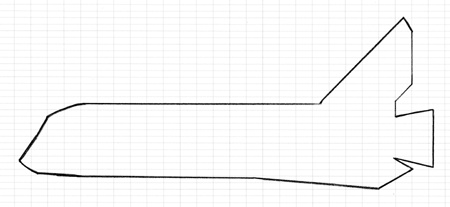
If you are like some people, you may find the sense of being in complete control overwhelming. Although your head may be full of ideas, it may seem daunting to try and figure out how to turn those ideas into actual models. You may end up with a sketchpad that looks like Figure 10-1.
Sometimes knowing what to leave out of your project makes as much difference as what you put in. That’s where this chapter comes in.
The term scope refers to the range of facets that your model is designed to encompass. In other words, scope seeks to help you answer these questions: “What is the purpose of this design?” and “How will I accomplish it?” It’s quite easy to sit down at your build table with bricks at the ready and announce, “I’m going to build the Empire State Building!” You can then decide that this model will be 20 feet tall, include hundreds of windows, and be made entirely from light gray bricks. Such a model is possible. But is it out of your league right now? Probably so. Most likely, you’ve given it a scope that is far too large for you to accomplish at this time.
So, let’s try again.
After you decide you want to build the Empire State Building, you look at your bricks and discover that you have a good number of dark gray, light gray, and white bricks. Why not use these colors to build your model? Perhaps changing colors at different layers of the building where the width or shape changes will help you make the shift look more natural. You also find that your supply of transparent bricks and/or windows is severely limited, so re-creating each window is out of scope and beyond your limits. Instead, you decide to use black bricks to simulate window openings. Lastly, you decide that a 2-or 3-foot-tall structure is probably more realistic than a 20-foot-tall one given the number of bricks in your collection.
You have just laid down a scope for your project that is much more feasible than your initial desires. Finding a suitable goal for building is not meant to be a limiting factor; rather, it’s a guide that can help you be more successful in your endeavor and ultimately more satisfied with the time and effort you put into building.
Part of limiting your scope involves knowing what to leave out. In the Empire State Building example, one thing you left out was height. You reduced it to something more realistic. Quite simply, the idea for the first model was too big for the average builder. Second, you substituted a part for a specific detail on the real building that would have been difficult to accomplish otherwise. This was your black-bricks-for-windows solution.
You also decided to mix some colors so you could still build a reasonably tall model that didn’t break the bank when it came to the number of bricks you needed in any single color. For most builders, the need to use more than one color (regardless of the actual color of the object being modeled) is a constant reality. As with size, though, your color limitations do not need to limit your creativity. Simply look at what you have and adjust your scope accordingly. For the Empire State Building example, the idea that your colors will include different grays, white, and black means that it might, in fact, be as visually interesting as if you had built it entirely in a single color. In this case, you might consider adding colors as a way to increase the scope, but it’s actually adding clarity to the goal and materials you need to accomplish your model.
Having a well-defined scope also helps you decide the level of detail that you want to include. Ask yourself a question like this: “Am I striving for a high degree of realism in this model?” If you’re doing a life-sized sculpture of a pet cat, then this is very possible. If you’re doing a 3-foot-tall Empire State Building, the answer is quite different. You are forced to drop certain details to build to the reduced height you have chosen. Intricate detailing above windows may have to go, and you may have to represent the feeling of where windows would be, not each and every window. In addition, you might have to settle for simplified doors and other street-level accoutrements.
Learning to build within these types of boundaries is not as restrictive as it might first sound. In fact, it’s an excellent way to improve your skills, hone your artistic eye, and maximize the enjoyment you get from your existing collection of LEGO bricks.
Let’s pick a subject for a model and follow it through from the first step to the last piece you need to complete it. Building with LEGO bricks is no at all fun if you don’t like the subject matter you’re working with. For that reason, be sure that you pick things to model that have some interest to you. Because you’re just beginning to design your own models, you may want to pick subjects that challenge you on different levels. Pick tall thin models (like the Empire State Building) to practice your column building techniques. Choose realistic buildings (like a minifig-scale restaurant) to work on building to an exact scale.
In order to illustrate as many of the design and building principles as possible, I’m going to have you try to create your own original model of the NASA Space Shuttle. The reason for picking this subject is that it should offer a good mix of shape, color, and construction challenges.
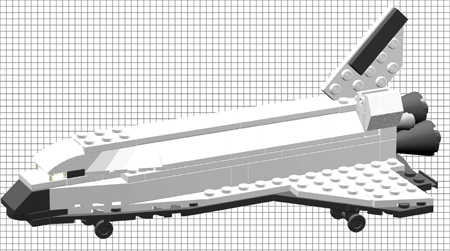
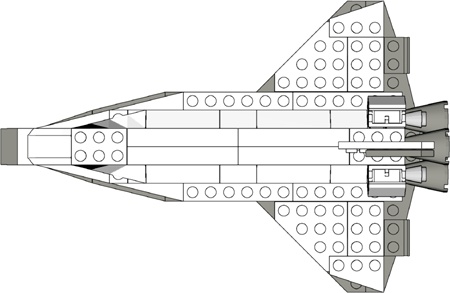
Because this is an original model, why not give it an original name? The name Triton is appropriate for two reasons. First, it is the name of a real ship that once sailed as part of the British Royal Navy. Second, it is still the name of the largest moon that circles the planet Neptune. This model, then, is a fictional version of a real ship. That’s okay because it adds some personal character to the original model. Figure 10-2 shows what Triton will look like when you’re done designing and building it.
While you’re at it, why not give this project a set number? Because it’s the first you’re building using the techniques in this book, how about calling it set #0001. (It’s not really necessary to give your models set numbers, but for the sake of this exercise, it adds a sense of authenticity.)
Of course, you won’t have a picture of a finished model to work from, but you can gather pictures to help inspire you. Photos from books, the Internet, or even ones you might have taken yourself can all help give you ideas to work with.
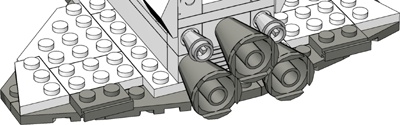
Where do you start when you want to build something like the shuttle? What section do you build first? You could start with the tail section, but if you did, how would you know if it is going to be the right size? You could begin constructing the cargo bay doors, but would you be able to easily attach them once the rest of the shuttle was done?
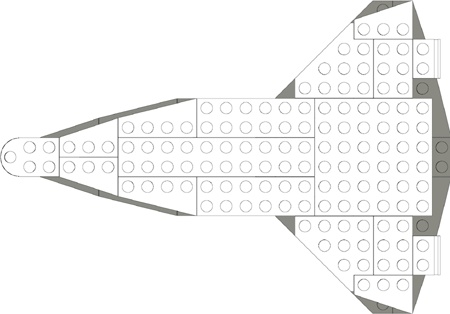
Rather than starting with either of those options, first look at what you’re trying to duplicate. The shuttle has many distinctive features, but one stands out above all of the others: its unique wing design (as you can see in the drawing I’ve made in Figure 10-3 using Design Grid #1).
Because the wings are effectively the bottom of the shuttle, they are an excellent place to start modeling. This answers the question of what section you are going to build first. You can then decide how to attach and accurately scale other parts of the ship to match the wings. This is not unlike creating the ground floor of a building first so you know how wide and tall the remaining floors should be.

I created the outline you see in Figure 10-3 using the following very simple steps:
I searched the Internet until I found a diagram that showed the shape of the shuttle wings from below.
I printed this image onto a sheet of plain paper.
I printed out a copy of Design Grid #1 from Appendix B. This is the grid that gives you a top-down look at a model, as though you were seeing it from above looking down at the studs.
Finally, I put the image from the Internet under the Design Grid and traced the outline of the wings. This gave me a very accurate reproduction of the shape and a blueprint to help me find LEGO pieces that could match that outline.
The shuttle wings are far from the basic rectangles that formed the shape of the Wright brothers’ flyer back at the beginning of the twentieth century. Therefore, to re-create their shape, you need parts that are more tapered. Wing plates and diamond-cut plates (see the Brickopedia, Appendix A, for sizes and shapes) should provide you with the geometric shapes you need.
Creating the wing using the Design Grid is just like putting together a jigsaw puzzle, except that instead of being given the pieces to assemble, you must find suitable pieces in your collection and get them to match the outline you’ve drawn on the grid.
You’ll notice that in Figure 10-4, I used wing plates to form the outer shape but then standard plates for the space between. You can literally set real pieces on top of your penciled-in design because the squares on the Design Grid are exactly one stud by one stud in size.
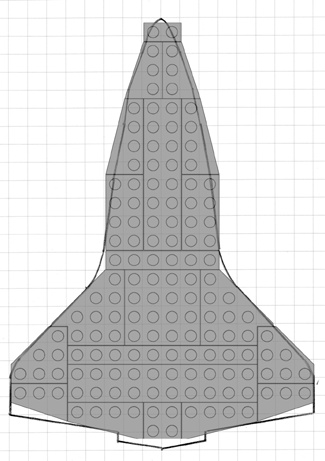
Figure 10-4. The LEGO elements are superimposed on a copy of the Design Grid with the outline of the wings drawn in.
Together these elements give you the foundation upon which to build the rest of the vehicle.
The size and quantity of these plates might vary if you are designing this model based on your own collection of parts. For instance, you might have to substitute standard plates in some cases where you don’t have the exact wing plates I used here. But the goal always remains the same: regardless of whether your shuttle is 10 studs long or 100 studs long, you still want to try and make it look like the real thing.
The idea illustrated earlier—finding one feature of an object upon which to base your model—is one that you can apply to nearly every creation you take from real life inspiration. It’s as simply as following these three steps:
Take a distinctive feature from the item being modeled. In the shuttle example, you are using the unique wing as your guide. For a model of a train engine, you might select the crew cab. For a spaceship, you might decide upon the engines as your starting place. In all cases, you want to find something interesting you can use as a guide.
Decide upon the types of elements that are best suited to represent that feature. In the shuttle example, you pick out wing plates that help you match the shape, drawn on the Design Grids, based on the real wings. You don’t pay much attention to size so much as you focus on duplicating the angles.
Build the rest of the model by incorporating other elements that work with those in step 2. As you finish the shuttle example, you’ll see that the choices for each of the other sections, including the bricks used to make them, are driven by the base you set down in step 2. The wings provide a fixed reference upon which you build, both literally and figuratively, the rest of the model.
These steps provide you with a basic wing design, but right away you need to make a structural decision. How will you hold all these pieces together? Perhaps the easiest way to solve this dilemma is to follow the guide provided by the actual shuttle.
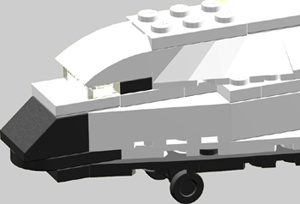
The portion of the wings you’ve created so far is most like the protective tiles that cover the underside of the ship. When you look at the real shuttle, you see that the upper layer of the wings is almost the same size and shape, but it is made from a different material than the tiles underneath. You can duplicate that look by adding a second layer of plates in a different color. As you can see in Figure 10-5, the second layer does not exactly match the shape of the first, but that’s all part of the design. By working to re-create the parts seen on the actual shuttle, you end up solving the problem of holding your first layer of plates together.
If the second layer of plates was configured exactly the same as the first layer, nothing would hold them together. By selecting different sizes and shapes of plates, you make sure that the individual parts are arranged to take the best advantage of the overlap technique.
So far, in this example, you’ve been using only Design Grid #1 from Appendix B. This grid looks down on a model from above, showing you only the tops of the bricks. It’s good for estimating the length and width of the model as well as its overall shape, however, it does not allow you to see the height. That’s why at this point, you want to begin using Design Grid #3 or #4 (Appendix B); they show a model from the side.
Each small rectangle on these grids represents a 1x1 plate as seen from the side. You can use this perspective to decide how many layers of bricks or plates you need to achieve your goal. You saw how you could apply this technique to planning a model back in Chapter 6 when you used the same grid to help plan the Empire State Building micro model. In that case, you used the portrait version (Design Grid #3) of the plate-view Design Grid. For the shuttle design work, you will use the landscape version (Design Grid #4) of the side-view grid. Because this sheet is longer than it is tall, it will accommodate a sketch of the shuttle as seen from the side.
Note
See Appendix B for more information on how best to use the Design Grids.
As you can see in Figure 10-6, by using the side-view grid paper, you can plan how tall the model will be (in this case, the body is roughly 3 bricks high) and also determine the location of key structures like the tail and engines.
As you draw your plan, don’t worry about making your sketch fit the lines on the Design Grids exactly. You will inevitably end up making compromises between what you draw and what you actually build. Rather than being a bad thing, compromise is often where the most inspired ideas come from. Sometimes not having what you think is the right piece leads you to using another piece (or pieces) that actually ends up providing a better solution.
Choosing a scale for any original model is one of the key decisions you’ll make. We’ve talked about scale a number of times already in this book, especially in Chapters Chapter 3, Chapter 5, and Chapter 6. In the case of your shuttle model, you’ve let the design of the wing, and how it matches available wing plates, set the scale for you. In other cases, you might decide to pick a scale in advance and build everything to that exact size. The train station we built in Chapter 3 is an example of that style of design. The point here is that, since this is an original model, you have complete control over the scale you chose. If you’re trying to match the size of another model for any reason, then you need to work to that scale. Otherwise, it’s whatever scale you feel is best for the particular project you’re working on.
Like scale selection, selecting colors for your models is entirely up to you. And like scale, you may also have specific reasons for choosing one set of colors over another, based on what feeling you want your model to project. Color can change the way that people react to or feel about a model. For instance, a sculpture of a dog made out of blue bricks might make people think of a cartoon character rather than a real pet. A building made out of mostly gray bricks might make the structure feel more like a warehouse or a factory than a comfortable home.
Apart from the way a single color can affect the impression the model makes, combinations of colors can also have a dramatic effect on how people react to your work. For example, a helicopter built from primarily white bricks with red accent pieces will probably make most people think of an air ambulance. If you use the exact same design except you build it from black or dark gray bricks, you might lead people to think it is a military or police vehicle.
It’s the fact that people have become accustomed to certain color combinations that makes them think of particular themes or settings. A model built of black and yellow bricks might give the feeling that it is somehow related to construction or industrial use because those are often colors used in those settings. Rides you find in amusement parks are often painted in bright primary colors like red, yellow, and blue. This gives them a feeling of fun that matches their purpose. The various color combinations go on and on. As you design your model, remember to look at the colors you are using to see if they represent the theme or the feeling you are trying to convey.
In the case of the shuttle model, you can let reality guide you. The real shuttle uses almost exclusively white and black pieces, reminiscent of the standard NASA color scheme for many of its rocket programs over the years. By sticking to the colors that people expect for the shuttle, you help add realism to your model despite its small size. As you can see in Figure 10-7, the black and white bricks create a dramatic contrast that brings out some of the main features on the ship.
There are certain ideas you need to keep in mind no matter what type of model you’re planning to build. Although art courses may go into greater detail, this text focuses on only four major concepts of design theory: shape, color, proportion, and repetition.
What shape will your model be? There is a reason a car isn’t shaped like a tree. Think about what form you are trying to create. For example, a plain flat wall can be boring. Don’t forget to include curves, angles, indents, and other interesting surfaces in your model.
- How shape relates to the shuttle model
In the case of the shuttle, you were trying to re-create the shape of the original ship (see Figure 10-8). This is one of your most important goals when you’re working from a real life inspiration. Try your best to find the pieces in your collection that most accurately represent the shapes you are copying from the real object. In Figure 10-8, you can see that I selected certain plates for the wings and slopes for the top of the body, since those helped the most to re-create the shapes I wanted.
Are you going to work with a couple of colors, or will you dig through your collection in order to use all the colors of the rainbow? Your choice of color can affect the overall impression the model makes, especially when combined with the shape(s) you have used.
- How color relates to the shuttle model
Once again, you are led by reality when you select colors for the shuttle model. Black, white, and shades of gray are the most appropriate (see Figure 10-9). However, if you want to have some fun, you can build the same model in different color schemes. Perhaps a black and yellow version could be a construction shuttle, destined for a space station. Or, a red and white version could be a rescue shuttle, standing by in case of an emergency.
Are the substructures of the model the right size for each other? In other words, are they all the same scale? For example, building the doors to the same scale as the windows makes a building look more realistic.
- How proportion relates to the shuttle model
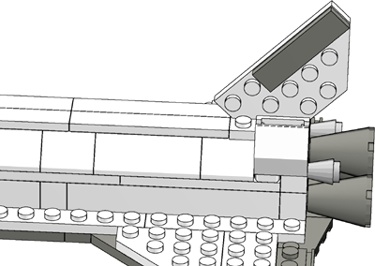
The real shuttle is a complex flying machine. To make it so your model emulates this, you need to retain the correct balance between the length of the body and the width of the wings. You have to make sure the tail (shown in Figure 10-10) is tall enough, but not too tall and not too thick. You need to design the wings so that they are strong enough to serve as the base of the model but still thin enough to look like they are able to fly.
Rows and rows of 2x4 bricks are boring. But a few rows of arches can be beautiful. Sometimes including the same shape over and over can add dimension to your model. Just be sure you select an interesting shape or LEGO element before you add too many to your creation.
- How repetition relates to the shuttle model
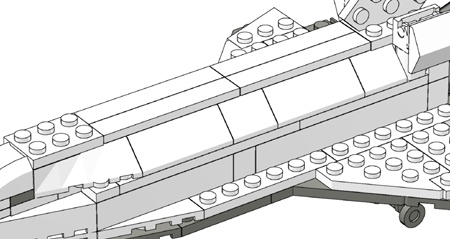
The shuttle model uses repetition to good effect by employing 1x6 tiles (shown in Figure 10-11) along the top of the cargo bay doors, giving at least the impression that they might open. In fact, the doors themselves, made from 45-degree slopes, are also an example of where repetition can help add authenticity to a model.