You definitely don't want to attempt to create a brochure in Fireworks, but you can take advantage of its excellent capabilities to format your on-screen text. Whether you're working with paragraphs or single lines of text, you have lots of options for applying fonts, styles, and interesting effects. In this chapter, you find out where to find the features you need to make your words look just the way you like them.
You can create text in either of two ways:
Select the Type tool, click in the image area, and begin typing.
Copy (or cut) text from another application, select the Type tool, and paste it on the artboard.
Tip
In a hurry? You can select text from one application and then click and drag it into the Fireworks workspace.
Text can create mood and feeling, so you have to make sure your message has the right font and style. You can apply text attributes by using one of two main methods: the Type menu or the Properties panel. In this chapter, you use the Properties panel (see Figure 4-1), because it provides an easier method of locating text attributes. If the Properties panel isn't visible at the bottom of the Fireworks workspace, choose Window

Whether you use the Type menu or Properties panel, you can set text attributes from the Properties panel either before or after you enter text.
Note
The same rule applies in Fireworks as in all other applications: You have to select it to affect it. Before you apply any attributes, use the Pointer or Text tool to select the text you want to format.
To set text attributes with the Properties panel, follow these steps:
Select the text you want to format.
Choose a font from the Font drop-down list and then choose a style from the Style drop-down list.
Tip
If you don't see your favorite font in bold, you can take advantage of the Bold button to create faux bold text. (It isn't the true bold font, but it's close). The same trick works with the Italic button.
To assign color, click the color selector box to the right of the Size drop-down list and then choose a color from the pop-up Swatches panel.
Unfortunately, the Fireworks text controls leave much to be desired, compared with the other Creative Suite applications. But if you want to fine-tune your text, you might consider adjusting the spacing between characters or lines.
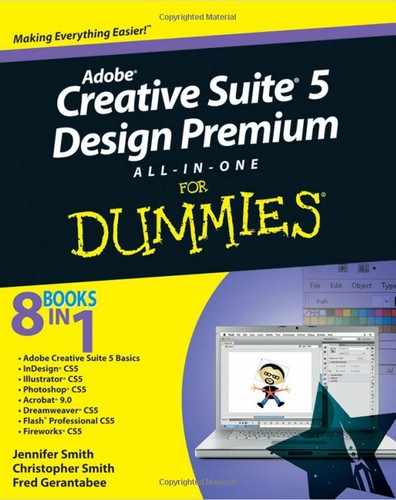
Sliders are available in the Properties panel for adjusting the kerning (spacing between two characters), tracking (spacing between multiple letters), and leading (spacing between lines of text). Select the text you want to format, adjust the slider as shown in Figure 4-2, and then click off the slider to confirm the change.
Note
Kerning and tracking are controlled using the same Kerning tool. To kern between two letters, insert the cursor between the two letters before making a change. To adjust tracking, select multiple letters before making a change.
To align selected text, click the Left, Center, Right, or Justified alignment button in the Properties panel.
You can also change the orientation of selected text by clicking the Set Text Orientation button (refer to Figure 4-2).
Spunk up your text by adding Live Effects from Photoshop. You can add drop shadows or 3D effects or even make your text look like wood!
To add effects to your text, follow these steps:
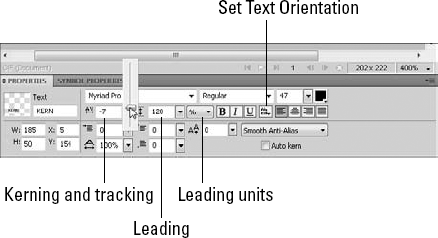
With the Pointer tool, select some text and then click the Add Filters button in the Properties panel, shown in Figure 4-3.
Select Photoshop Live Effects from the pop-up window that appears.
The Photoshop Live Effects dialog box appears (see Figure 4-4).
In the list on the left side of the dialog box, select the effect you want to apply.
Set the related options on the right side of the dialog box and click OK.
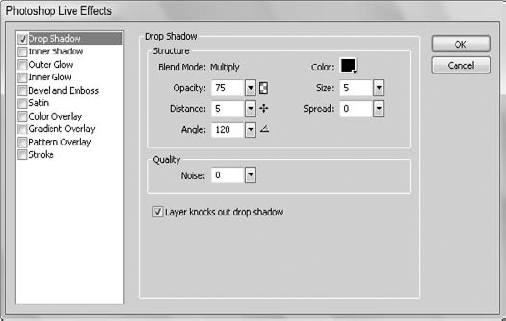
The effects are applied to your text, as shown in Figure 4-5.

Tip
Don't apply all these effects to your text at the same time. You've heard it before, but we have to say it again: Just because you can do something doesn't mean that you always should.
You can choose among an array of interesting default styles to apply to both objects and text. You can also create your own styles — an extremely helpful capability when text needs to be consistent throughout an entire Web site.
Styles are applied to the entire text area.
To apply an existing text style, follow these steps:
Create some text by typing, cutting, copying, and pasting or by dragging the text on the artboard.
Use the Pointer tool to select the text you want to affect.
Choose Window

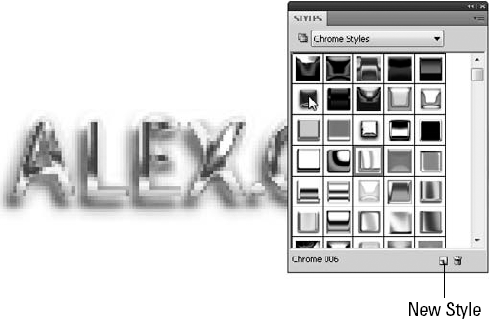
The Styles panel appears (see Figure 4-6).
From the drop-down list, choose a category of style that you want to apply.
In Figure 4-6, the Chrome Styles category was selected.
Click the style preview that you want to apply to your selected text.
Save yourself time by applying all the text attributes you need to make your text look just right.
To create a custom style, follow these steps:
Select some text and apply all the formatting and effects you want to use, following the procedures described earlier in this chapter.
Choose Window
From the Style Category drop-down list, choose a category for saving the style.
Click the New Style button in the lower right corner of the Styles panel (refer to Figure 4-6).
The New Style dialog box appears.
Type an appropriate name for the style in the Name text box.
Select the attributes you want to save and click OK.
You have a saved style that you can apply to selected text at any time.
Checking your spelling is simple, right? It certainly is simple in Fireworks, so you have no excuse for typographical errors.
To check the spelling of your text in Fireworks, follow these steps:
Choose Text
The Spelling Setup dialog box appears.
Choose the language that you want to use for the spelling check.
Set any other options you want to use and click OK.
Choose Text
The Check Spelling dialog box appears with the first questionable spelling highlighted.
Tip
If you want to add unique words in your document to the spell-checking dictionary, click the Add to Personal button in the upper right corner of the Check Spelling dialog box.
Add some excitement by attaching text to a path. In Figure 4-7, the text is attached to a curvy path, but you can just as easily create angled text or text that follows a circle.
Follow these steps to attach text to a path:
Select the text that you want to attach to the path.
Create a path with the Pen, Line, or Shape tool.
See Book III, Chapter 5 for additional details on creating a path using the Pen tool.
Using the Pointer tool, select the text area and then Shift-click the path.
Both the text and the path are selected.
Choose Text

Tip
If you want the text to run inside a shape, such as a circle, choose Text
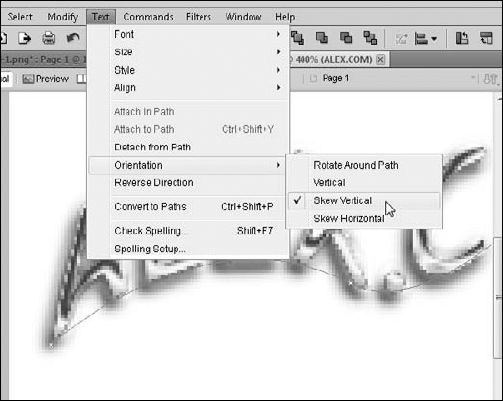
To change the orientation of the attached text on the path, choose Text
Creating interesting text with unique fonts can be fun. But what if you need to send the text to someone whose computer perhaps doesn't have your funky Giddyup font installed? No problem — Fireworks lets you outline text, which means essentially to turn it into a vector path.
Warning
The content of your text can't be edited after it's been outlined.
To outline your text, follow these steps:
Create some text with the attributes you want, including the font.
The size doesn't have to be exact, however; you can rescale even after outlining the text.
With the Pointer tool, select the text area.
Note
You can't outline individual letters or words within a text area.
Choose Text
The text is outlined.
To edit the new vector path, switch to the Subselection tool and click an individual letter, as shown in Figure 4-9.
Tip
You can ungroup your text by selecting it then choosing Modify