Adding text to a page
Choosing and editing fonts
Using the Property Inspector to style text
Understanding CSS
Creating an external style sheet
Adding text to a Web page requires more than just typing on the page. You must carefully plan your Web pages so that search engines (and viewers) can easily find relevant content on your Web site. In this chapter, you read about the fundamentals of text formatting for Web pages, from the basic principles of choosing a font size and font family to spell checking text and implementing Cascading Style Sheets (CSS).
Because you can assign type properties quickly and update several instances in a few easy steps with CSS, it's viewed as the most efficient and preferred method of applying text attributes on a Web page. When you create text for the body of your page, include keywords that provide descriptions of your site's content. This strategy makes your page more relevant to search engines and viewers.
Note
As a default, Dreamweaver formats all text on your page with CSS, which is the standard for formatting and styling text. In Dreamweaver CS3 and earlier, you still had the option to enable and use archaic <font> tags to format text if you so chose; this option has been removed from the CS5 preferences. Now you can format with font tags only by manually inserting <font> tags by choosing Insert
To add text to your Web page, simply click the page wherever you want the text to appear; an insertion point appears where you can start typing. You can add text right to the page, in a CSS layer, or in the cell of a table.
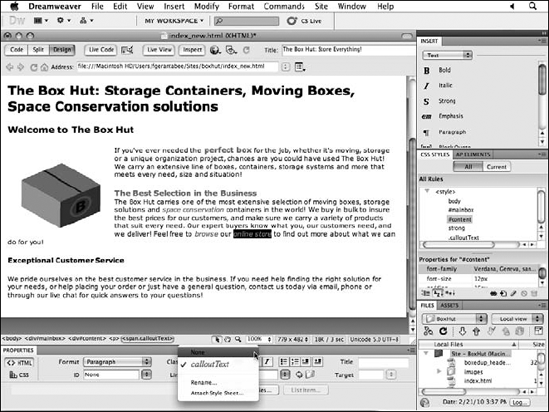
Formatting text in Dreamweaver can be as simple as formatting text in any word processing application or even applications such as Illustrator and InDesign. By using the Property inspector, you can easily apply basic font attributes, such as color, typeface, size, and alignment options. Clicking the Text category of the Insert panel gives you several different HTML text tags to apply to selected text (see Figure 5-1).

Most options in the Text category are apparent, but here's a breakdown of some text tags that may be unfamiliar to you. To use these tags, simply select the text that you want the tag to be applied to and then click the tag on the Insert panel. Here's a description of a few options on this panel:
Strong: Choosing this option bolds the selected text.
Emphasis: Choose this option to indicate emphasis; it looks like italic.
Tip
Dreamweaver favors the accessibility friendly
<strong>and<em>tags over<b>and<i>, though both bold and italicize text, respectively,<strong>and<em>, are used in almost all cases, even when you click the B and I buttons.h1/h2/h3: These heading tags create three heading levels; h1 is the largest.
UL (Unordered List): This setting creates a bulleted list from the selected text.
OL (Ordered List): Use this option to create an ordered (numbered) list from the selected text.
DL (Definition List): The definition list creates a structured, non-bulleted list best suited for term and definition style formatting.
Tip
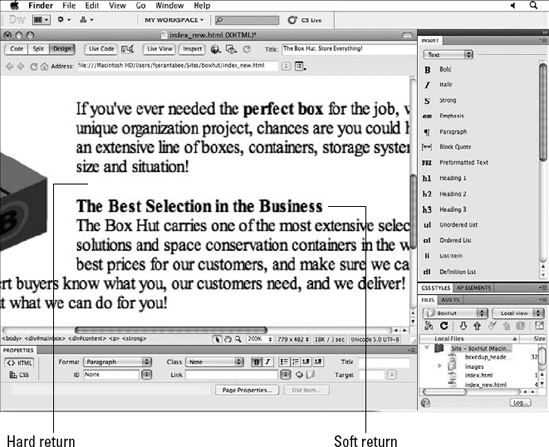
When you press the Enter or Return key, a <p> tag is created automatically in the HTML source code. This tag may create more space than you like between lines and create new list items. Pressing Shift+Enter (Windows) or Shift+Return (Mac) creates a <br> tag, which is essentially a line break or soft return. See Figure 5-2.
Use the Property inspector, shown in Figure 5-3, to apply HTML tags and build CSS classes to format text color, face, size, and other characteristics. The Property inspector is divided into two views: HTML and CSS. You can toggle them by using the buttons on the left side of the panel.

Here's what all the buttons on the Property inspector mean:
Format (HTML): Use the Format drop-down list to apply HTML tags that format an entire paragraph, including heading tags (Heading 1 through Heading 6) that are generally applied to headers and titles, the paragraph tag, and the preformatted text tag. You can easily fine-tune each of these tags' attributes (color, size, and font family, for example) later by using CSS.
Note that Heading 1 is the largest format size (on average, about equivalent to 24-point text), and Heading 6 is the smallest. It makes sense if you think about how these tags were originally used to create technical documents and outlines on the Internet, where text contained in Heading 1 should be treated as more important than text in Heading 2 or Heading 3.
The last choice in the Format drop-down list is Preformatted. Sometimes you want the browser to display text exactly the way you composed it — with indents, line breaks, and extra spaces. You can line up text this way if you choose Preformatted; it's not pretty, but for down-and-dirty lists and columns, it can work well.
ID (HTML): This setting applies a CSS ID style to an element. IDs are a specific type of CSS rule (or selector) that are used to store formatting information unique to a single item on the page (for instance, positioning information for a container).
Class (HTML): This drop-down list applies an existing class style to a selection on the page. Class styles can be created with the Property inspector (discussed later in this chapter) or directly from the CSS styles panel.
Link (HTML): Type a hyperlink (such as
http://www.wiley.com) or click the folder icon to browse and link to another page within your Web site. The selected text becomes linked (preview your page in a browser or enable Live View to see it work).Target (HTML): Choose where the linked target will appear. (Read about targets in Chapter 6 of this minibook.)
Bold (HTML/CSS): Bold selected text.
Italic (HTML/CSS): Italicize selected text.
Alignment (CSS): You can click the alignment buttons on the toolbar to apply left, center, and right alignment. To revert to the default left alignment, click the selected alignment button again.
Unordered List (HTML): Automatically insert bullets in front of listed items. As you advance in the use of Cascading Style Sheets, you can apply many more attributes to lists, including customizing the bullets.
Ordered List (HTML): Automatically numbers each additional line of text every time you press the Enter (Windows) or Return (Mac) key. To force the text to another line without adding automatic numbering, press Shift+Enter (Windows) or Shift+Return (Mac).
Text Outdent (HTML): Undo pressing the Indent with the Text Outdent button. This option removes the
<blockquote>tag that the Text Indent button creates.Text Indent (HTML): Use this option to indent text. Simply put the cursor in the paragraph of text that you want to indent and press the Text Indent button. A
<blockquote>tag is applied. You can apply this tag multiple times to a paragraph to indent it even further.Targeted Rule (CSS): Modify an existing CSS rule or create a new one. This drop-down list makes it clear whether you are creating a new rule or modifying an existing one in the Property inspector.
Edit Rule / CSS Panel buttons (CSS): For the rule shown in the Targeted Rule drop-down list, you can either edit the properties and values for that rule in the CSS Rule Definition dialog box or view it in the CSS Styles panel on the right, respectively.
Font (CSS): Use this drop-down list to select a font family. The font is the typeface you choose for displaying text. The lack of typeface selection isn't a restriction in Dreamweaver, but rather in Web design as a whole. Keep in mind that what font the viewer sees on your Web page is based on the availability of the fonts on that user's computer. For this reason, font sets are limited to basic system fonts that are installed on most every computer, regardless of operating system.
Tip
The viewer may not have fonts that you load in your font sets, so try to stick to such common typefaces as the ones already included in the existing Dreamweaver font sets.
Assigning and editing fonts
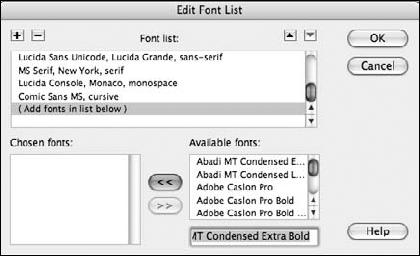
When a viewer opens a page referencing a font set, the text is displayed using the first available font in the font family. If the first font face on the list isn't available, the next font face is referenced, continuing down the list in the font family until a font in the font set is found on the viewer's computer. If you choose Edit Font List from the Font drop-down list, the Edit Font List dialog box appears (see the figure).
Click the existing font lists to see which fonts are included in each set. You can add new fonts to the sets by clicking the double arrow pointing from the Available Fonts panel into the Chosen Fonts panel. Delete a font from an existing font list by clicking the font in the Chosen Fonts panel and clicking the double arrow pointing toward the Available Fonts panel. You can even create an entirely new list yourself by clicking the plus sign (+) in the upper left corner of the Edit Font List dialog box.
Size (CSS): Using the Font Size drop-down list, you can apply a fixed font size from 9 to 36 (pixels) or enter a value by entering it directly. You can use the relative sizes shown (x-small and small, for example), which resize the font relatively larger or smaller according to the user's browser font size preferences. If you don't change the font size, it defaults to 12 pixels (px). By default, the unit of measurement is set to pixels, but you can use the neighboring drop-down list to set other units of measurement, including points, picas, ems, and more.
Warning
Keep in mind that the user can set browser preferences to override the size settings you've chosen.
Color (CSS): Assign a color to your selection by clicking the swatch icon and selecting a swatch from the panel that appears. Colors are represented in HTML and CSS by hexadecimal codes, 6-character codes that represent the RGB (Red, Green, Blue) values which form that color. This code is shown at the top of the Swatches panel whenever you select a color.

Using Cascading Style Sheets (CSS) is a standard method for styling text and other elements on Web pages. The powerful style sheet design tool allows you to assign properties to type and other page elements quickly and update all instances in a few easy steps. The reason for the name Cascading Style Sheets is because certain cascading rules apply when several styles (and style sheets) are used at the same time.
If you apply many different styles to a page, whether they're internally built on the page or linked to external style sheets, you may have conflicts. Conflicts occur when two (or more) styles assign different properties to the same element. For example, if you specify in an internal style sheet that any bolded element is blue but an external style sheet instructs the browser to display any bolded element as red, which style wins? The blue instruction from the internal style sheet wins. If conflicts occur in external style sheets, you can set the order of importance by using the up and down arrows. By default, the Web page's style sheet overrides the browser's default values.
Note
Style sheets are consistent across most modern browser versions, but some older browsers may not provide consistent (if any) support for CSS. Always preview pages in multiple browsers or use the Check Browser Compatibility button (located under the Check Browser Compatibility list on the Document toolbar) to test CSS properties you've used against a variety of browsers and versions.
We definitely offer the quick-and-dirty course on CSS, but if you're interested in finding out more, check out HTML, XHTML, and CSS All-in-One For Dummies by Andy Harris.
Tip
Dreamweaver CS5 uses Cascading Styles Sheets (CSS) exclusively to format text and no longer provides direct support for <font> tags. You can still add <font> tags if you absolutely need to by choosing Insert
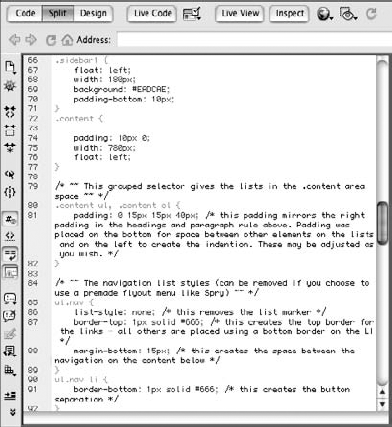
Dreamweaver offers CSS starter pages that have CSS layouts available and that include CSS hints visible only in Code view (see Figure 5-5). Find the CSS starter pages by choosing File
Using Cascading Style Sheets in Dreamweaver is extremely intuitive; simply create a blank HTML page, add and select some text, and begin styling your selection directly in the Property inspector CSS view by selecting properties for color, size, typeface, and more.
Assigning formatting to a selection opens the New CSS Rule Dialog box, allowing you to save choices you've made into a new CSS rule (or style). You can choose a name, selector type, and location for the new rule.
Several types of selectors determine which style properties should be applied and where. When Dreamweaver finds a selector, it applies the properties and values you've chosen. You make formatting choices once and reapply them repeatedly in a single click!
(You can find out how to take advantage of advanced properties for creating layouts in Chapter 8 of this minibook.)
Creating a tag (or an element) selector is a simple and safe route for new users to understand CSS because you can work with existing HTML tags, such as P, H1, and H2. Using existing element tags on your page, you can choose to apply automatic formatting wherever certain HTML tags are used. For instance, you can make anything inside a <strong> tag automatically italic, 20 pixels, and red.
To create a tag style with the Property inspector, follow these steps:
Open an HTML page that contains text.
On the Property inspector, click the HTML button on the left side of the panel to display the Property inspector in HTML view.
Select a line of text and bold it using the B button located in the Property inspector.
Switch to CSS view of the Property inspector by clicking the CSS button on the far left side of that panel.
The goal is to assign definitive style information to the tag that bolds text, so any bold text on the page also appears red.
Leave the bolded text selected, and in the Property Inspector select <New CSS Rule> from the Targeted Rule drop-down list.
With the text still selected, use the color selector on the right side of the Property inspector (located below the B and I buttons) to select a red color to apply to the selected, bold text.
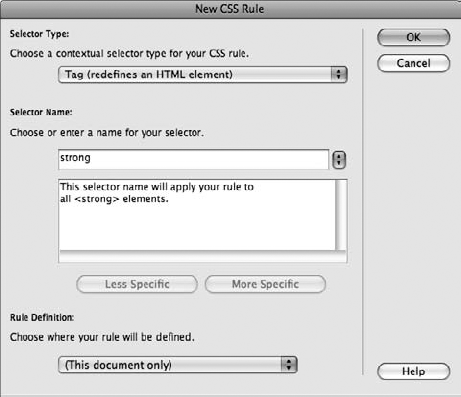
The New CSS Rule dialog box appears, as shown in Figure 5-6.
From the Selector Type drop-down list, choose Tag (Redefines an HTML Element); choose Strong from the Selector Name drop-down list; choose (This Document Only) from the Rule Definition drop-down list.
The selector type determines how the formatting will be applied to elements on the page. Tag styles change the appearance of any element formatted with a specific HTML tag.
Click OK to create the new tag style and close the panel.
Now, every time you apply the <strong> tag to make bold text (using the B button or other shortcuts), that bold text also appears red. You've created a tag style that determines how bold text appears any time it appears in a document.
Tip
You can further refine this new tag style by selecting any bold text and continuing to modify text properties from the Property inspector, as shown in Figure 5-7.
If you'd like to edit and fine-tune the rule you've created, you can click the Edit Rule button below the Targeted Rule drop-down list to open the CSS Rule Definition dialog box. This dialog box opens by default to the Type category, where you can modify type related properties. Some common type properties you'll see in this category are as follows:
Font family: Notice that you can apply a font family by using the Font drop-down list. This method is preferred for assigning a font family.
Font size: Enter a text size and then, with the Unit drop-down list to the right of the size, enter it in pixels, points, inches, centimeters, and other units of measurement. By specifying a size and unit of measurement here — 12 pixels, for example — you can ensure that the text appears as relatively the same size on both the Windows and Macintosh platforms.
Line height: By assigning a size in any unit, you can define the space between lines of text. For example, if the type size is 12, the line height of 24 pixels is essentially the same as double spacing. If you come from the typesetting or design world, it works much like leading.
Font decoration: Hmm, if you want it, get it here! Blinking isn't a good idea: It's just plain B-A-D and also not compatible on all browsers. Try to use underlines to make key text stand out, or use underlines to create a line underneath paragraph or page headers.
Tip
Don't like underlines under links? Create a tag style for the
<a>tag (this HTML tag is the one used to create a link) and select None in the Decoration drop-down list.Font-Weight: Make text lighter or heavier with this drop-down list. Just so you know, a value of 700 is the typical boldness of bold text; any heavier is bolder than bold.
Font-Variant: Use this drop-down list to choose small caps.
Tip
You may be wondering why Normal is a choice in the Style drop-down list. It's because you may have defined small caps, for example, as the variant for all instances of the
<strong>tag but then decided that on one page you want to override that attribute. By creating a style defined in the document only with Normal selected in variant, you can override the style (small caps) definition on the external style sheet.Font transform: Choose from Capitalize, Uppercase, Lowercase, or None.
Color: Assign a color to your selector by clicking the arrow in the lower right corner of the Color definition swatch or type a number in the Color text box.

When you're finished fine-tuning your tag style, click Apply at the bottom of the dialog box to see your changes. You can also click OK to apply your changes and exit the dialog box.
For more styling control over pages, you can create class selectors, which are named styles for body, text, headlines, subheads, and other elements. Unlike with tag selectors, you can choose just about any name for a class and apply its style selectively to items if and when you want.
If you choose properties that work on a variety of elements, you can get a lot of mileage from a single class style in many places throughout your page. Essentially, class styles are like creating your own character or paragraph styles, if you're familiar with that feature from common page-layout applications, such as InDesign.
This time, you can also make your new rule available to more than one page in your site by defining a new external style sheet. This method saves your rules in an external file that can be attached to several pages at a time.
Follow these steps to create a class style from the CSS Styles panel:
Locate the CSS panel, off to the right, and click the New CSS Rule button at the bottom or choose Format

The New CSS Rule dialog box appears (refer to Figure 5-6).
From the Selector Type drop-down list, choose Class (Can Apply to Any HTML Element).
In the Selector Name text box, enter a name for your new class.
You can enter any name you want, but make sure that it has no spaces and is descriptive of how you'll use it.
Reallycoolstyleis a bad name;headlinestyleis a better name. Dreamweaver inserts the period at the front of the style name because it's a necessary naming convention.From the Rule Definition drop-down list at the bottom, choose (New Stylesheet File).
Click OK.
The Save Style Sheet File As dialog box appears. Locate your site folder (or if you haven't defined a site, a folder where you'll keep all relevant information, such as image files and pages for your site).
Enter a name for the style sheet.
Enter an appropriate name, such as main.css or basic.css if it's the main set of styles you're creating for your Web site. (Dreamweaver will add the mandatory .
cssextension at the end of the filename.)Leave the URL as is and the Relative To drop-down list set to Document.
Click Save.
You've created a new .
cssfile, or an external stylesheet. The CSS Rule Definition dialog box appears.In this dialog box, you can create the set of attributes that you want included in the CSS definition for the style you're creating. As you might notice, this dialog box is the same one you work with when you edit an existing CSS style (see the previous section). The difference with the tag and class styles lies only in the fact that you must apply a class style to an element using the Property inspector (via the Class or Style drop-down lists).
Apply a font, size, style, line height (leading), and any other attributes that you couldn't apply to text using straight HTML coding.
After you select attributes for your class style, click OK to close the dialog box and return to your page.
Now you can apply the CSS class style to some text. When applying a class style, you can choose to apply it to only some text or to an entire paragraph of text. Follow these steps to apply a class style to an entire paragraph:
Place the cursor in a paragraph of text or click and drag to select a line of text.
If the Property inspector isn't visible, choose Window
From the Class drop-down list in the Property inspector, select a new style, as shown in Figure 5-8.
The new style is applied to the selection.