Getting started with CSS pages
Modifying layouts
Positioning content with the AP Div tool
Using behaviors with DIV tags
Creating a page layout sometimes requires more precision than tables or standard HTML tags are capable of. More designers are moving to the flexible and preferred method of Cascading Style Sheets (CSS) positioning to create innovative layouts without boundaries. Dreamweaver provides you with an extensive gallery of CSS-based layouts to get started, or you can build your own using the Insert panel's Layout tools, including the Insert DIV and AP Div objects.
Dreamweaver provides you with a library of sample pages with CSS-based layouts as an alternative to starting from scratch. These CSS sample pages feature useful and common layout ideas, and because they're created with CSS positioning, they're highly flexible. You can modify them directly from the CSS Styles panel or the Property inspector. Just add your content and go!
Follow these steps to create a new document from a CSS sample page:
Choose File

The New Document panel appears.
Choose Blank Page from the left, select a layout from the Layout column on the right (for example, the 2 Column Liquid, Left Sidebar, Header and Footer layout), and click Create.
A new, untitled page opens, based on the layout you chose.
Choose File
Replace the placeholder text in each column with your own content.
A CSS layout, as its name indicates, is controlled completely by style sheet rules, so you can modify the look and feel of the page directly from the CSS Styles panel and the Property inspector. Each column, box, and space on your new page is positioned and sized using CSS rules and properties, all of which you can adjust from either the Property inspector (on the CSS Styles panel) or the CSS Rule Definition panel.
You can modify the layout by following these steps:
If the CSS Styles panel isn't already open, choose Window
Select the All tab to display the style sheet and its rules.
The internal style sheet is shown as
<style>at the top. Click the arrow to its left to expand it and show all the rules it contains. Note: Layouts using an attached (external) style sheet display the style sheet name (such asstyles.css) instead of the<style>tag.Select the
bodyrule.This tag-based style controls the general formatting of the entire page (everything inside the
<body>tag).Click the field next to the background rule to edit it; rather than keep the #4E5869 (medium gray) setting, type a hexadecimal color (such as #CC0000 for red) to change the page's background color.
Click the swatch next to the color rule to open the Swatches panel; pick a new default type color for the text on your page.
At the top of the CSS Styles panel, select another style (for example, the .
twoColElstHdr #containerstyle) to view its properties.The .
twoColHybLtHdr #containerID style controls the size and appearance of the main layout container on the page.In the Property inspector, edit the properties to change the appearance of the style.
For example, you can change the width of the rule by entering a new number in the Width Rule text box. If you enter 95%, for example, you make the entire layout wider.
Each column and section that comprises your layout is controlled by one of the ID styles listed in the CSS Styles panel. Most every ID style features a width property you can use to change the size of different areas on the page.
Continue to modify different styles listed in the CSS Styles panel and see how they affect different elements on your page. Try changing the type color, font family, and other properties, such as padding and background color.
Tip
To figure out exactly which ID controls which column or section, click within the page area and look at the tag selector at the bottom of the Document window. The last <div> tag at the end of the chain shows you which container you're in and its corresponding ID in the CSS Styles panel (for example, <div#mainBox>).
Dreamweaver uses CSS-positioned virtual containers, or boxes, created by the DIV tag to freely position content on a page. The DIV tag is a basic tag used to create areas for content on your page. You can create DIV tags from several places in Dreamweaver, including the Layout section of the Insert panel. Each DIV tag can have a unique ID style assigned to it to control its position, appearance, and size. The process of placing content often requires two steps: creating the DIV tag and then creating its corresponding style.
Dreamweaver makes this task easy with the AP Div tool, which enables you to draw boxes freely on the page and place content inside.
Note
AP Div is short for a bsolute-positioned DIV; an item with an absolute position is fixed at a specific location on the page. When you draw an AP Div, its position is commonly set using the top and left CSS properties, with the top-left corner of the page as its reference point.
Note
If you have used much earlier versions of Dreamweaver, you may remember Dreamweaver layers. The AP Div object replaced the Layer object as of version CS3, and the AP Elements panel now replaces the Layers panel.
CSS treats every element on a page as a box that holds content; this approach is referred to as the CSS Box model. Although CSS can consider a box to be most any containing element on a page (such as a table or a list), DIV tags are most commonly used to create virtual boxes that you can use to position text, images, and even other boxes.
Each box can have its own width, height, position (via the top and left properties), border, margins, and padding; each one is set using CSS rules.
To create AP Divs, follow these steps:
On the Insert panel, select the Layout category.
Select the Draw AP Div tool.
The cursor appears as a cross hair when you move it back over the page.
Click anywhere on the page and drag to draw a new AP Div, as shown at the top in Figure 8-1; release the mouse button.
Move the mouse pointer over the edge of the box until it changes to a hand; click once and handles appear on all sides (refer to the bottom of Figure 8-1).
Click and drag any of these handles to resize the box vertically or horizontally.
To move the box, click and drag it by the tab that sits on its top-left edge and place the box where you want it on the page.
Take a look at the Property inspector, and you see the name as well as many DIV properties listed.
If the CSS Styles panel isn't open, choose Window
You see a new
#apDiv1ID style that's attached to the new AP Div you created. For each new DIV created, Dreamweaver assignsapDivwith a corresponding number in order of creation.Click inside the new box to type, paste, or insert new content.

When you draw an AP Div on the page, two things occur: Dreamweaver inserts a tag to create the box and creates an ID selector that stores the DIV's position, width, height, and other properties. After you create an AP Div, you can type, paste, or insert content directly inside it. You can also assign a class rule to any DIV from the Property inspector — most often for handling content formatting, leaving the ID selector to control positioning and dimensions.
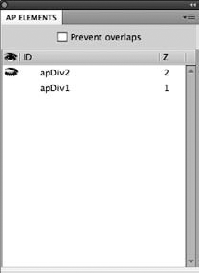
Each AP Div you draw is listed automatically in the AP Elements panel (choose Window
Tip
The AP Elements panel is often grouped with the CSS Styles panel, just in case you're looking for it.
To modify a box (AP Div), follow these steps:
Choose Window
In the panel (refer to Figure 8-2), locate and select
apDiv2to highlight it on the page.The Property inspector displays its size and position in addition to other properties.
Using the text boxes in the Property inspector, change the box width by entering a number into the W field and change the box height by entering a number in the H field.
Click the swatch next to Bg Color and choose a color from the pop-up Swatches panel to set a background color for the box.
For additional properties, such as border or padding, add them in the CSS Styles panel.
If the CSS Styles panel isn't already visible, open it by choosing Window
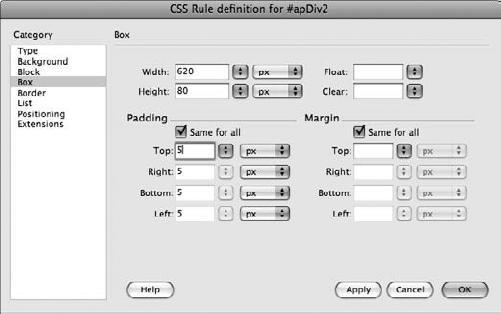
Double-click the
#apDiv2 IDstyle that controls the box.The CSS Rule Definition dialog box appears, as shown in Figure 8-3.
Select the Border category from the left to change the border.
In the Style column, use the Top drop-down list to set a border style (such as Solid) to all four sides.
Use the Top drop-down list under the Width category to select a border thickness (for example, medium) for all four sides. Use the topmost Color Picker under the Color column to assign a border color to all four sides.
Tip
To assign different values to any or all sides for style, width, or color, deselect the Same for All check box under their respective columns.
In the Box category on the left, under Padding, set the padding for all four sides of the box to the thickness you want (for example, enter 5 px in the text boxes).
Click OK to exit the panel and apply the changes.
You see how the CSS properties you applied affect the
apDiv2box on the page.
Tip
To hide a box shown under the AP Elements panel, click the column to the left of its name (under the Eye icon) until a closed Eye icon appears. To make the box reappear, click the Eye icon until the box opens again.
Tip
You may notice the Prevent Overlaps check box, deselected by default, at the top of the AP Elements panel. Because AP Divs can easily overlap each other, selecting this check box overrides that behavior by forcing boxes next to each other and preventing the creation of new boxes on top of each other.
The precision and to-the-pixel positioning of AP Divs can be quite liberating for designers, especially those who like the flexibility of print-based layouts. However, on certain occasions, you may want boxes to flow inline with other content on the page. AP Divs literally float above other elements, so shifting other page content has no effect on their position.
For more traditional inline behavior, you can create DIVs that use relative positioning, which allows an element to be shifted along with content surrounding it, making for a more liquid layout. This type of positioning is important for nested content or any situation where items should fall in line with other page content. For this task, use the Insert Div Tag tool, which can be found within the Insert panel's Common and Layout categories.
Follow these steps to create a relatively positioned DIV:
Click within your page to position the cursor within an existing AP Div and then click the Insert Div Tag tool under the Insert panel's Common and Layout categories.
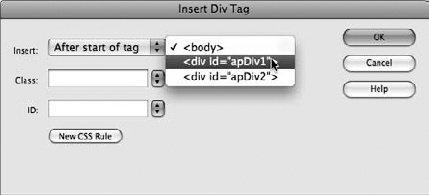
When the Insert Div Tag dialog box appears, fine-tune the location of your new DIV by selecting a location from the Insert drop-down list, shown in Figure 8-4.
(For example, choose After Start of Tag to place it within an existing DIV tag in your page.)
Tip
You can also use the Insert Div Tag dialog box's drop-down list to place the DIV before, after, or inside existing elements on the page. Leave the Insert drop-down list set to At Insertion Point to leave the box where you drew it or choose another location where you want the DIV created.
If you have an existing class selector you want to apply, choose it from the Class drop-down list; otherwise, leave it blank.
Assign an ID selector to the DIV to control its appearance by selecting from the ID drop-down list.
If one isn't available, enter a new name and click the New CSS Rule button to create one.
When the New CSS Rule dialog box appears, be sure that your new selector is set to ID and that the name has a pound sign (#) in front of it. Click OK.
When the CSS Rule Definition dialog box appears, click and select Positioning from the Category list on the left to view CSS positioning properties.
In the Positioning area, select Relative from the Position menu, enter a width and height value in the Width and Height text boxes, and then click OK.
Click OK to close the Insert Div Tag dialog box.
A new, relatively positioned DIV appears with placeholder text, as shown in Figure 8-5.

To add cool effects and serious interactivity, you can use the built-in Dreamweaver behaviors, a collection of ready-to-use scripts that you can apply to boxes, form elements, text, and images on a page. Used with boxes (AP Divs), behaviors can enhance them with special effects or mouse interaction (such as clicks and rollovers) to make the page more exciting.
The Behaviors panel features a whole new set of effects, such as Fade/Appear, Shrink, Highlight, Slide, and more — all of which you can apply to the AP Divs you create.
You can add behaviors by following these steps:
Choose Window
Select a box by using the AP Elements panel or select a box directly on the stage.
In the Behaviors panel, click the plus sign.
The menu of available behaviors appears.
From the menu, choose the behavior you want to apply.
For example, to apply a fade effect, choose Effects
The Appear/Fade dialog box opens.
Make sure the effect is set to Fade and select the Toggle Effect check box to make sure the box reappears when it's clicked a second time. Then click OK.
The behavior is added to the list. The phrase onClick to its left indicates that this action occurs when the box is clicked.
Choose File
To see the effect in action, preview the page in a browser.
Choose File

When you test the page, clicking the box makes it disappear or reappear — lots of fun for you and highly interactive for users!
Warning
If your browser is restricting the Web page from running scripts or ActiveX controls, click the message at the top of the browser window and select Allow Blocked Content to properly test the new behaviors.
Note
When effects behaviors are used, Dreamweaver needs to copy to your local site several files that make the effects possible.