Discovering Acrobat and PDF files
Understanding when to use PDF files
Becoming familiar with the Acrobat workspace and tools
Adobe Acrobat 9 provides a variety of tools for sharing and reviewing documents. Adobe Creative Suite applications can create Portable Document Format (PDF) files, and you can also use Acrobat to create PDF files from programs that aren't part of the Creative Suite. After you create a PDF file, you can use Acrobat to enhance the files by adding interactivity, merging PDF documents, adding comments or annotations, or applying security that restricts features, such as printing or editing.
In this chapter, you find out why you may want to create PDF files and acquaint yourself with the Adobe Acrobat tools and workspace. You see how easy it is to navigate through PDF files with the navigational tools, tabs, and viewing options in Acrobat. In the following chapters of this minibook, you explore how to use Acrobat to create PDF files from documents produced in a variety of programs and discover ways to enhance your PDF files with Acrobat.
Adobe Acrobat is used to create, review, and modify PDF files. You can use PDF as a way to share documents created with the Adobe Creative Suite. Because PDF is a common file format, you can use it to share Creative Suite files for review, approval, or final publication. When you use a program in the Creative Suite, such as Illustrator or InDesign, to create a document, others would need the same software to open or edit the files. By converting your documents to PDF, they can easily be shared with others who might not have the same software as you because PDF files can be viewed by users on virtually all types of computers and operating systems.
PDF provides a common file format for viewing files, regardless of what software program was used to create them. Additionally, Acrobat provides extensive tools for reviewing, commenting, and marking files so that you can easily collaborate on a project without modifying the original document, along with tools to make PDF files interactive, merge related documents together, and secure files to restrict viewing or editing.
Because the software to view PDF files is free, you can be assured that those receiving your files don't need to purchase any special software. In fact, the odds are quite good that most users already have some type of free PDF viewing software, such as Adobe Reader.
PDF has become a popular way to share files because it provides a true reproduction of an original document. PDF is used by the Internal Revenue Service to distribute tax forms online. Many financial services firms and insurance companies use PDF because the electronic documents can be secured, and they accurately represent documents that have been approved for distribution. Graphic artists even use PDF files to send books, like the one you're reading now, to the printing plant.
Although PDF files provide a high-quality representation of an original file, they're more than just a picture of a document. PDF files retain the high-quality appearance of text while keeping the text searchable. Logos and illustrations created with Adobe Illustrator retain a high-quality appearance when converted to PDF, and intricate details from bitmap images, such as those edited with Adobe Photoshop, can also be maintained. PDF files allow you to distribute a high-fidelity electronic document. When creating a PDF file, you can choose settings that make the file suitable for high-quality printing or make the file smaller and more suitable for posting to a Web site or sharing as an e-mail attachment.
Although Acrobat is part of the Creative Suite, it's not a design tool — rather, it's a tool for distributing documents created in other software programs and enhancing these documents for online distribution. You generally don't use Acrobat to build new documents. Acrobat is a medium for sharing files, not for creating them. With Acrobat, you can
Share documents with users who don't have the same software or fonts that you use.
Review and mark PDF files that others send you. With Adobe Acrobat, you can enable a PDF file to be reviewed by users with the free Adobe Reader software.
Combine documents created in other programs. You can use Acrobat to merge PDF files together into one document, even files that may have been originally created in different programs.
Create a PDF portfolio. You can combine various file formats into a single PDF package and yet retain the files in their original file formats.
Edit Adobe PDF files to make minor changes to text or graphics.
Apply security to PDF files when you don't want them changed or you want to restrict viewing to certain individuals.
Add interactivity to PDF files by enhancing them with sounds, movies, animations, and buttons.
Create interactive forms to collect information electronically, avoiding the need for manual data collection.
We cover these capabilities throughout the rest of this minibook.
So when does it make sense to use Adobe PDF files? Here are some examples:
When you want to review a document quickly and efficiently: When documents need to be reviewed or approved, Acrobat really shines. The reviewers don't need to have the Creative Suite software — or whatever you used to create the document. They only need a program to view PDF files, such as the free Adobe Reader or the Apple Preview application. Recipients can then use commenting, markup, and annotation tools to add suggestions and edits to a file. You can even combine comments from multiple reviewers into a single document and manage the review process online or via e-mail.
When you've created a document that you don't want others to edit: Your recipients may have the same software you used to build the document, but you can keep them from editing the original file by distributing it as a PDF file. Whether you want to secure a spreadsheet from editing or an InDesign document from modification, Acrobat includes security options that allow you to protect your original content.
When you've created a presentation that includes files from different programs: By converting the documents to PDF, you can combine them into a single file. For example, you can merge PowerPoint, Excel, and InDesign files into a single PDF document. Whether you need to protect your brand and identity by keeping documents from being edited or simply want to ease the process of sharing files, PDF makes it easy to share your ideas.
When you have a sensitive document: If you have a document containing information that you don't want unauthorized persons viewing or you don't want printed, you can enhance the file with security with the Adobe Acrobat security tools. With the security options, you can require users to enter a password to view the file, or you can limit other features, such as the ability to print or edit the document.
To take advantage of all that Acrobat has to offer, you'll want to discover the workspace and tools so you can get around within a PDF file. Acrobat opens with a blank workspace, and most tools and capabilities aren't available until you open a document. You can open a document by clicking the folder icon in the upper-left corner of the Document window or choosing File
When you open a document, you see the Acrobat workspace, which is divided into three areas. The largest portion of the workspace is the Document window, which displays the document you have opened. Across the top, the tools are stored in the toolbar well. Along the left side of the window, you find the navigation panels that help you find your way through the document. When you open a PDF document with Acrobat, you can use the toolbars and buttons in the toolbar well to navigate a file and you can use the navigation panel to move through a PDF file. For example, a PDF file may contain multiple pages. You can use the navigational buttons or the Pages panel to move between pages and then use a tool to manipulate the file, such as the commenting tools.
In the toolbar, you find useful information for navigating through your document, including
Current page and total pages: To move to a specific page, click in the area showing the current page, type a different page number, and press Enter (Windows) or Return (Mac).
Previous Page and Next Page buttons: Use these navigational buttons to skip forward or backward one page at a time.
Sometimes you want to see the entire page of a document; other times, you may only need to read the text or examine a small portion of a page. Acrobat provides several preset viewing options to help you with this, and you can also customize the magnification to zoom in on the page.
If things are a bit too small for you to see clearly, increase the magnification used for viewing pages with the Zoom drop-down list in the toolbar. Preset magnification choices are available in this drop-down list. You can also use the minus (–) and plus (+) symbols to the left of the current magnification level to zoom out or in.
The Marquee Zoom tool is the magnifying glass icon located to the left of the minus and plus symbols. You can use the Marquee Zoom tool to identify specific portions of a page that you want to magnify. Select this tool and then click and drag around a portion of the page to increase the magnification. You can also click multiple times on an area with this tool to increase the page magnification, but clicking and dragging a box with the Marquee Zoom tool is generally a much faster way to focus on a portion of a page you want to view. You can change the Marquee Zoom from its default attribute of increasing the magnification to decreasing the zoom by selecting the Marquee Zoom tool and Ctrl-clicking (Windows) or Option-clicking (Mac) in the Document window. The magnifier's plus (+) sign changes to a minus sign (–) to indicate that you're decreasing the document's magnification. It's usually faster to choose a preset zoom percentage though.
To the right of the magnification percentage box are page buttons that you can use to change the page magnification:
Scrolling Pages: Use this button to avoid scrolling from left to right when reading a document. The view is changed to fit the document's width in the available space on your display, making it necessary to only scroll up and down on a page. This also sets the page view to display the top or bottom of adjacent pages. When you scroll and reach the bottom of one page, the top of the next page becomes visible.
One Full Page: Use this button to fit the current page within the available screen space on your monitor. For smaller documents, such as a business card, the magnification is increased. For larger documents, the magnification is generally decreased unless you have a large monitor. When viewing pages in the Fit Page mode, only one page is displayed at a time. This mode is good for viewing the entire display of a page layout.
The toolbars in Acrobat 9 are customizable, so you can display different toolbars or change the location of existing toolbars to meet your needs.
Customizing the location of toolbars on your screen can make it easier for you to work with PDF files in Acrobat. For example, you may want all the tools for navigating through your documents in one section of the toolbar well. To achieve this, you can rearrange the location of specific toolbars.
Along the left edge of every group of tools is a dotted double line. By clicking and holding onto this edge with your mouse, you can drag any toolbar to a new location on your screen. This new location can be within the same area holding the other toolbars, or anywhere in the Acrobat work area. If you pull a toolbar out of the docking area, the toolbar becomes independent and floating. You can reposition or drag floating toolbars back into the docking area when you're finished working with them. You can also close a floating toolbar by clicking its Close Window button. You can place toolbars along the left or right side of the Acrobat work area — turning either side of the Acrobat workspace into a docking area for toolbars.
Tip
Although the flexibility of placing toolbars anywhere you like is useful, it may lead to a chaotic work environment. Instead of leaving toolbars all over your screen, you can have Acrobat clean up the workspace by choosing View
Toolbars contain both tools and buttons. For example, you choose the Marquee Zoom tool to change the magnification by clicking or selecting an area of the page. Buttons perform an immediate task, such as printing, saving, or applying security to a PDF document. In general, most of the task buttons are on the top row of the docking area, immediately below the menu bar, and most of the tools are on the bottom row — but you can move these toolbars.
Tip
Some tools and task buttons also include additional options that you can access through drop-down lists within the toolbars. Tools and buttons that contain additional choices are noted by the small triangle immediately to the right of the icon. Click this small triangle, and you see a drop-down list providing the additional choices for that tool or button.
Less than half the toolbars are visible in the default Acrobat display. You can add to the tools that are displayed or limit them by clicking the check box next to those you want to display or hide in the More Tools dialog box. Toolbars that have a check mark next to their names are visible, whereas those without a check mark aren't visible.
To display additional tools, choose View
Tip
You can choose to show or hide additional toolbars by right-clicking (Windows) or Control-clicking (Mac) in the toolbar well. After right-clicking/Control-clicking, choose the toolbar you want to show or hide from the contextual menu that appears.
Acrobat provides several viewing modes that control how the document's displayed. For example, you can choose to display the pages of a book or a magazine side-by-side, or view only one page at a time. You can choose which viewing mode is used by choosing View
The viewing modes are
Single Page: This mode displays only the current document page on-screen and doesn't show any adjoining pages. When you scroll to the top or bottom of the current page, other pages aren't visible at the same time as the current page.
Single Page Continuous: With this mode, you can see the current document page, and if you scroll to the top (or bottom) of the current page, the adjoining page is also visible. If you reduce your page viewing magnification, many document pages are visible.
Two-Up (previously known as Facing): Use this mode to see pages as a spread, where you can view both the left and right sides of adjoining pages at the same time. When you have documents with pictures or text that spans a pair of pages, use this option to see the pages presented side-by-side in Acrobat. As with the Single Page mode, other pages that go before or fall after the spread aren't visible — only the one pair of pages is visible on-screen, regardless of the magnification or scrolling.
Two-Up Continuous (previously known as Continuous-Facing): If you have a document with many pages containing text or pictures on their adjoining pages, you can use this mode to scroll from one pair of visible pages to the next. When the Two-Up Continuous view is selected, you can see adjoining page spreads. This option is identical to the Two-Up option, but it also shows pages above or below the spread you're presently viewing.
If you have pages where images or text goes across pages, the Two-Up choice is useful. By default, the pages generally display incorrectly. For example, a magazine will display the cover (page 1) and page 2 together, instead of pages 2 and 3. To correct this, choose View
Tip
You can add viewing modes as menu buttons by choosing View
Acrobat has two additional options for changing your document display:
Full Screen mode (View

When using the Full Screen mode, you can select Edit
Tip
You can set a document to automatically open in Full Screen mode by choosing File
Reading mode (View
Acrobat offers a variety of panels that are helpful when navigating through PDF documents. The navigation panels are displayed along the left side of your Document window as small icons. Click an icon to make its panel visible. For example, click the Pages icon to display thumbnail-size representations of each page, as shown in Figure 1-1.
In the Pages panel, click a thumbnail page to display that page in the Document window. You can also choose View
Many panels have more advanced uses that are covered in later chapters of this minibook. In this chapter, we provide you with a brief understanding of how you can use the Pages panel to more easily navigate through a PDF document. Follow these steps:
Make sure that the Pages panel is visible by clicking its panel icon.
In the Pages panel, click any page thumbnail to navigate directly to that page.
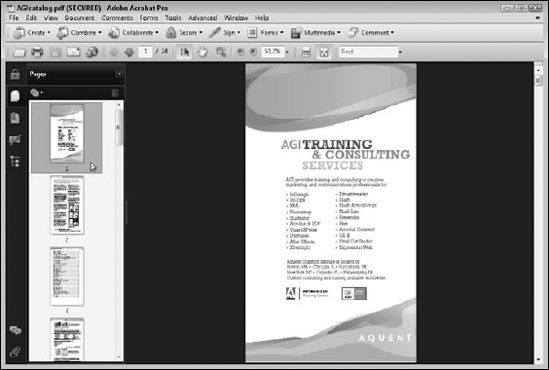
A dark border appears around the selected page and a red box in the Pages panel indicates what portion of the page is being viewed.
You can click in the corner of the small red box and drag diagonally upward to increase the magnification on the section of the page contained within the box. Alternatively, make the box larger by clicking and dragging down and out to expand the size of the viewing area. Changing the size of the red box displayed on the page in the Pages panel changes the focus of the magnification.