Creating, saving, and opening documents
Getting familiar with the workspace and tools
Creating and saving workspaces
Introducing Flash Player 10
Understanding layers
Importing and exporting files
Understanding the publishing process
Welcome to the world of Flash, one of today's hottest applications for creating eye-catching motion graphics featuring sound, video, and visual effects. In this minibook, you explore the whole process, from basic graphics creation and animation to complex effects and user interaction.
Flash can create full Web sites, complex games, and highly functional, rich Internet applications. One or more of the sites you visit each day is likely to use Flash.
You can start creating a new, blank Flash document and set up your workspace in one of two ways:
From the start page, choose Flash File (ActionScript 3.0) under the Create New column.
Choose File

Your new document is created and the workspace appears. Before you get to work, specify some important settings, such as width and height, for your file by using the Document Properties dialog box.
To open the Document Properties dialog box, choose Modify
Frame Rate: Because Flash files behave like movies, the frame rate is an important setting that affects the performance and playback speed of your movie. The default setting of 24 frames per second (fps) should work well.
Dimensions: The width and height you specify determine the size of your stage and in turn, the visible area of your finished movie. For now, leave the default setting of 550 pixels wide by 400 pixels high.
Background Color: Click the swatch to pick a background color for your stage from the Web-safe color palette. This setting also determines the background color of any Web pages created by Flash when you publish your movie to the Web.
Ruler Units: Select from this drop-down list the unit of measurement used for all measurement values in your document, including document size, width and height values, and ruler increments when rules are visible in the workspace.
When you're done fine-tuning your document's properties, click OK.
On the Flash workspace, shown in Figure 1-1, you create your Flash movies. The most prominent item you'll notice is at the top of your screen: The stage is where the action happens — where you draw, build, or import graphics, create text, and construct layouts.
The gray area surrounding the stage is the pasteboard. Items placed on it aren't visible in your finished movie because they're outside the bounds of the stage. However, it helps to think of this area as backstage — where text, artwork, and images can make their entrances or exits or be placed until they're ready to appear in your movie.
What CS5 application would be complete without a fancy toolbar? Flash has a comprehensive set of tools for just about any drawing task you need to wrap your hands around. Table 1-1 gives you a rundown and description of the tools you'll find. The Tools panel has been redesigned to make your work area flow more smoothly. A double arrow at the top lets you toggle between expanded and icon views to maximize your work area.
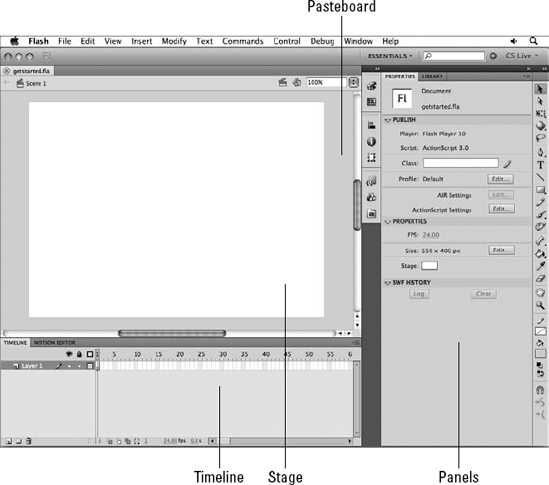
Table 1-1. The Tools Panel
Button | Tool Name/Keyboard Command | What You Can Do with It |
|---|---|---|
Selection (V) | Select and move objects on the stage and work area | |
Subselection (A) | Select and move specific points on a path or a shape | |
Free Transform (Q) | Change an object's dimensions, rotation, or proportions | |
Gradient Transform (F) | Change the size, intensity, and direction of a gradient fill | |
3D Rotation (W) | Translate 2D artwork into the 3D plane and rotate it around an x, y, and z axis | |
3D Translation (G) | Click and drag artwork along the x, y, or z axis to illustrate depth and distance | |
Lasso (L) | Create freehand selections around one or more points | |
Pen (P) | Create accurate, point-by-point straight and curved paths | |
Add Anchor Point (=) | Add anchor points along an existing path | |
Delete Anchor Point (-) | Remove anchor points from an existing path | |
Convert Anchor Point (C) | Change the curve orientation of an existing point | |
Text (T) | Create text on the stage | |
Line (N) | Draw straight lines | |
Shape Tools (R, O) | Create rectangular, oval, or multisided shapes on the stage | |
Primitive Tools (R, O) | Create rounded rectangles and multiradiused ovals that can be modified | |
Pencil (Y) | Draw freehand paths | |
Brush (B) | Draw broad, freehand fill areas | |
Spray Brush (B) | Create a spattered, airbrush-like painting with symbols from the library | |
Deco (U) | Create animated or non-animated flower-and-leaf style fills or symmetrical artwork with symbols | |
Bone (M) | Join shapes or symbols with virtual "bones" for creating posable inverse kinematics (IK) objects | |
Bind (M) | Edit connections between objects created using the Bone tool | |
Paint Bucket (K) | Apply or modify the fill color of an area | |
Ink Bottle (S) | Apply or modify the stroke color and style of a shape or path | |
Eyedropper (I) | Sample the color property from an object | |
Eraser (E) | Erase parts of a fill or path | |
Hand (H) | Reposition the stage and work area within the workspace | |
Zoom (Z) | Zoom in or out of a selected area of the stage |
Below the stage sits the Timeline, where you bring your artwork to life through animation. The Timeline is composed of frames, each one representing a point in time moving from left to right. The Timeline is further broken out into layers; new documents automatically contain one new layer labeled Layer 1. Each layer on the Timeline is composed of frames that span horizontally from left to right, each one representing a point in time, just like frames in a movie reel (see Figure 1-2).
The Motion Editor lets you see and modify all properties of an animation in a graph-style format. All properties that can be animated are displayed in rows, each of which contains a value line that can be manipulated to change the behavior of a selected tween. You can also add complex forces, such as gravity and inertia, and even add to or subtract from your tween without using the Timeline or stage.

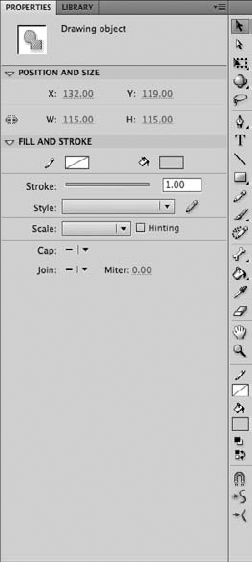
Sitting at the right side of your workspace, the Property inspector lets you get (and set) attributes, such as height and width, for a selected item on the stage or work area (see Figure 1-3). The contextual Property Inspector displays adjustable options for any item you select on the stage, such as width and height for a selected shape or fill and stroke color. When you don't have any objects on the stage selected, the Property inspector will display global document properties such as frame rate.
Tip
To modify a document's properties, such as frame rate and dimensions, at any time, either use the Property inspector when no items on the stage are selected or choose Modify
The numerous panels included in Flash give you total control over most aspects of your movie, from creating and managing colors to exploring the structure of your project and adding code to frames.
The default (Essentials) workspace launches with the Property inspector and Library panel in full view, as well as a minimized group of eight panels that include
Color
Swatches
Align
Info
Transform
Code Snippets
Components
Motion Presets
Get familiar with panel behaviors and features so that you can manage their appearance and make organizing your workspace a snap.
The panel group sits on the right side of the workspace and features multiple grouped panels. Panels can be added to or removed from the panel group on the right.
You can't freely reposition the panel group in the workspace. However, you can resize or collapse it to icon view with the double arrows found in its upper-right corner.
You can remove and float panels from the panel group. Simply click and drag a panel away from the group by its title tab. To add a panel to the group, drag it into the panel group on the right.
You can position each panel individually anywhere in the workspace by dragging it by its title tab. You can find additional appearance options under each panel's menu, accessible from the icon in its upper-right corner (see Figure 1-4). This panel menu also provides another way of reaching that panel's primary tasks.

To group panels, simply drag one on top of the other; after they're grouped, you can move and minimize several panels as one unit. This technique is handy for keeping commonly used or related panels together.
You can save panel groups and panel positions as part of custom workspaces. (See the later section "Creating and Saving Workspaces.")
Tip
Panels can always be toggled on or off from the Window menu. If you don't see a panel you need or have accidentally closed one, look for it on the Window menu. Many panels have shortcut keys; if you use a panel often, use its shortcut key combination for easy access.
One of the most useful additions in recent versions of Flash is its ability to save your workspaces, or the appearance and layout of workspace items such as the toolbar, Timeline, Property inspector, and panels.
Saving workspaces is essential if you're sharing a computer workstation with other people and want to recall your favorite panels and setup instantly. However, a workspace can also be useful for maintaining different views for different projects, even if you're the only person working on your computer.
To create and save your workspace layout, follow these steps:
Open and position any panels you want to make available, including the Tools panel, Timeline, Motion Editor, and Property inspector.
You can toggle panels on or off from the Window menu.
Choose Window
Enter a new name for your workspace and click OK.
Tip
To recall a workspace, choose Window
You can view all saved workspaces at any time by choosing Window
Tip
You can't modify, delete, or rename default workspaces, such as Default, Classic, and Designer.
Always save a document after you make significant changes or additions to it, and always save (though it isn't necessary) a new document immediately after you create it. To save a document, choose File
To open an existing document, choose File
You may need at some point to save a copy of your document under a new name, to either create an alternative version or perhaps make it compatible with an older version of Flash. Flash CS5 can save .fla files in CS4 format to make it compatible with the previous version of Flash.
Note
Flash CS4 can't open .xfl or Flash CS5–format .fla files. To share a file with someone using Flash CS4, choose File
To save a copy of your document under a new name, choose File
If you used previous versions of Flash, you probably noticed that Flash CS5 features a new file format: .xfl. Thus new, uncompressed file format results in a project folder containing a number of .xml files and any original assets (such as images and audio files) that you may have imported into your project's library. Because of this open file format, resources in your project can be exchanged with and opened in other applications. The XFL file format opens up the possibility of Flash files eventually being editable in other applications.
The traditional FLA file format combines all your project's vital information and resource files into a single file, making it more portable but less likely to exchange with other applications. You don't have direct access to assets you've imported into your project; for most purposes, however, the standard FLA file format is suitable, especially if Flash CS5 Professional is your sole editor for Flash applications.
Warning
Saving a document in an older version of Flash may make some newer features unavailable. Avoid saving files in an older file format unless you absolutely need to make them available to an older version of Flash.
Flash Player is at the heart of Flash technology. The player, which you can find as a plug-in to Web browsers or as a standalone application, runs and plays completed Flash movies, known as SWF (ShockWave Flash) files.
Beyond simple playback, Flash Player is also responsible for deciphering and carrying out instructions written in ActionScript, the powerful, built-in Flash scripting language. ActionScript, discussed in Chapter 7 in this minibook, gives your Flash movies many more capabilities, including playback control, real-time user interaction, and complex effects.
Users must have Flash Player installed in order to view movies. If you don't have it installed, you can get the free download from the Adobe Web site at www.adobe.com. Fortunately, the Flash Player is installed on over 90 percent of Internet-enabled PCs on average worldwide.
If you've worked with other programs that use layers (such as Photoshop or Illustrator), the concept is much the same as using layers to arrange and stack artwork in these applications. If you're new to layers, think of them as clear pieces of film stacked on top of each other. Each layer can contain its own artwork and animations.
In Flash, you use layers to stack artwork and animations on the stage, allowing them to exist together visually but to be edited or moved independently from one another. You can reorder layers to position artwork in front of or behind artwork on other layers.
To delete a layer, follow these steps:
In the Timeline window below the stage, select the layer you want to delete.
Hold down the Shift key to select multiple layers. You can then click the Trash icon to delete all selected layers at one time.

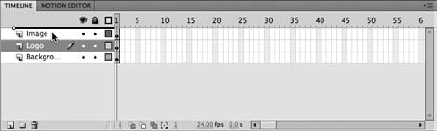
The beauty of working with layers is that you can easily change the stacking order and appearance of artwork and animations distributed across those layers. To reorder layers, simply select a layer by clicking its label on the Timeline and then click and drag the layer up or down in the stacking order and release it to its new position (see Figure 1-5). Layers at the top of the list appear in front of other objects in lower layers; in contrast, layers at the bottom of the list appear below or behind items on higher layers.
Two additional aspects of managing layers include toggling a layer and its contents to be visible or invisible and locking layers to prevent their contents from being accidentally moved or modified.
Locking layers ensures that you don't accidentally move or delete the artwork it contains. Make a habit of locking layers whenever you aren't working with them.
Note
Layer visibility affects only what you see inside the authoring environment and has no effect on the finished SWF file. Layers whose visibility is toggled off in your document still appear when published. You can, however, override this behavior in your document's publish settings, discussed in Chapter 9 of this minibook.
Sometimes you need to use assets — such as artwork or photo files created in Adobe Photoshop or Illustrator, MP3 sound files, and even video files — that weren't created in Flash. Here are some of the file formats you can import into your Flash movie:
Images: EPS, GIF, JPEG, PNG, TIFF
Flash SWF
Layered artwork files: AI (Adobe Illustrator) and PSD (Photoshop)
Audio files: AIFF, MP3, and WAV
Video files: DV, F4V, FLV, MOV, MPEG, QuickTime
You can import these types of files directly to the stage for immediate use or to your document's library (see Chapter 3 of this minibook) for storage until you're ready to place them on the stage.
Follow these steps to import files to the stage:
Choose File
Select from your hard drive the file or files you want to import.
Imported items are placed on the stage on the selected layer and frame.
Follow these steps to import files directly to the library:
Choose File
Select the files from your hard drive that you want to import and click the Open button.
Imported files don't appear on the stage but are available in the Library panel for later use.
Tip
To select multiple files for import, hold down the Shift key when prompted to select files from your hard drive. You can bring several files to the stage or library in one step.
In contrast to the Import menu, the Export menu is used to generate files from your current document out of Flash, most often to create a compressed SWF file (movie) for final delivery. Additionally, the menu can be used to generate static (such as JPEG or GIF) images from specific frames in your movie.
The final step in preparing your movie to be posted on the Web, distributed on CD-ROM, or used as a desktop application is the publishing process, which includes these important tasks:
For Web publishing: Export the final SWF file that's playable by Flash Player and create all additional files (such as Web pages) necessary to display your movie.
For desktop publishing: Create an AIR application that's viewable in the AIR runtime.
For the desktop or a CD/DVD-ROM: Create self-contained
.appor.exefiles.
The File menu's publish settings and options handle the setup and publication of your movie so that you can show the world your new creation.
Flash can create all these file types at publish-time:
HTML: To display movies on the Web, you need to contain them within a Web page or HTML file. Flash takes care of creating this page for you.
JPG, GIF, or PNG: You can create static images from the first frame of your Flash movie in these Web-friendly image formats. These are useful for a number of purposes, including previews or stand-ins when the Flash plug-in is not available.
Projector: If you want to distribute your movie as a standalone file, you can create a Mac or PC compatible projector that includes Flash Player. Projectors are good in situations where you want to distribute a movie offline and not require your users to download the Flash player.
SWF: This is the most common format in which you'll publish your Flash movies. SWF files are playable in the Flash player/plug-in, and are compressed, ready-to-view versions of your original file.
Chapter 9 of this minibook explores publishing in more detail.