Getting ready to publish
Picking a publish format
Previewing your work
Publishing for Web delivery
Choosing settings for your movie
Publishing Adobe AIR applications for the desktop
Creating custom publish profiles
To show your creations to the world, publish the final movie with the Publish command. Before publishing, you can use the Publish Settings option to specify important settings for your final movie, including quality and version settings as well as your choice of file formats. Different options let you publish for the Web, CD-ROM, and even mobile phones. We cover all these options in this chapter.
The .fla or .xfl files you use to build your movie are intended only for the Flash authoring environment. When you're ready to deliver a final product, create a final .swf (compressed movie) file that Flash Player can display in a Web browser.
Flash Player is responsible for displaying your movie in Web pages and mobile phones and on CD-ROM (when packaged as a projector). Adobe AIR (Adobe Integrated Runtime) provides an environment where movies can be run as desktop applications.
The Publish command, activated when you choose File
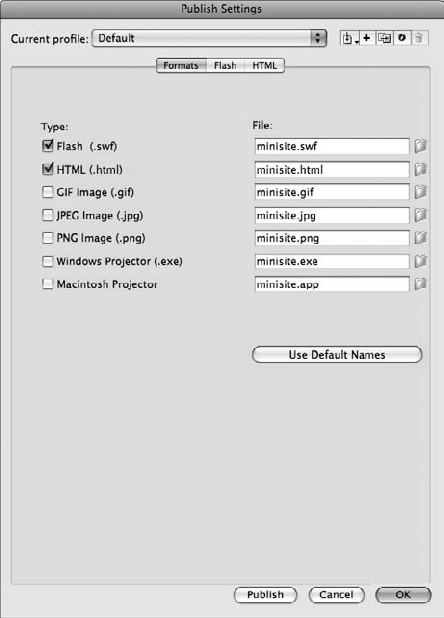
Before publishing your final movie, use the Publish Settings dialog box to tell Flash exactly which files you want to generate and which settings to use for each file type. You can specify settings for every file format you choose as well as quality settings for sounds and images used in your movie. The file types you choose depend on your movie's final destination, whether it's the Web, your desktop, a CD-ROM, a mobile device, or a standalone, kiosk-style presentation.
Depending on where and how you plan to distribute your movie, you can have Flash create a variety of different formats at publish time. Although the most common deployment for Flash is a SWF file and a companion HTML (HyperText Markup Language) file for the Web, it can generate files that can be used for CD-ROMs and mobile phones as well.
To choose file formats, choose File
Take a look at the different file formats you can publish and where they're used:
Flash (
.swf): SWF is the most common file type you publish; it's the one Flash Player and its plug-in use. Think about Flash Player as a movie projector and the SWF file as a movie reel you load on it. When publishing for the Web, this file type is the one to choose, most often accompanied by an HTML (Web) page that contains it.HTML (
.html): An HTML file, or a Web page, is used as a container for your Flash movie when the target venue is the Web. HTML files also provide an extra level of abilities, such as checking for the Flash plug-in or enabling additional runtime parameters, such as looping.GIF Image (
.gif), JPEG Image (.jpg), and PNG Image (.png): These selections create static images from your movie in the Web-friendly GIF, JPEG, and PNG formats (depending on which check boxes you selected). You can use these images as placeholders (in case the user doesn't have Flash Player or its plug-in) or as elements you can use if you're creating a non-Flash version of your site.Windows Projector (
.exe) or Macintosh Projector: A projector is a package that includes your movie and Flash Player all in one. Projectors are commonly used for delivery on non-Web formats, such as CD-ROM, but you can use them for any situation where you want standalone distribution, such as over e-mail or an intranet. Because the projector contains Flash Player, a user doesn't need to install a program to view your movie. Projectors are created as EXE files for Windows or APP files for the Mac. If you're delivering to users on both platforms, publish a projector for each one.
Warning
A projector can't be viewed in a Web browser, so it isn't a viable choice if you're trying to work around requiring users to have Flash Player or its plug-in.
Before you publish, always use Publish Preview to test the settings you created in the Publish Settings dialog box. Like the Test Movie command, Publish Preview can immediately create and display a SWF file in Flash Player for immediate viewing, but that's where the similarity ends.
Publish Preview creates a preview for any file formats you choose in the Publish Settings dialog box, including Web pages, images, and projectors. The preview lets you see how these files will look before you complete your final publish task and gives you a chance to adjust your publish settings for the best results possible.
To preview any selected publish formats, choose File
Publish Preview shows how the final movie will look in an HTML page. To preview an HTML and an embedded SWF file, choose File
Tip
Press the Publish Preview shortcut key combination Ctrl+F12 (Windows) or
Note
If HTML or SWF aren't among your selected publish formats, the Publish Preview defaults to the next format you selected after choosing Publish Settings
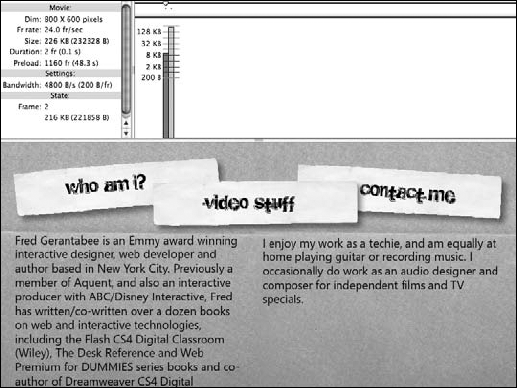
When previewing a movie with either the Test Movie or Publish Preview (Flash option only) command, you can use the Bandwidth Profiler. This graph, shown in Figure 9-2, appears at the top of the preview window and shows the total file size of your movie, as well as where and how data is loaded as the movie plays. This step can be important in gauging whether the file size may be too much to users to download or whether you should distribute data-intensive items (such as sound files or images) more effectively across the Timeline.
The bars across the graph appear at frames where data is loaded, and the height of the bar indicates how much data was loaded when the playhead reached that frame.
To view your movie with the Bandwidth Profiler, choose File
If your movie's final destination is the Web, select the two necessary file formats in the Publish Settings dialog box: Select the HTML (.html) and Flash (.swf) check boxes. The HTML file (or Web page) acts as a container for your SWF file, displaying it in the browser and placing it against a matching background. This HTML file also contains code that sets additional options in your movie at runtime (such as instructions to loop automatically).
Playback of the actual SWF file is handled by Flash Player, which works as a plug-in for all major Web browsers.
When you publish your final movie and HTML file, you upload both files to your Web-hosting account or company server or wherever your movie needs to go to make it available for public viewing.
To publish the necessary files for the Web viewing, choose File
Uploading your files to the Web with FTP
File Transfer Protocol (FTP) is the method used to connect and transfer files between your local computer and a remote Web server and is the most common way of posting finished files to the Web for the public to see.
FTP connections occur between your computer and a server that opens the connection to receive the files. Servers often are maintained by a hosting company that provides you with an account and a space for your Web site files. You may also be posting your work to a network machine or a dedicated server maintained by your company. Flash doesn't have FTP capabilities, but there are many FTP clients available that you can install on your computer vary in price and features.
Adobe Dreamweaver CS5 includes full FTP functionality and can create and store connections to several different servers or hosting accounts. If you want a more basic (and free) option, you can connect to a Web server via FTP directly from Windows Explorer or choose the Go
Remember: To connect to a server, you need to purchase or have access to a Web-hosting account, network computer, or dedicated server. Most FTP connections require a user ID and password; check with your server administrator or hosting company to find information for your specific account.
Flash's ability to include full-featured video, audio, and graphics has made it quite a popular choice for creating CD-ROM based presentations, e-brochures, learning materials, and interactive application installers. When packaging for a CD-ROM, consider that a SWF file alone may not be enough, especially because users might not have a standalone version of Flash Player installed on their computers.
For this reason, you can package movies for CD-ROM as projectors. (See the section "Selecting Your Formats," earlier in this chapter, for more on projectors.)
To create standalone projectors for Windows or Mac, select the Windows Projector (.exe) or Macintosh Projector check boxes on the Formats tab of the Publish Settings dialog box. Projectors are created when you publish, along with other formats you've chosen. These projectors can then be copied to and distributed on a CD or a DVD.
After you pick the file types you want to publish, you can specify settings for each selected format in the Publish Settings dialog box. Take time to familiarize yourself with the available options and experiment with different settings until your finished movie is just right.
Tip
Flash stores publish settings as part of your document, so you need to set them only once for each Flash movie. Be sure to save your movie after you choose your publish settings so that your settings are available the next time you open the document.
SWF files are compressed movies used by Flash Player for display on the Web or directly on a user's computer. When you choose to publish a SWF file, you have the opportunity to specify settings that determine version, security, and quality.
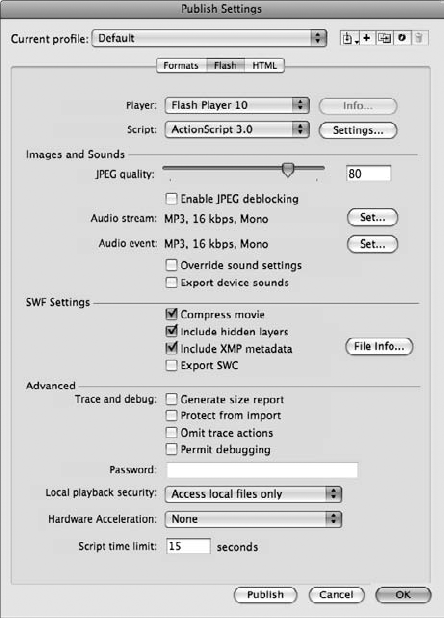
Flash settings are available on the Flash tab in the Publish Settings dialog box (see Figure 9-3). (First make sure that you select the Flash [.swf] check box on the Formats tab.)
The following list takes a look at some of the settings you'll work with and how each one affects the performance and quality of your Flash movie:
Player: This drop-down list controls which version of Flash Player your movie is created for. In most cases, you want to select the latest version, Flash Player 10, so that you can take advantage of the player's latest features. In some cases, you may need to publish your movie to be compatible with a previous version of Flash Player; here, you can specify versions as far back as Flash Player 1. You can also publish your movies for Adobe AIR, as well as Flash Lite, a version of Flash player developed for mobile devices.
Script: What you choose in this drop-down list is completely dependent on which version of ActionScript (if any) you're working with. Because each version contains differences in both features and structure (particularly between ActionScript 3.0 and previous versions), publish in the version you've used throughout your movie. If your movie doesn't use any ActionScript, leave the default setting for the Flash Player version you choose.
Chapter 7 of this minibook discusses ActionScript and the differences between Versions 2.0 and 3.0.
JPEG Quality: Flash performs a certain amount of compression on bitmap graphics in your movie (such as imported photos) to reduce file size and increase performance. Use this slider to determine the amount of compression applied and, in turn, the resulting file size and quality of your movie. The higher the quality, the less compression applied and the larger the resulting file size.
Audio Stream and Audio Event: If your movie includes sound, you can set its quality in your final SWF file by clicking the Set button beside either Audio Streams or Audio Events. By default, sound is converted to 16 kbps, Mono and MP3 format, but you can change both compression and quality settings as needed. Keep in mind that, like the JPEG quality settings, higher-quality settings for sound likely increases the overall file size of your movie.
Chapter 5 of this minibook discusses stream and event sounds.
SWF Settings area: In previous versions of Flash, hidden layers were published by default to your final movie. This behavior can be toggled off by selecting the Include Hidden Layers check box to ensure that layers that are turned off in your FLA file don't show in the resulting SWF file.
The Compress Movie check box, which is selected by default, compresses your SWF file to reduce the file size and, in turn, the download time. Leave this check box selected, especially if your file is ActionScript or text intensive.
Tip
Because the Include Hidden Layers check box is selected by default, any layers that are turned off on the Timeline appear in your final movie. Be sure to deselect this option if you want to ensure that hidden content isn't included.
Advanced area: The Flash authoring software can't open or decompile SWF files for editing, but it can import them as frame-by-frame movies into a FLA document. This strategy opens the door for artwork and graphic resources to be extracted, perhaps against your will. Selecting the Protect from Import check box prevents SWF files from being imported into the Flash authoring environment. The Password text box below the check boxes becomes active when the Protect from Import check box is selected so that you can assign a password to allow only certain parties (a colleague or client, for example) to import the SWF file if they need to.
For presenting Flash movies on the Web, you'll need to publish an HTML file that contains your SWF file. This HTML file not only displays your movie but also includes all code necessary to control dimensions, appearance, and runtime options (such as telling your movie to loop). The HTML file features the same background color as your movie so that it matches seamlessly when viewed in a browser.
Select the HTML (.html) check box in the Formats tab of the Publish Settings dialog box and then click the HTML tab. On the HTML tab, you can choose from the following options for your published HTML file:
Template: This setting generates an HTML file based on different possible environments, such as standard browsers, Pocket PCs, or additional options for full-screen support.
Note
For any selected template, an
AC_RunActiveContent.jsfile is created. Copy this file to your Web server with any other generated files. This file is a workaround for recent changes to Internet Explorer's handling of active content.Detect Flash Player Version check box: This option adds code in your HTML file to display alternative content if the user doesn't have Flash Player installed. You can customize this content in any HTML editor. The default content provides a link for the user to download and install the latest version of Flash Player.
Dimensions: The code in your HTML file specifies a size for your Flash movie, which, by default, matches your movie's dimensions. You can override this setting and force your movie to a different size in either pixels or percentage by typing values in the Width and Height text boxes.
Playback: Check boxes in this area set runtime options for your Flash movie. By default, Flash Player is directed to loop movies and to make the contextual menu available to the user. You can disable either of these features, force the movie to pause at the start, or use device fonts (fonts from the user's machine instead of embedded fonts).
Quality: Control the overall display quality of your movie by selecting a Low, Medium, or High quality setting from the drop-down list.
Window Mode: This drop-down list lets you choose how Flash appears in the context of your Web page. You can set Flash movies to be opaque or transparent to reveal the background of the page.
HTML Alignment: Select a left, right, top, or bottom alignment of your movie as determined by the HTML code using the provided drop-down list.
Scale: This drop-down list lets you choose whether the HTML page scales the Flash movie to a size other than its default size.
Flash alignment: This option controls the positioning of your Flash movie within the page. Use the drop-down lists to select vertical or horizontal alignment values, or both.
After you select the correct settings for the file formats and files you want to create, you can publish your movie in one of two ways:
At the bottom of the Publish Settings panel, click the Publish button.
Choose File

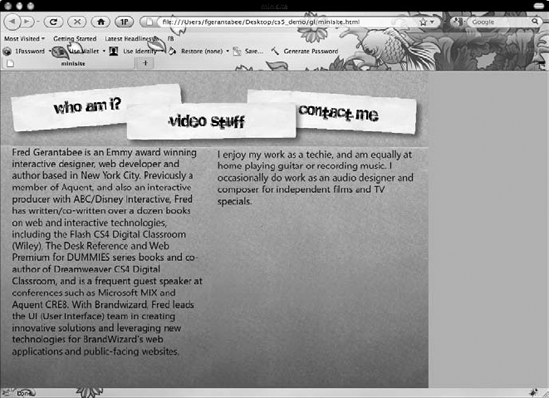
In most cases, you'll publish a SWF and companion HTML file so you can view your movie in a Web browser, as shown in Figure 9-4.
The Adobe AIR (Adobe Integrated Runtime) platform gives designers and developers a way to use their existing skills to create cross-platform desktop applications.
Users can download the AIR runtime for free and install it to manage and play AIR applications directly from their desktops. The best news for designers and developers is that AIR applications can be created from standard FLA files in Flash by making a few simple changes to your publish settings.
AIR applications have several advantages over the use of standard Flash projectors; AIR applications can work with the operating system, files, and other applications without the restrictions faced by projectors in the past.
Tip
Because AIR applications publish in their own unique format, it's not necessary to create installers for both Windows and Mac; an AIR application installs and runs on both operating systems!
Many features unique to AIR applications are beyond the scope of this minibook, so this section covers only the basics of publishing AIR applications from any Flash movie.
Before you get started, download and install the Adobe AIR runtime from the Adobe Web site at www.adobe.com/products/air. The following steps are based on the Adobe AIR 2 Beta 2 installer, which was the newest available version at the time of this writing.
Follow these steps to publish your movie as an AIR application:
Open a document in Flash CS5 that you want to publish as an AIR application.
Choose File
If the Flash tab isn't available, make sure that Flash (.swf) is selected on the Formats tab.
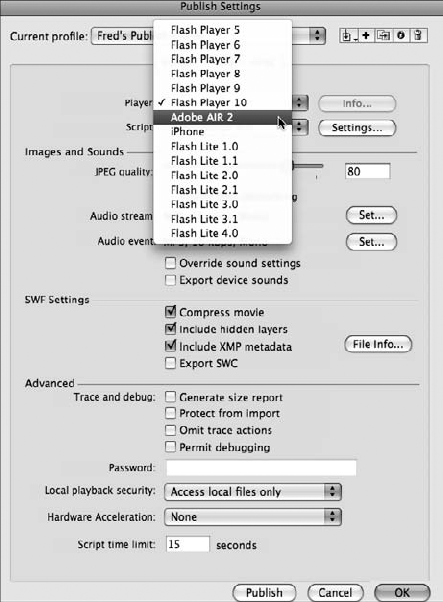
Locate the Player drop-down menu and select Adobe AIR 2 as the player type, as shown in Figure 9-5.
Click the Settings button directly next to the Player drop-down menu.
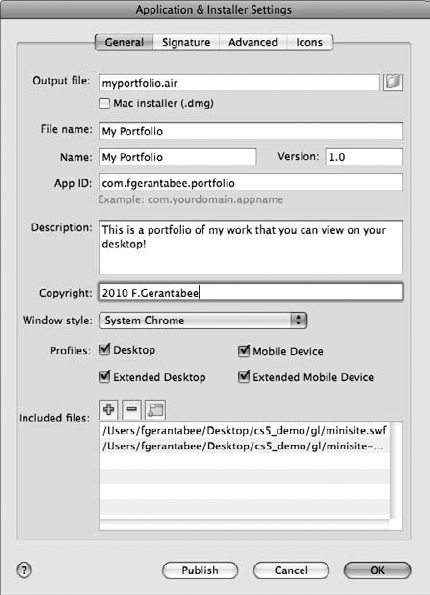
The AIR 2 Application & Installer settings dialog box opens, as shown in Figure 9-6.
A number of options and settings are available:
Output file: Choose a filename and location for your published AIR application. The Mac Installer (
.dmg)/Windows Installer (.exe) check box provides an alternative installation file type for the Mac and Windows platforms. If you're unsure which one to use, leave this option deselected.File name: The name of your file as displayed by the AIR application installer.
App Name: Your application displays this name (Super Picture Viewer, for example) when it's installed and when it's running on your desktop.
Version: This option indicates which version of an application is installed or running. Attach a version number so that users can distinguish between installations as you create updated releases of your application.
App ID: This identifier is often used to distinguish one company's applications from another, or even several applications from the same publisher. A common naming scheme is the "reverse DNS" scheme, such as
com.mycompany.mycoolapp. If your company is atcoolwidgets.comand your app is The Picture Widget, for example, your app ID might becom.coolwidgets.picturewidget.Description: In this area, you can provide a description of your application — for example, "The Picture Widget lets you view and organize your mobile phone snapshots quickly and easily."
Copyright: Enter your copyright information here (for example, 2010
CoolWidgets.com).Window Style: This setting determines how your application is "framed" within the operating system environment. You can use the default system windows (System Chrome); your own, custom frame, or even no frame (Custom Chrome — opaque or transparent).
Included Files: This panel shows all files to be packaged and included in the AIR application, typically a
.swffile and an application manifest (.xml) file. If your application depends on other files (such as external audio or video files), you can add them here as necessary.
Enter or modify the AIR 2 Settings and then click the Publish button.
A dialog box appears, prompting you to choose a digital certificate for signing your application.
Click the Create button on the far right side, and in the dialog box that opens, fill in the information necessary to create your own, self-signed certificate.
For more information on digital certificates, see the later sidebar named "What is a digital certificate?"
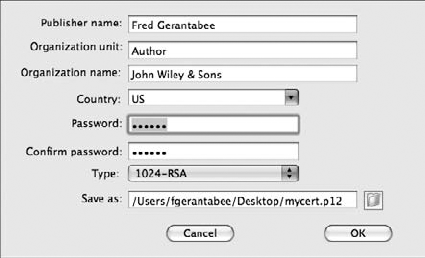
Enter information for the publisher name, organization unit, organization name, country, and password, and then click Browse to choose a save location, as shown in Figure 9-7.
Click OK to create and save your certificate.
This step returns you to the digital signature dialog box, where your new certificate is already selected.
Reenter the password you chose when you created your certificate and click Publish.
A dialog box notifies you that your AIR file has been created.
Click OK to exit the Application & Installer Settings dialog box and then click OK to close the Publish Settings dialog box.
Before giving your new desktop application a test run, make sure that you've installed the latest version of the Adobe AIR Runtime from www.adobe.com/products/air.
Any user who needs to run your application needs to also install the Adobe AIR Runtime using the same URL shown above. The good news is that many users already have AIR installed, and if not, it's a fast, free download from the Adobe Web site.
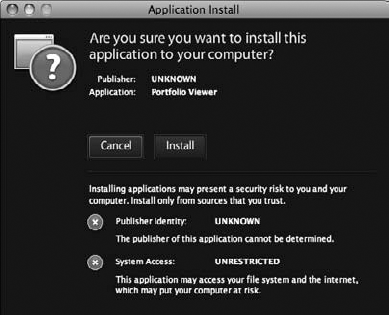
To install and run the AIR application, locate and double-click the .air file you published. The Adobe AIR Runtime launches, and a dialog box prompts you to install the new application, as shown in Figure 9-8. Click Install. Your application is now installed!
If you want to use the same publish settings across multiple movies, you can capture your settings as a profile that you can recall and use in other documents.
To create a new publish profile, follow these steps:
Choose File
Select some formats and choose settings as described, in the earlier section "Choosing the Right Settings."

The Create New Profile dialog box appears, prompting you to assign the new profile a name.
Enter the profile name in the Profile name text box and click OK.
The profile is created and is an available option under the Current Profile drop-down list at the top of the Publish Settings dialog box.
To make your profile available to other documents, export it:
Choose File

You're prompted to name and save your profile (stored as a separate
.xmlfile). Although you can save the file anywhere, keep it in the Flash application's Publish Profiles folder, which is the default location.Assign the XML file a name by typing it in the File Name (Windows)/Save As (Mac) text box, choose a Save location, and click Save.
To import a profile from another document, follow these steps:
Choose File
Choose Import from the Import/Export icon at the top of the dialog box.
The Import Profile dialog box appears, as shown in Figure 9-9.
Locate the XML file you created when you exported the profile and click Open.
The profile is now available under the Current Profiles drop-down list at the top of the Publish Settings dialog box.
