If someone has been coaching you in using Adobe Illustrator, you may have heard the old line "You have to select it to affect it." It means that if you want to apply a change to an object in Illustrator, you must have that object selected or else Illustrator doesn't know what to change. You sit there repeatedly clicking a color swatch and nothing happens. Although making selections may sound simple, it can become tricky when you're working on complicated artwork.
Before delving into the world of selecting objects in Illustrator, you must know what the selection tools are. In this section, we take you on a quick tour of the anchor points (integral to the world of selections), the bounding box, and, of course, the selection tools. (Yes, Illustrator has several selection tools.)
To understand selections, you must first understand how Illustrator works with anchor points, which act like handles and can be individually selected and moved to other locations. You essentially use the anchor points to drag objects or parts of objects around the workspace. After you place anchor points on an object, you can create strokes or paths from the anchor points.
You can select several anchor points at the same time, as shown in Figure 3-1, or only one, as shown in Figure 3-2. Selecting all anchor points in an object lets you move the entire object without changing the anchor points in relationship to one another. You can tell which anchor points are selected and active because they appear as solid boxes.


As a default, Illustrator shows a bounding box when an object is selected with the Selection tool. (A bounding box is shown in Figure 3-1.) This feature can be helpful if you understand its function but confusing if you don't know how to use it.
By dragging on the handles, you can use the bounding box for quick transforms, such as scaling and rotating. To rotate, you pass the mouse cursor (without clicking) outside a handle until you see a rotate symbol and then drag.
If the bounding box bothers you, you can turn off the feature by choosing View
Illustrator CS5 offers five selection tools:
Selection: Selects entire objects or groups. This tool activates all anchor points in an object or group at the same time, allowing you to move an object without changing its shape.
Direct Selection: Selects individual points.
Group Selection: Hidden in the Direct Selection tool in the Tools panel and used to select items within a group. This tool adds grouped items as you click objects in the order in which they were grouped. This selection tool becomes more useful to you as you find out about grouping objects in Illustrator.
Magic Wand: Use the Magic Wand tool to select objects with like values, such as fill and stroke colors, based on a tolerance and stroke weight. Change the options of this tool by double-clicking it.
Lasso: Use the Lasso tool to click and drag around anchor points you want to select.
You can select an object with the Selection tool by using one of three main methods:
Click the object's path.
Click an anchor point of the object.
Drag a marquee around part or all of the object's path. (In the later section "Using a marquee to select an object," we discuss using the marquee method.)
After you have an understanding about the basics of selections, you'll probably be eager to try out some techniques. In this section, you see the basics: Make a selection, work with anchor points and the marquee, make multiple selections, and of course, save your work.
Note
Smart guides, turned on by default in Illustrator CS5, can help you make accurate selections. These guides are visible as you're drawing, they display names such as anchor point and path, and they highlight paths when you're lined up with endpoints or center points. You can come to love these helpful aids, but if you don't want to see them, simply choose View
To work with selections, you need to have something on the page in Illustrator. Follow these steps to make a selection:
Create a new page in Adobe Illustrator. (Any size or profile is okay.)
Alternatively, you can open an existing illustration; see Chapter 2 of this minibook for instructions. Skip to Step 3 if you're working with an existing illustration.
If you're starting from a new page, create an object to work with.
For example, click and hold down the Rectangle tool to select the Star tool. Then click and drag from the upper left to the lower right to create a star shape.
Exact size doesn't matter, but make it large enough that you can see it. To start over, choose Edit

As a default, all shapes start with a black stroke and a white fill (see Figure 3-3). If yours isn't black and white, press D, which changes the selected object to the default colors.
Tip
You can see the width and height of your object while you click and drag. If you don't want those values to display, choose Edit
Using the Selection tool, click the object to make sure it's active.
All anchor points are solid, indicating that they're all active (refer to Figure 3-3). You see, as a default, many additional points you can use to transform your selected object.
Click and drag the shape to another location.
When you are finished relocating your selection, press Ctrl+D (Windows) or

You can use one of these three methods:
Choose Select
Ctrl+click (Windows) or
Use the key command Ctrl+Shift+A (Windows) or

When you have a selection to work with (see the numbered list), you can deselect all active anchor points and then make just one anchor point active. Follow these steps:
Choose Select
Select the Direct Selection tool (the white arrow) from the Tools panel.
Click one anchor point.
Only one anchor point (the one you clicked) is solid, and the others are hollow, as shown in Figure 3-4.
Click and drag that solid anchor point with the Direct Selection tool.
Only that solid anchor point moves.

Sometimes you can more easily surround the object you want to select by dragging the mouse to create a marquee. Follow these steps to select an object by creating a marquee:
Choose the Selection tool.
Click outside the object and drag over a small part of it, as shown in Figure 3-5.
The entire object becomes selected.

You can also select only one anchor point in an object by using the marquee method:
Choose Select
Click outside a corner of the object and drag over only the anchor point you want to select.
Notice that only that anchor point is active, which can be a sight-saver when you're trying to select individual points (see Figure 3-6).

If you have multiple items on a page, you can select them by using one of these methods:
Select one object or anchor point and then hold down the Shift key and click another object or anchor point. Depending on which selection tool you're using, you either select all anchor points on an object (Selection tool) or additional anchor points only (Direct Selection tool).
You can use the Shift key to deactivate an object as well. Shift+click a selected object to deselect it.
Choose Select
Use the marquee selection technique and drag outside and over the objects. When you use this technique with the Selection tool, all anchor points in the objects are selected; when using the Direct Selection tool, only the points you drag over are selected.
Spending way too much time trying to make your selections? Illustrator comes to the rescue with the Save Selection feature. After you have a selection that you may need again, choose Select
Tip
New in Illustrator CS5, you can use the same Select-behind keyboard shortcut that has existed in InDesign for several versions. To select an object behind another, simply place the cursor over the area where you know that the object (to be selected) is located and press Ctrl+click (Windows) or
Keep objects together by grouping them. The Group function is handy when you're creating something from multiple objects, such as a logo. Using the Group function, you can ensure that all objects that make up the logo stay together when you move, rotate, scale, or copy it.
Follow these steps to create a group:
If you aren't already working with an illustration that contains a bunch of objects, create several objects on a new page — anywhere, any size.
For example, select the Rectangle tool and click and drag the page several times to create additional rectangles.
Select the first object with the Selection tool and then hold down the Shift key and click a second object.
Choose Object
Choose Select
Both objects become selected.
While the first two objects are still selected, Shift+click a third object.
With all three objects selected, choose Object
Illustrator remembers the grouping order. To prove it, choose Select
With the Group Selection tool, click the first object; all anchor points become active. Click the first object again; the second object becomes selected. Click the first object again and the third object becomes selected.
This tool activates the objects in the order you grouped them. After you group the objects, you can treat them as a single object.
To ungroup objects, choose Object
When you use Isolation mode in Illustrator, you can easily select and edit objects in a group without disturbing other parts of your artwork. Simply double-click a group and it opens in a separate Isolation mode, where all objects outside the group are dimmed and inactive. Do the work you need to do on the group and exit from Isolation mode by clicking the arrow to the left of Group in the upper-left corner of the window, shown in Figure 3-7.

In the following list, you discover a few other cool things you can do with selected objects:
Move selected objects: When an object is selected, you can drag it to any location on the page, but what if you only want to nudge it a bit? To nudge an item one pixel at a time, select it with the Selection tool and press the left-, right-, up-, or down-arrow key to reposition the object. Hold down the Shift key as you press an arrow key to move an object by ten pixels at a time.
Constrain movement: Want to move an object over to the other side of the page without changing its alignment? Constrain something by selecting an object with the Selection tool and dragging the item and then holding down the Shift key before you release the mouse button. By pressing the Shift key mid-drag, you constrain the movement to 45-, 90-, or 180-degree angles!
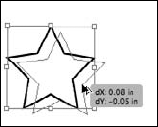
Clone selected objects: Use the Selection tool to easily clone (duplicate) an item and move it to a new location. To clone an item, simply select it with the Selection tool and then hold down the Alt key (Windows) or Option key (Mac). Look for the cursor to change to two arrows (see Figure 3-8) and then drag the item to another location on the page. Notice that the original object is left intact and that a copy of the object has been created and moved.
Constrain the clone: By Alt+dragging (Windows) or Option+dragging (Mac) an item and then pressing Shift, you can clone the item and keep it aligned with the original.
Note
Don't hold down the Shift key until you're in the process of dragging the item; otherwise, pressing Shift deselects the original object.
After you clone an object to a new location, try this neat trick to create multiple objects the same distance apart from each other by using the Transform Again command: Choose Object
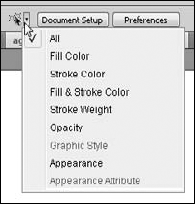
Use the Select menu: By using the Select menu, you can gain additional selection controls, such as choosing Select