Checking for broken links and missing files
Running your site reports
Checking browser compatibility
Publishing to a Web server
Making site improvements
When you're ready to launch your Web site, you can take lots of steps to ensure that it looks good and works well. Dreamweaver tools and reports streamline the process of testing and fixing any problems so that you can present visitors with a favorable first impression.
The first step toward getting your Web site ready for the world is making sure that everything works and all files are in order. Dreamweaver is packed full of tools that let you know exactly what's broken and what can be done better and how your site will perform across a spectrum of different browsers.
One key benefit of a Dreamweaver site is its ability to see relationships between various pages and files and detect any broken links or missing images before you publish your Web site for public viewing. Choose Site
To use the Check Links Sitewide feature, follow these steps:
Choose Window

You can also use the F8 shortcut key (Windows or Mac).
Open the Files panel menu (it's in the upper right corner) and choose Site
The Link Checker panel appears and displays any results. Each listing shows the broken link and the name of the page that contains it to the left, as shown in Figure 9-1.
To open and edit the page to correct the link, double-click the filename that's shown.
You can then edit the broken link directly from the Link Checker panel without opening the file. Click the broken link that's displayed, and a folder icon appears next to it, on the right.
Double-click the folder to open the Select File dialog box and choose an available file to correct the link or relink it to a different file.
Click OK (Windows) or Choose (Mac).

Tip
If you want to change a link that appears across several pages, open the Files panel menu and choose Site
The Dreamweaver site reports provide a detailed look at potential issues lurking within your site as well as assistance in cleaning out redundant or empty tags from your pages.
Reports are in two categories:
Workflow: Shows you where your files have been, and when, and are useful if you're using functions, such as the Check In/Check Out feature to share work with others.
HTML: Points out design and accessibility issues, such as missing ALT tags for images, improperly nested tags, or empty tags that you can clean up.
You can run a site report by following these steps:
Choose Site
The Reports dialog box appears, as shown in Figure 9-2.
Choose each report you want to see by selecting the check box next to the report name.
As shown in Figure 9-2, we chose all reports in the HTML Reports category.
At the top of the Reports dialog box, use the drop-down list to select what aspect of the Web site you would like to run the reports on.
You can choose the Current Document, Entire Current Local Site, Selected Files in Site or a specific folder of your choice. If you are unsure, choose the Entire Current Local Site option.
Click the Run button to run the selected reports.
The Results panel appears and displays the results of each report.
Each report result displays the file and line number and a description of the problem.
To address a problem that's shown, double-click the filename to open the page.
The page opens for editing, and the section in which the problem occurs appears highlighted in Split view.

If you're using CSS for formatting and layout throughout your site, make sure that your page appears properly across all popular browsers, such as Internet Explorer, Firefox, Chrome, and Safari. Over the years, different browsers adopted CSS at different levels and paces, requiring designers to test pages in a variety of browsers and versions.
To eliminate this time-consuming task, Dreamweaver provides the Browser Compatibility Check, which works hand in hand with the Adobe Web site to discover and report any CSS-related display issues that may occur in selected browsers and versions. The Browser Compatibility Check checks CSS compatibility by default in these browsers: Firefox 1–3; Internet Explorer (Windows) 6.0–8.0; Internet Explorer (Macintosh) 5.2; Netscape Navigator 7.0–8.0; Opera 7.0–9.0; and Safari 1.0–3.0.
For any problem that the Browser Compatibility Check discovers, the Results panel displays a description of the problem along with a direct link to the CSS Advisor section of the Adobe Web site. The CSS Advisor reports on known browser-display issues and possible solutions for fixing them.
Follow these steps to test a page with the Browser Compatibility Check:
Open a page for editing by choosing File
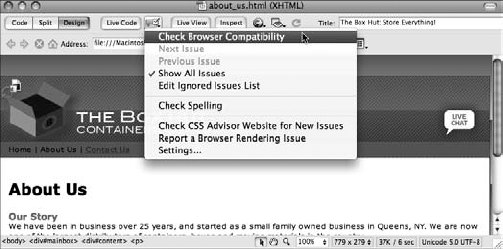
In the Document window (next to the Live Code button), click and hold the Check Browser Compatibility button and then choose Check Browser Compatibility from the menu that appears, as shown in Figure 9-3.
The Results panel appears, with the Browser Compatibility tab forward. Any results are displayed on this tab.
To view details and possible solutions for any results that may appear, select the result (see Figure 9-4).
The description, as well as a link to the Adobe Web site, appears on the right side of the panel.
Possible compatibility issues are listed along with the filename, line number, and description of the problem.
Click the link below the detail panel to jump to the Adobe Web site for solutions.

When you're ready to publish your site for the world to see, set up a remote server in your site definition so that you can connect and copy files to your Web-hosting account or dedicated server.
Typical remote server information consists of an ID and a password, an FTP (File Transfer Protocol) or network address, and the name of the specific directory where your files need to go. This information is available from the company your hosting service was purchased from or from your network administrator.
To set up a remote connection, follow these steps:
Choose Site
The Manage Sites panel appears.
Select your site from the list and click the Edit button.
When the Site Setup dialog box appears, select the Servers category on the left.
Here you can add connection information to a Web server where you can store and publish your Web site.
Tip
Servers, more often referred to as "Web hosting accounts" can be purchased from Web hosting providers. Your Web hosting account is essentially a folder on a remote computer, where you can store your files and point your users so they can view your site from any computer or device. There are thousands of hosting providers (such as GoDaddy, FatCow, 1 and 1) from which you can purchase these services.
Below the listing of servers (which is likely empty right now), click the Add new Server button. This opens a dialog box where you can enter your connection information.
Enter a name for your connection in the Server Name text field.
Under the Connect Using drop-down list, select the type of connection you're going to create.
In most cases this is FTP, but check with your IT Administrator if you're unsure. If you're connecting to a Web hosting account, FTP is the most common way in which you'll connect.
Enter your FTP address, Username, and Password in their respective text fields (as shown in Figure 9-5).
This information is provided to you when you set up a Web hosting account. If you are unsure of this information, contact your Web hosting provider or IT Administrator.
Enter your Root Directory in the appropriate text field.
This is the name or location of the folder where your web site files will be kept on the remote server. If you are unsure of this information, leave it blank.
Enter your Web URL in the text field shown.
This is the actual Web address where users will find your Web site (for example,
http://www.mycoolwebsite.com).Click the Test button to test your connection.
If the connection is made successfully, Dreamweaver will let you know. If not, you may need to double-check the information you entered and try again.
Tip
If you experience difficulty connecting to your remote server or the connection is taking unusually long, select the Use Passive FTP checkbox under the More Options section at the bottom. (You'll need to expand this by clicking the arrow next to More Options.) Passive FTP can also be a workaround if you're trying to connect from behind a firewall.
If your settings are correct, click Save to create the Server connection.
Click Save again to exit the Site Setup dialog box.

After your connection is up and running, you're ready to upload files and present your Web site to the world. Files can be transferred to and from your remote Web server by using the built-in FTP functionality of the Files panel. It displays files in your local directory and the remote server, and between them, you can put, get, or synchronize site files.
Follow these steps to upload your Web site to a remote Web server:
Choose Window
Click the Expand to Show Local and Remote Sites icon.
The panel expands so that you see both the local site and the remote site to which you want to copy (upload) the files.
Make sure that the correct site definition is selected in the Show drop-down list in the upper left corner of the panel.
Your local files appear on the right.
To connect to and display files on the remote Web server, click the Connect button at the top of the panel.
When the connection is made, all files (if any) are displayed on the left side of the panel.
To copy files, select and drag them from the local files on the right to the remote files on the left, as shown in Figure 9-6.
Alternatively, select the files you want to copy on the right and click the Put button at the top of the Files panel.
Tip
You can put all of the files within your site on your Web server at once by selecting the root folder at the top of the local files panel and clicking the Put button.
After you copy all files to the remote Web server, test your site by opening a browser and typing the Web site's URL.
The URL is a full address, such as
www.mywebsite.com, or an IP address, such ashttp://192.1.1.1.If you notice broken images or files, return to Dreamweaver to double-check whether all files were copied to the server and then run the Link Checker by choosing Site

To retrieve files from a remote Web server, follow these steps:
Select the files you want to retrieve from the remote files on the left side of the Files panel.
Click the Get button (which appears as a green, downward pointing arrow) at the top of the panel or drag the files to the local root folder on the right.
Tip
To return the Files panel to its original position on the right side of the workspace, click the Expand button in the upper right corner of the panel to deselect it. The Files panel minimizes and docks back with the panel group on the right.
The handy Dreamweaver site synchronization feature compares files between your local and remote sites to ensure that both are using the same, and most recent, versions of your site files. This check is essential if there's a chance that files on the remote server may be more up-to-date or if you're unsure which files have been updated since the last time you worked on a Web site.
Follow these steps to synchronize your local and remote directories:
If the Files panel isn't already visible, choose Window
Select the site you want to synchronize in the Show drop-down list in the upper left corner of the panel.
Your local files appear on the right.
Click the Connect button at the top of the panel to connect to the remote server.
If you're not viewing your Files panel in Expanded view, choose Remote Server from the drop-down list at the top to display your remote files.
Click the Synchronize button at the top of the Files panel.
The Synchronize Files dialog box appears.
From the Synchronize drop-down list, choose whether you want to synchronize the whole local site or only files selected in the Files panel (if any).
From the Direction drop-down list, choose whether you want newer files put to the remote server, retrieved from the remote sever, or both.
To clean up unused or old files on the remote server, select the Delete Remote Files Not on Local Drive check box.
Click the Preview button to begin the process.
This step may take a while, depending on the number of files in your site.
The Synchronize Files dialog box appears and displays all changes that will be made between the local and remote folders.
Select, change, or delete any actions as necessary.
Click OK to have Dreamweaver complete the synchronization process.
Warning
Be careful when using the Delete Remote Files Not on Local Drive option; some files on the remote server are installed by the Web hosting company and are necessary for the operation of your site.
Remember that a site is like a living organism: It continues to grow and will still need care after it's live. As you add to your site, find new and innovative ways to present information to site visitors; after all, it's all about giving them what they came looking for.
To improve your site and keep visitors coming back, try these tips:
Solicit feedback from focus groups or colleagues in different fields. Let them tell you the best and worst features of your site, and then use this feedback to assist in design, layout, and content decisions.
Use Web statistics to your advantage. Use these statistics, often provided for free by Web hosting companies, to see where users are spending the most time and where they leave your site.
Provide a feedback form. Site visitors can then comment on the service and information they receive, with the opportunity to provide comments and suggestions.
Always keep your content fresh. Stale information and features can deter return visits and ruin first impressions.
Respond immediately to problems that surface. Don't ignore or put off broken links, images, or misspellings.