Using internal links
Discovering how to use anchors
Linking to external documents, e-mail messages, and PDF files
Making sure that your links work
Links are a major and necessary component of any Web site. You must incorporate links on your Web site; this way, viewers can easily navigate your site to see the information they're seeking. In this chapter, we show you how to add links easily and effectively in Dreamweaver.
Links, or hyperlinks, are navigational aids; viewers click links to go to other Web pages, to a downloadable resource file, to an e-mail address, or a specific spot on a Web page (known as an anchor). As you create the first link from one of your Web pages to another, you've essentially created a Web site — it may be a small site, but it's a start. While you're still in the small site stage, here are a couple of recommendations to keep in mind as you add more pages and create more links, making your site even bigger:
Two kinds of links exist:
Internal links connect viewers to other parts of your Web site.
External links connect viewers to other pages or content outside your site.
We show you how to create both kinds of links in this chapter.
Before you start working with any pages to be linked, make sure that you've created a Dreamweaver site (see Chapter 3 of this minibook for details); the site helps you locate local files to link to, and later you can check and validate links between pages in your site.
Internal links, an essential part of any user-friendly site, help viewers easily and quickly navigate to other pages on your Web site.
Warning
If you need to change filenames after they've been linked somewhere, do so only within the Files panel in Dreamweaver. Otherwise, you end up with broken links. Take a look at the "Resolving Link Errors" section, later in this chapter, to find out how to change the names of linked files without breaking the links.
You can create a link from text or an image (such as a button graphic). The following sections outline several methods you can use for creating links.
To create a hyperlink with text as the link, you can use the Hyperlink command:

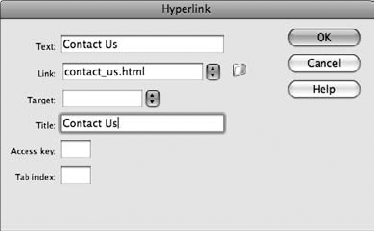
The Hyperlink dialog box appears with your selected text already entered in the Text field, as shown in Figure 6-1. (You can also choose Insert

You can either enter a URL (or location of a file) or click the Browse folder icon to the right of the Link drop-down list and browse to the file you want to link to.
You can also enter an external link here; see how to link to external locations a little later, in the "Linking to Pages and Files Outside Your Web Site" section.
a. If you want the page to appear in the same Document window, essentially replacing the existing page, leave the Target drop-down list blank or choose _self.
b. If you want to force the link to create its own Document window, choose _blank.
Click OK to create your link.
You can also link text and images from the Property inspector HTML view.
Select on your page the element you want to link up.
With your text or image selected, click the HTML button on the left side of the Property inspector to switch to HTML view and then type the link location into the Link text box.
To locate the destination file, click the folder icon (Browse) to the right of the Point to File button.
The Select File dialog box opens.
Navigate to the folder containing the file you want to link to, select it, and click OK (Windows) or Choose (Mac).
If you're in a hurry and want a more visual way of linking up your pages, you'll love this quick method for creating hyperlinks:
Select the text you want to use as a link on your page.

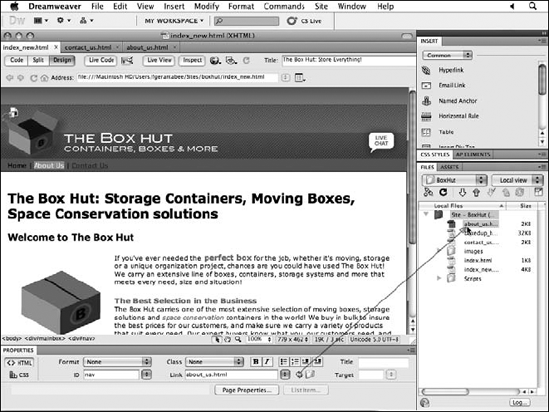
Move the arrow pointer over the file in the Files panel that you want to link to and release the mouse button (see Figure 6-2).
Voilá! The connection is made, the filename appears in the Hyperlink text box, and the selection is now hyperlinked to your selected file.
Anchors are a link to a specific section of a page, on either the same page as the link or another page entirely. Anchors are especially handy for long pages that have a lot of text. You've probably seen and used anchors, for example, when clicking a Back to Top button or when navigating within a page using a table of contents. Anchors are extremely helpful to viewers and should be implemented whenever possible.
To create an anchor in Dreamweaver, follow these steps:
Insert the cursor in a location on the page that you want to link to.
The anchor may be placed before a line of text or on its own line.
Click the Named Anchor button in the Common category of the Insert panel.
The Named Anchor dialog box, shown in Figure 6-3, appears.
Tip
You can avoid clicking the Anchor button by using the keyboard shortcut Ctrl+Alt+A (Windows) or

Type a short name that's relevant to the content or location on the page (for example, TopOfPage or headline).
In Figure 6-3, you see that the text TopOfPage was entered because this anchor returns the viewer to the top of the page. Anchors are case sensitive, so keep this in mind when deciding on a name.
Click OK.
The new anchor appears in your page, as shown in Figure 6-3.

Figure 6-3. Top: Create a simple anchor name in the Named Anchor dialog box. Bottom: The completed anchor.
You've created the anchor but have no links directed to it yet. You can define an anchor as a link manually or by using the Point to File tool, as described in the following two sections.
Here's one reason why a short, appropriate name is useful for anchors: You may end up having to type it! By manually linking to an anchor, you can link within the page you're working on or direct the link to an anchor on a completely different page.
You can manually define an anchor as a link by following these steps:
Select the text that will become the link.
If the Property inspector isn't open, choose Window
Select the text that you want to link to your new named anchor and click the Hyperlink button located on the Insert panel.
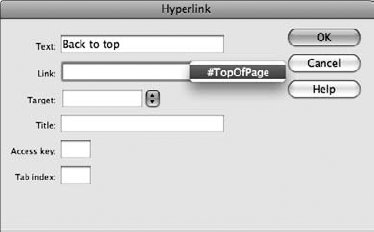
In the Hyperlink dialog box, locate the Link field and click the drop-down list directly next to it.
Your named anchor appears as a selection, as shown in Figure 6-4.
You can also link to a page and add an anchor reference to it from the Property inspector. For example, if you want to link to this spot from another page, you select an element on that page and in the Link text box (in HTML view) type the name of the page, a pound sign (#), and the name of the anchor — for example, birds.html#canary. This action directs the browser to the birds page and then to the canary anchor within that page.
Frequently, you see anchors separated by the pipe sign (|). You can create this type character by pressing Shift+. The backslash key is directly above the Enter (Windows) or Return (Mac) key.
You can use the same cool Point to File icon you used earlier to create hyperlinks for creating anchors. The Point to File icon in the Property inspector can also target anchors you've created on your page. Follow these steps:
Select the text you want to use as a link on your page.

The text is now linked to the anchor, and the anchor's name appears in the Property inspector's Link text field preceded by a pound sign (such as
#canary).
You can link to pages anywhere, in your site or out. An internal link (sometimes referred to as a relative URL) is one within your site. The link to another page in your site may appear as contact.html in the Link text box in the Property inspector. But if you're directing people to a contact page posted on another site, you have a link that looks more like this: http://www.aquent.com/contact. By typing the http:// and the address of the external link (sometimes referred to as an absolute URL) in the Property inspector, you're essentially directing the browser to a site on the Internet that's away from your site.
Note
You must include the http:// prefix in front of a Web address. Omitting this prefix results in a Page Not Found error in your browser because it may interpret www.aquent.com, for example, as a local filename rather than as an outside Web address.
Linking to an e-mail address opens on the viewer's computer a new mail message that's already addressed to the e-mail address you specify in the link (as long as the viewer has set up an e-mail program on her machine, of course).
Linking to an e-mail address is easy and extremely helpful if you want to give users an easy way to contact someone through your Web site. To create an e-mail link, follow these steps:
Select the element that will be the link to an e-mail.
The element can be either text or an image.
In the Property inspector, locate the Link text box, type mailto:<address>, and then press Enter or Return.
For example, type mailto:[email protected] and press the Enter or Return key. The
mailto: directive tells the browser that the link is to an e-mail address so that the default e-mail application on the user's computer opens with a new, preaddressed message.
To link to a PDF file instead of a Web page, you link to the name and location of the PDF file. If you link to a PDF file and the Acrobat PDF plug-in is loaded in the viewer's browser, the PDF is opened in the browser window. If the viewer doesn't have the Acrobat plug-in (free from www.adobe.com), the browser prompts the viewer to save the file to his computer. You can then view this file later on using Adobe's Acrobat Reader or another compatible program, if available.
Page names can change, and pages can be deleted (intentionally or not), so you should periodically check for broken links. You can ensure that links are working correctly in several ways. The most cumbersome, to preview a page and click every link, would take a long time and wouldn't be much fun. To check local links more efficiently and quickly, follow these steps:
Choose Site
The Results panel appears, with the Link Checker tab active.
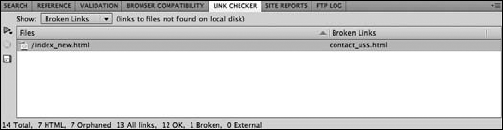
Any broken links appear, including page, scripts, and images, as shown in Figure 6-5.
Use the Show drop-down list in the top-left corner to sort the link results by broken link, external link, or orphaned file.
To focus only on broken links, leave Broken Links selected.
If you don't have broken links — congratulations! If you do, you can fix them directly in the Results panel. The page that has the broken link is listed in the Files column on the left. The broken link appears under the Broken Link column on the right.
Click the name of the broken link and correct the filename, if it's a problem, or click the Browse folder icon to locate the correct location or file.
Click OK (Windows) or Choose (Mac).
The broken link is repaired.
Tip
Orphaned files are pages or images that are not in use or linked to from any place within your site. Although having orphaned files isn't necessarily a problem, to ensure that you don't have important files that are orphaned, select Orphaned Files from the Show menu under the Link Checker section of the Results panel.