Importing images
Editing images
Optimizing and exporting images
Creating images for your Web site is most likely what you'll use Fireworks for most often. In this chapter, you find out how to work with images from various sources, discover the importance of optimizing, and see how to export your images.
Besides making your own graphics and illustrations, you can use four main methods for getting images into Fireworks:
Open: Fireworks isn't picky. As long as you open images (vector or raster) by choosing File

When you open a native Adobe Illustrator or Photoshop file, expect to see a dialog box, like you see in Figure 5-1. This particular dialog box appears when you open a Vector image from Adobe Illustrator. As you can see, you have to make some decisions as to what size the file should be, which artboards should be imported, and how you want to handle layers and groups.
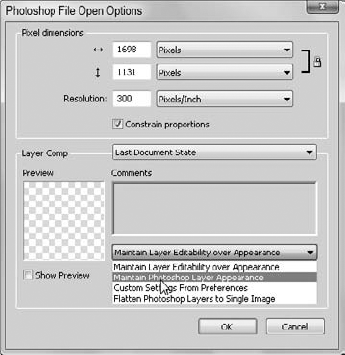
When importing a Photoshop file, your choices are relatively the same, as shown in Figure 5-2. The integration between Fireworks and Photoshop is excellent; you can keep layers intact and continue your editing process in Fireworks.
Import: By choosing File
Drag and drop: You can drag and drop an image from other applications, such as Adobe Illustrator and Adobe Photoshop, right into the Fireworks workspace.
Note
To drag and drop between Adobe applications on the Windows platform, you must drag your selection down to the application's tab on the taskbar and wait for the application to come forward. Then you can drag into the work area.
Browse: Just as you can in the rest of the Creative Suite applications, you can take advantage of Adobe Bridge to preview, search, and organize images before opening them in Fireworks. Because images typically open in Photoshop by default, you right-click the image and choose Open with Adobe Fireworks CS5 from the contextual menu.

To open a file in Bridge, you must click the Browse in Bridge button on the Application bar in Fireworks, as shown in Figure 5-4.

After you have an image open in Fireworks, you can start editing it. The editing features in Fireworks are similar to those in Photoshop but aren't as extensive. You can do many basic tasks in Fireworks — crop, paint, and even curve adjustments — but we suggest that you perform most of your in-depth retouching in Photoshop.
This section introduces five basic image-editing tasks that you typically perform when creating Web graphics. We also discuss the Image Editing panel, which lets you choose among multiple editing tools.
Making images the right size is important. If an image is too large, you waste valuable download time; if it's too small, the image looks pixelized and out of focus. We cover three scaling methods in the following sections.
To scale an image in Fireworks proportionally (keeping the same width and height ratio), follow these steps:
Select the layers you want to scale.
If you have multiple layers, you can hold down the Ctrl (Windows) or


Anchor points surround your selection.
To make an image smaller, click and drag a corner anchor point toward the center; to make an image larger, click a corner anchor point and drag outward.
Warning
Typically, you don't scale a bitmap image to a dramatically larger size, because it may become pixelized. The rule of thumb is to not make raster images more than 20 percent larger. This rule, of course, doesn't apply to vector objects.
If you don't want to scale proportionally, follow these steps:
Select the layers you want to scale.
Select the Pointer tool in the Select section of the Tools panel.
To resize an image, click and drag a corner anchor point without using the Shift key.
If you need to constrain scaling to an exact amount, you're better off using the Image Editing panel. Follow these steps to perform numeric scaling:
Select the layers you want to scale.
Choose Window
The Image Editing panel appears.
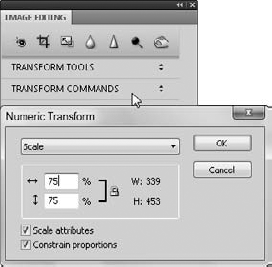
Click Transform Commands and choose Numeric Transform from the drop-down list.
The Numeric Transform dialog box appears, as shown in Figure 5-5.
In the Width and Height text boxes, type the percentage by which you want to scale and click OK.
If you don't need part of an image, get rid of it. Unwanted image data is a bad thing for Web graphics because it takes up valuable time when downloading. Follow these steps to eliminate unwanted image areas:

Refer to the preceding section, "Numeric scaling," to see how to open the Image Editing panel.
Click and drag to select the area you want to keep when the crop is complete.
Press the Enter or Return key.
The image is cropped to the selected area, and the Crop tool is deselected.
If you're working with a wireframe of a larger Web page design, you may want to export only a small portion — for example, to export just the navigational tools, not the rest of the page. To crop only when exporting, follow these steps:
Click and hold the Crop tool to select the Export Area tool.
Click and drag to select the area you want to keep when the image is exported.
Double-click in the middle of the cropped area.
The Image Preview window appears, offering you the opportunity to set export settings for this section of your image.
Choose your export settings.
You can choose preset GIF and JPEG settings from the Saved Settings drop-down list in the upper right area of the Image Preview dialog box or use the Options, File, and Animation tabs on the left to set up custom export options.
Click Export.
The selected area is exported to a location you choose and you return to your image, which is still intact.
Fireworks has many of the same painting capabilities as Photoshop, but the method in which you use them can be quite different at times.
When you select the Brush tool from the Bitmap section of the Tools panel, for example, you make decisions about the size of the brush, paint color, and blending mode from the Properties panel (see Figure 5-6) rather than from the Options panel, as in Photoshop.

The Rubber Stamp tool works much like the Clone Stamp tool in Photoshop. Follow these steps to clone (copy) pixels in Fireworks:

Hold down the Alt (Windows) or Option (Mac) key and click the part of the image you want to clone.
In Figure 5-7, the crosshair on the boy's left shoulder indicates the pixels that are being cloned.
Position the mouse pointer over the area where you want the cloned pixels to appear and start painting.
The cloned pixels appear in the image area (see the left side of Figure 5-6).

As you paint, follow the marker for the source; it moves simultaneously with the mouse pointer. You can use the Properties panel to change brush attributes.
Filters offer you many opportunities to edit your images. You can choose to blur an image or adjust its colors by using the Curves or Hue Adjustment layer. To access your filters, you can choose them from the Filters menu or choose Window
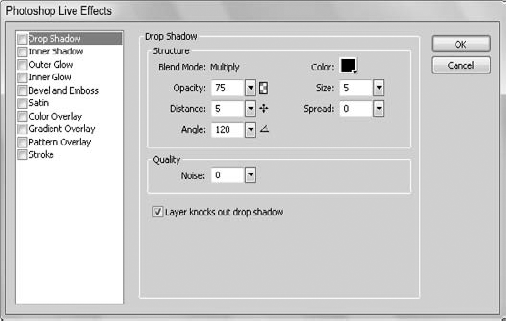
If you want to apply additional filters that you can change later or even delete, click the Add Filters button in the Properties panel and choose Photoshop Live Effects from the drop-down list. The Photoshop Live Effects dialog box appears (see Figure 5-8).
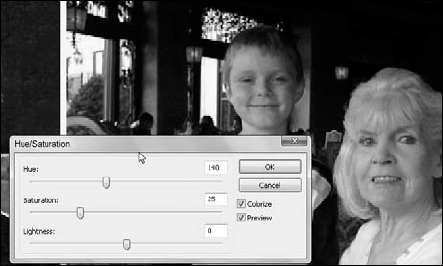
In the following example, you use the Hue/Saturation filter to add a color tint to an image. Follow these steps:

Click the Add Filter button in the Properties panel.
Choose Adjust Color and then Hue/Saturation.
The Hue/Saturation dialog box appears (see Figure 5-9).
Check the Colorize check box to apply a color tint.
Adjust the Hue slider until you find a color you want and click OK.
If you want to edit or delete a filter, follow these steps:
Double-click on the listed filter to edit it.
The Hue/Saturation Filter panel opens, where you can make changes to the filter.
Delete a filter by selecting it from the filter list and clicking the minus icon (–) located on top of the filter list.
Now that you have created and edited your image, you're ready to prepare it for the Web. You must consider two major factors in Web graphics: speed of download and appearance. Having the best of both worlds is difficult, however; usually, you opt to give up some appearance for better speed. This process is optimization.
Fireworks helps you with the optimization process from the beginning. By using the 2-Up preview in the upper left section of the image window, you can easily compare your optimized image with the original, based on your settings in the Optimize panel.
You can even use the preview windows to compare two to four Web formats and see which one looks best but has the most reasonable file size. Each preview window includes important information, such as file size.
If you want to go crazy, you can compare four settings by clicking 4-Up (see Figure 5-10). Using the preview windows, you can quickly change various settings — such as format, number of colors, and quality — and see the effect immediately, without previewing the image on the Web.

Now that you know how to compare images, where do you make the necessary optimization changes? In the Optimize panel, of course (see Figure 5-11). For a more thorough description of each file format, including its benefits and drawbacks, see Book IV, Chapter 10, which covers Web optimization in Photoshop CS5.

When you understand the Web-format settings, you can click the preview image you want to optimize; choose Window
You can export individual images or entire Web pages by using the Export feature of Fireworks.
To export a Fireworks document, follow these steps:
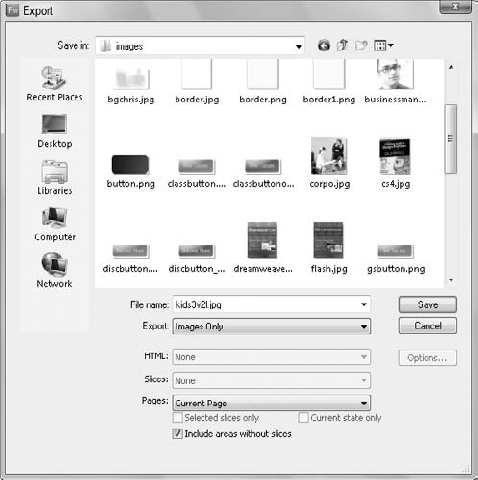
Choose File
The Export dialog box opens, as shown in Figure 5-12.
Navigate to an appropriate location to save your file.
Tip
If you intend to use this image on a Web site, the best practice is to save it in the folder you typically use for Web images.
Type a name in the File Name text box.
Choose Images Only from the Export drop-down list and click Save.
In Chapter 6 in this minibook, you discover how to export entire pages with sliced images.