So you have beautiful artwork but aren't sure how to remove it from your screen. You could have a party and invite all interested clients to stand around your monitor and admire it or share or sell your artwork by posting it on the Internet or printing it.
In this chapter, we show you how to use your illustrations in a variety of workflows, from using Illustrator files in page layout programs to exporting files for Photoshop (and other programs) and the Web. This chapter can help you use your artwork effectively and understand the saving and flattening choices available in Adobe Illustrator.
In this section, we show you how general choices differ in the Save As dialog box (choose File
When you choose File
Tip
If you need a file format not listed in the regular Save As dialog box, choose File
Warning
Many formats rasterize artwork, so they no longer maintain vector paths and the benefits of being vector. Scalability isn't limited, for example. If you think that you may want to edit your image again later, be sure to save a copy of the file and keep the original in the .ai format.
If you're working with the programs in the Creative Suite, the best way to save a file is as a native Illustrator .ai file. For instance, the .ai format works with Adobe applications such as Adobe InDesign for page layout, Adobe Dreamweaver for Web page creation, Adobe Photoshop for photo retouching, and Adobe Acrobat for cross-platform documents.
Understanding when it's best to use the .ai format is important. Saving your illustration as an .ai file ensures that it's editable; it also ensures that any transparency is retained, even if you use the file in another application.
To save and use a file in native Illustrator format, follow these steps:
Tip
After you follow the preceding step list to prepare your Illustrator file, you can use the illustration in other Adobe applications:
Adobe Acrobat: Open the Acrobat application and choose File

Adobe InDesign: Choose File
Adobe Photoshop: Choose File
If you want to go crazy with an Illustrator file in Photoshop, when you save the file in Illustrator, choose File
In Photoshop, choose File
Adobe Flash: Use the integration features built into Adobe Illustrator to cut and paste directly into Adobe Flash. If you choose Edit
You can also choose File
Adobe Dreamweaver: By choosing File
Click the Image button in the Insert panel in Dreamweaver. When the Select Image Source dialog box appears, navigate to the location where you saved your optimized file. Select it and click OK. If your file is located out of the root folder for the site you're working on, an alert window appears, offering the opportunity to save the file with your other site assets. See Book VI, Chapter 4 for more information about importing images in Dreamweaver.

When saving an .ai or .eps file, you can choose File
When the Illustrator Options dialog box appears, choose a version from the Version drop-down list. Keep in mind that any features specific to newer versions of Illustrator aren't supported in older file formats, so make sure that you save a copy and keep the original file intact. Adobe helps you understand the risk of saving back to older versions by putting a warning sign next to the Version drop-down list and showing you specific issues with the version you selected in the Warnings window.
Encapsulated PostScript File (EPS) is the file format that most text editing and page layout applications accept; EPS supports vector data and is completely scalable. Because the Illustrator .eps format is based on PostScript, you can reopen an EPS file and edit it in Illustrator at any time.
To save a file in Illustrator as an EPS, follow these steps:
Choose File
From the Version drop-down list, choose the Illustrator version you're saving to.
In the EPS Options dialog box that appears (shown in Figure 13-2), choose the preview from the Format drop-down list:
Select either the Transparent or Opaque radio button, depending on whether you want the non-image areas in your artwork to be transparent or opaque.
Specify your transparency settings.
These settings are grayed out if you haven't used transparency in the file. (See the "Flattening Transparency" section, later in this chapter, for more about this setting.)
Leave the Embed Fonts (for Other Applications) check box selected to leave fonts you used embedded in the EPS file format.
In the Options section, leave the Include CMYK PostScript in RGB Files check box selected.
If you don't know which Adobe Postscript level you want to save to, leave it at the default.
Click OK to save your file in EPS format.

If you want to save your file in a format that supports more than a dozen platforms and requires only Acrobat Reader, available as a free download at www.adobe.com, choose to save your file as a PDF (Portable Document Format) file.
If you can open an Illustrator file in Acrobat, why would you need to save a file in PDF format? For one thing, you can compress a PDF to a smaller size; also, the receiver can double-click the file and then Acrobat or Acrobat Reader launches automatically.
Depending on how you save the PDF, you can allow some level of editability in Adobe Illustrator. To save a file as a PDF, follow these steps:
Choose File
In the Adobe PDF Options dialog box that appears, choose one of these options from the Preset drop-down list:
Illustrator Default: Creates a PDF file in which all Illustrator data is preserved. PDF files created using this preset can be reopened in Illustrator with no loss of data.
High Quality Print: Creates PDF files for desktop printers and proofers.
PDF/X-1a:2001: The least flexible, but quite powerful, delivery method for PDF content data; requires that the color of all objects be CMYK (Cyan, Magenta, Yellow, Black) or spot colors. Elements in RGB (Red, Green Blue) or Lab color spaces or tagged with International Color Consortium (ICC) profiles are prohibited. All fonts used in the job must be embedded in the supplied PDF file.
PDF/X-3:2002: Has slightly more flexibility than the X-1a:2001 method (see preceding bullet) in that color managed workflows are supported elements in Lab and attached ICC source profiles may also be used.
PDF/X-4:2008: Based on PDF 1.4, which includes support for live transparency and has the same color management and ICC color specifications as PDF/X-3. You can open PDF files created for PDF/X-4 compliance in Acrobat 7.0 and Reader 7.0 and later.
Press Quality: Creates a PDF file that can be printed to a high-resolution output device. The file will be large but maintain all information that a commercial printer or service provider needs in order to print files correctly. This option automatically converts the color mode to CMYK, embeds all fonts used in the file, prints at a higher resolution, and uses other settings to preserve the maximum amount of information contained in the original document.
Tip
Before creating an Adobe PDF file by using the Press Quality preset, check with your commercial printer to determine the output resolution and other settings.
Smallest File Size: Creates a low-resolution PDF suitable for posting on the Internet or sending by e-mail.
Standard: Lets you select, from the Standard drop-down list, the type of PDF/X file you want to create. Avoid picking a PDF/X standard unless you have a specific need or are filling a request.
Compatibility: Makes different features available for different versions, such as the ability to support layers in Version 6 or higher. For the most compatible file type, choose Acrobat 5 (PDF 1.4). To take advantage of layers or to preserve spot colors, you must choose Acrobat 6 or higher.
Click Save PDF to save your file in PDF format.
Note
If you want to be able to reopen the PDF file and edit it in Illustrator, make sure that you leave the Preserve Illustrator Editing Capabilities check box selected in the Adobe PDF Options dialog box.
In the Adobe PDF Options dialog box, to the left of the preset choices, are options you can change to customize your settings. Skim the options to see how to change resolution settings and even add printer's marks. Take a look at Book V to find out more about the additional Acrobat PDF options.
Tip
Want a press-quality PDF but don't want to convert all your colors to CMYK? Choose the Press setting and then click the Output options. In the Color Conversion drop-down list, select No Conversion.
If you need to save artwork for the Web, no feature is better than Save for Web & Devices. This dialog box opens a preview pane where you can test different file formats before you save the file.
To save an Illustrator file that you intend to use in a Web page, just follow these steps:
Choose File
The Save for Web & Devices dialog box appears, showing your artwork on the Optimized tab. (See Figure 13-3.)
Choose a tabbed view: Original, Optimized, 2-Up, or 4-Up.
You see as a default the artwork in Optimized view, which previews the artwork as it will appear based on the settings to the right. The best choice is 2-Up view because it shows your original image versus the optimized version.
Choose a setting for your file from the options on the right.
If you want to make it easy on yourself, choose a preset from the Preset drop-down list. Keep these points in mind:
Graphics Interchange Format (GIF) is generally used for artwork with spans of solid color. GIF isn't a lossy format. You can make your artwork smaller by reducing the number of colors in the image — hence the choices, such as GIF 64 No Dither (64 colors). The lower the number of colors, the smaller the file size. You can also increase or decrease the number of colors in the file by changing the preset values in the Color text field or by clicking the arrows to the left of the Color text field.
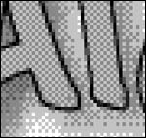
Dithering tries to make your artwork look like it has more colors by creating a pattern in the colors. It looks like a checkerboard pattern up close and even far away, as shown in Figure 13-4. It also makes a larger file size, so why use it? Most designers don't like the effect and choose the No Dither option.
Joint Photographic Experts Group (JPEG) is used for artwork that has subtle gradations from one shade to another. Photographs are often saved in this format. If you have drop shadows or blends in your artwork, select this format. JPEG is a lossy file format — it reduces an image to a lesser quality and can create odd artifacts in your artwork. You have choices, such as High, Medium, and Low in the Settings drop-down list — make sure to choose wisely. You can also use the Quality slider to tweak the compression.
PNG-8 is quite similar to the GIF file format. Unless you have a certain reason for saving as PNG-8, stick with the GIF file format.
PNG-24 supports the best of two formats (GIF and JPEG). The Portable Network Graphics (PNG) format supports not only the nice gradients from one tonal value to another (such as JPEGs) but also transparency (such as GIFs). It isn't just any old transparency: If you make an object 50 percent transparent in Adobe Illustrator and then save it by selecting Save for Web & Devices as a PNG-24 file with the Transparency check box selected, the image shows through to any other objects underneath it on its destination page.
The Shockwave Flash (SWF) graphics file format is a version of the Adobe Flash Player vector-based graphics format. Because a SWF file is vector based, its graphics are scalable and play back smoothly on any screen size and across multiple platforms. From the Save for Web & Devices dialog box, you can save your image directly to SWF from Adobe Illustrator. Using the SWF choice, you can preview and make decisions about how you want to export to the file and make decisions about how to export layers.
Scalable Vector Graphics (SVG) is an emerging Web standard for two-dimensional graphics. SVG is written in plain text and rendered by the browser, except that in this case it isn't just text that's rendered but also shapes and images, which can be animated and made interactive. SVG is written in XML (Extensible Markup Language). You can choose to save Scalable Vector Graphics out of Adobe Illustrator from the Save for Web & Devices dialog box.
Use the Wireless Application Protocol Bitmap Format (WBMP) format for bitmap images for mobile devices. This format produces a black-and-white image that is not necessarily attractive, but necessary for some mobile devices.
When you're satisfied with your chosen settings, click Save.

Tip
When saving illustrations for the Web, keep these points in mind — they make the whole process much easier for you and anyone who uses your illustrations:
Keep file sizes small. Don't forget that if you're saving illustrations for a Web page, many other elements will also be on that page. Try to conserve on file size to make downloading the page quicker for viewers with dial-up connections. Most visitors don't wait more than ten seconds for a page to download before giving up and moving to another Web site.
When you make your choices, keep an eye on the file size and the optimized artwork in the lower left corner of the preview window. A GIF should be around 10K on average, and a JPEG around 15K. (Though these rules aren't written in stone, please don't try to slap a 100K JPEG on a Web page.)
Tip
You can change the download time by clicking the panel menu in the upper right corner of the Save for Web & Devices dialog box and choosing Optimize to File Size. Then you can enter a final file size and have Illustrator create your settings in the Save for Web & Devices dialog box.
Preview the file before saving it. If you want to see the artwork in a Web browser before saving it, click the Preview in Default Browser button at the bottom of the Save for Web & Devices dialog box. The browser of choice appears with your artwork in the quality level and size in which it will appear. If no browser is selected, click and hold down the Preview in Default Browser button to choose Other and then browse to locate a browser you want to use for previewing. Close the browser to return to the Save for Web & Devices dialog box.
Change the size. Many misconceptions abound about the size of Web artwork. Most people generally view their browser windows in an area measuring approximately 700 × 500 pixels. Depending on the screen resolution, this setting may cover the entire screen on a 14-inch monitor. Even viewers with 21-inch, high-resolution monitors often don't want to have their entire screens covered by a browser window, however, so their areas still measure approximately 700 × 500 pixels. When choosing a size for your artwork, choose one with proportions similar to these. For example, if you want an illustration to occupy about a quarter of the browser window's width, make your image about 175 pixels wide (700÷4 = 175). If you notice that the height of your image is more than 500 pixels, whittle the height in size as well or else viewers have to scroll to see the whole image (and it will probably take too long to download).
Use the Image Size tab to enter new sizes. As long as the Constrain Proportions check box is selected, both the height and width of the image change proportionally. Click the Apply button to change the size, but don't close the Save for Web & Devices dialog box.
Finish the save. If you aren't finished with the artwork but want to save your settings, hold down the Alt (Windows) or Option (Mac) key and click the Remember button. (When you aren't holding down the Alt or Option key, the Remember button is the Done button.) When you're finished, click the Save button and save your file in the appropriate location.
You may find that all those cool effects you added to your illustration don't print correctly. When you print a file that has effects, such as drop shadows, cool gradient blends, and feathering, Illustrator flattens them, by turning into pixels any transparent areas that overlap other objects and leaving what it can as vectors.
To understand flattening, look at Figure 13-5 to see the difference between the original artwork (on the left) and the flattened artwork (on the right). Notice that in the figure, when the artwork was flattened, some areas turned into pixels. But at what resolution? Flattening helps you determine the quality of art — before receiving an unpleasant surprise at the outcome.

If you've taken advantage of transparency, or effects using transparency (which we discuss in Chapter 11 of this minibook), follow these steps to produce the highest-quality artwork in your file:
Make sure that the artwork you created is in CMYK mode.
You can change the document's color mode by choosing File
Choose Effects
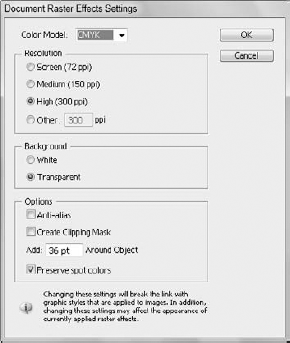
The Document Raster Effects Settings dialog box appears, as shown in Figure 13-6.
Choose the resolution you want to use by selecting an option in theResolution area
Select the Screen (72 ppi) option for Web graphics, Medium (150 ppi) for desktop printers and copiers, and High (300 ppi) for graphics to be printed on a press.
Choose whether you want a white or transparent background.
If you select the Transparent option, you create an alpha channel that's retained if the artwork is exported into Photoshop.
You can generally leave the items in the Options section deselected:
The Anti-Alias check box applies antialiasing to reduce the appearance of jagged edges in the rasterized image. Deselect this option to maintain the crispness of fine lines and small text.
The Create Clipping Mask check box creates a mask that makes the background of the rasterized image appear transparent. You don't need to create a clipping mask if you select the Transparent option for your background.
The Add around Object text field adds the specified number of pixels around the rasterized image.
The Preserve Spot Colors check box keeps any spot colors you have defined intact. Leave this checked.
Click OK.
The next step is to set the transparency options in the Document Setup dialog box.
Choose File
From the Transparency section in the middle of the dialog box, click the Preset drop-down list and select the Low, Medium, High, or Custom option. Select the Low option for onscreen viewing, the Medium option for printers and copiers, or the High option for press quality. To control more settings, click the Custom button to the right of the drop-down list.
Click OK.
Tip
If you customize settings regularly, choose Edit
You can apply the flattening in several ways. Here are three simple methods:
Select the objects that require flattening and choose Object
Choose File
Note
Overprints aren't preserved in areas that use transparency.
Choose File
If you want to preview your flattening, open the Flattener Preview panel by choosing Window
The Flattener Preview panel doesn't apply flattening, but it shows you a preview based on your settings. Click the Refresh button and choose Show Options from the panel menu. Test various settings without flattening the file. Experiment with different settings and then save your presets by selecting Save Transparency Flattener Preset from the panel menu. The saved settings can be accessed in the Preset drop-down list in the Options dialog boxes that appear when you save a file in EPS format or in the Document Setup dialog box.
To update the preview, click the Refresh button after making changes.
Tip
Zoom in on artwork by clicking in the Preview pane. Scroll the artwork in the Preview pane by holding down the spacebar and dragging. Zoom out by Alt-clicking (Windows) or Option-clicking (Mac).
Printing from Illustrator gives you lots of capabilities, such as printing composites to separations and adding printer's marks.
To print your illustration, follow these steps:
Choose File
In the Print dialog box that appears, select a printer if one isn't already selected.
If the PPD isn't selected, choose one from the PPD drop-down list.
A PPD is a printer description file. Illustrator needs one in order to determine the specifics of the PostScript printer you're sending your file to. This setting lets Illustrator know whether the printer can print in color, the paper size it can handle, and its resolution, as well as many other important details.
Choose from other options.
For example, use the General options section to pick pages to print. In the Media area, select the size of the media you're printing to. In the Options area, choose whether you want layers to print and any options specific to printing layers.
Click the Print button to print your illustration.
That's it. Although printing illustrations can be quite simple, the following list highlights some basic points to keep in mind as you prepare one for printing:
Print a composite: A composite is a full-color image, where all inks are applied to the page (and not separated out onto individual pages — one apiece for cyan, magenta, yellow, and black). To ensure that your settings are correct, click Output in the print options pane on the left side of the Print dialog box and select Composite from the Mode drop-down list.
Print separations: To separate colors, click Output in the print options pane on the left side of the Print dialog box; from the Mode drop-down list, choose the Separations (Host-Based) option. Select the In-RIP Separations option only if your service provider or printer asks you to. Other options to select from are described in this list:
The resolution is determined by your PPD, based on the dots per inch (dpi) in the printer description. You may have only one option available in the Printer Resolution drop-down list.
Select the Convert Spot Colors to Process check box to make your file 4-color.
Click the printer icons to the left of the listed colors to turn off or on the colors you want to print.
Printer's marks and bleeds: Click Marks and Bleeds in the print options pane on the left side of the Print dialog box to turn on all printer's marks, or just select the ones that you want to appear.
Specify a bleed area if you're extending images beyond the trim area of a page. If you don't specify a bleed, the artwork stops at the edge of the page and doesn't leave a trim area for the printer.
Tip
After you create a good set of options specific to your needs, click the Save Preset button (which is the disk icon to the right of the Print Preset drop-down list). Name your presets appropriately; when you want to use a particular preset, select it from the Print Preset drop-down list at the top of the Print dialog box for future print jobs.