Making images work for the Web
Touring the Property inspector
Inserting Photoshop files and working with Smart Objects
Aligning images and adding space around them
Creating backgrounds from images
Creating a rollover
Inserting a Flash movie on a page
Placing images that are interesting and informative is one of the most exciting parts of building a Web page. In this chapter, you see how to insert and optimize native Photoshop (PSD) files directly in Dreamweaver and how to take care of basic needs such as resizing, cropping, and positioning an image. You also find out how to create interesting backgrounds and create easy rollovers.
Tip
If you plan to follow any steps in this chapter, create a site or have a practice site already open. Images are much-needed linked assets on your page — you don't want to lose track of them in your filing system. If you don't know how to create a site, read Chapter 3 of this minibook.
Placing images isn't difficult, but you must consider the formats they're saved in and their file sizes. (See Book IV, Chapter 10 for details on selecting the correct format and using the Save for Web & Devices feature in Photoshop.)
Putting images on a Web page requires planning to make sure that sizes are exactly what you want. You also need to make sure that you don't prevent a page from loading quickly by having too many images.
If you look in the lower right corner of the Document window, you see the page file size and its approximate download time. In Figure 4-1, the page file size is 33k (kilobytes), and the download time is 5 seconds, based on the assumed connection speed of 56K (kilobits) per second. You can change the download speed by choosing Edit

Tip
The jury is always out when you want to know how fast a page should download, but fewer than 15 seconds is a good target. Unless you have truly compelling content, you'll probably lose viewers if they have to wait any longer. If your page requires more time, consider distributing its content across several pages.
Putting images on a Web page in Dreamweaver is easier than ever, mostly because of its integration with other Adobe products. You can use menu items, copy and paste, and even drag and drop images on your Dreamweaver page. In the following sections, you not only find out how to place images but also receive some helpful general tips related to putting graphics on the Web.
If you're preparing images ahead of time, save or move the optimized images into your site folder. You can select an image from anywhere in your directory — it just adds the extra step of copying the image into your site folder.
After you open a page, you can insert an image by following these steps:
Click somewhere on the page to position the cursor wherever you want to place the image.

If Image isn't the default for your Insert Image button, click and hold the arrow to the right of the button and choose Image from the drop-down list.
The Select Image Source dialog box appears.
Navigate to the spot where your image is located and click OK (Windows) or Choose (Mac) to place the selected image.
Tip
If your images are in your site folder, you can click the Site Root button in the Select Image Source dialog box to navigate there quickly. If an image isn't in your site folder, an alert box asks whether you want to copy the file there now.
If you're prompted to copy the image to your site's root folder, click Yes. When the Copy File As dialog box opens, verify that the name is correct and click Save.
The Image Tag Accessibility Attributes dialog box requests that you enter alt text. (For more on alt text, see the nearby sidebar, "Gotta have that alt text.")
Type a word or three that best describes your image (such as Our Family Photo) in the Alt text field and click OK.
The image is placed.
In addition to inserting images from the Insert panel or application menus, you can drag and place images directly from the Files panel to the page. If you're dragging an image, the cursor follows it while you move it around the document; release the mouse button when the cursor marks the correct spot where you'd like to drop the image.
If you're taking advantage of the Adobe Bridge workflow, you can leave Bridge running and drag images as you need them directly from the Bridge window into your Dreamweaver page. You can access Bridge by choosing File
If the image is a native Photoshop (PSD) or Fireworks (PNG) file, the Image Preview dialog box appears, giving you the opportunity to optimize the image before placing it.
You can also drag and drop an optimized image from your desktop or other folders into a Dreamweaver page. If an image is not in your site folder, you have the opportunity to copy that image to your site folder when it's placed.
Many of the tools you use when working with images are located in the Property inspector (see Figure 4-2).

You can choose from these properties when an image is selected:

Tip
You can select the default image editing application for different image file types by choosing Preferences

Optimizing an image: You can optimize images directly from the Dreamweaver page, but this method doesn't provide quite the same abilities as when you place a native Photoshop or Fireworks file, because the image you're selecting has already been optimized. It may already be a GIF or JPEG file — and yes, you can reduce the number of colors in the GIF or convert a JPEG to a GIF, but you can't increase color levels or quality on these images, because they're not linked to the original image file.
Cropping an image: This feature is sure to become a favorite because you can make cropping decisions right on your Dreamweaver page. Simply click the Crop tool, acknowledge the warning message that you're editing the image, and then click and drag the handles to the size you want. Press the Enter key and you're done!
Resampling an image: You may have heard that you shouldn't resize an image placed on a Dreamweaver page because if you were making the image larger, it would become pixilated, and if you were making the image smaller, you were wasting lots of bandwidth downloading the file. Fortunately, you can now use the Resample button on the Property inspector after you resize the image. Just keep in mind that making the image larger still causes some quality issues, so you should reduce the file size before clicking the Resample button. If you need to make an image considerably larger, find the original and optimize it to the proper size.
To resize an image, you can either click and drag out the lower right handle of the image or type a pixel value in the W (Width) and H (Height) text fields in the Property inspector.
Brightness and contrast: If high quality is important to you, open your original image in Photoshop and make tonal corrections with professional digital imaging tools. If volume and quickly getting lots of images and pages posted are important, take advantage of the Brightness and Contrast controls built into Adobe Dreamweaver. Simply click the Brightness and Contrast button in the Property inspector, acknowledge the Dreamweaver dialog box, and adjust the sliders to create the best image.
Sharpen: Add crispness to images by applying the Sharpness controls available in Dreamweaver. As with some of the other image editing features in Dreamweaver, you're better off using the Unsharp mask filter in Photoshop; in a pinch, this feature is a quick and useful tool to take advantage of. To use the Sharpening feature, click the Sharpen button, acknowledge the warning that you're changing the image, and use the slider to sharpen the image.
If you've created artwork or prepared images in Photoshop, you can place original PSD files directly in your pages. The Image Preview window lets you save Photoshop files into Web-ready image formats such as GIF, JPEG, and PNG and scale and crop artwork before it's placed on the page.
The ability to work with Photoshop files is useful for most designers who depend on Photoshop as part of their workflow. When you place Photoshop files on a page, Dreamweaver creates a Smart Object, an image that maintains a connection to the original Photoshop file from which it was created.
The image displays an icon that lets you know whether the original file was updated, and you can apply the changes in the original file to the image in one click.
To place a Photoshop file in your page, follow these steps:
Click wherever you want to place the new image and then click the Image object in the Insert panel's Common category.
When the Select Image Source dialog box appears, browse and select a Photoshop PSD file and then click Choose/OK to select the image.
The Image Preview dialog box appears, where you can optimize, crop, scale, and save your image in the Web-friendly GIF, JPEG, or PNG format, as shown in Figure 4-3.
On the Options tab, select from the Format drop-down list the file format you want to save your image in, and choose from the Quality drop-down list the quality settings that best suit your image.
Tip
You can use the Saved Settings drop-down list at the top of the dialog box to choose an image-quality preset.
(Optional) Click the File tab to switch to the File options, and then enter settings to scale your image or use the Crop tool at the bottom of the preview window to crop your image.
Click OK to save the image.
When the Save Web Image dialog box appears, navigate to your site's root folder and click OK to save the image in the appropriate folder (for instance, your default images folder).
If the Image Tab Accessibility Attributes dialog box appears, type a short description of the image in the alternate text field and click OK to place the image.
The new image is placed and a small icon appears in its upper left corner. This Smart Object indicator shows two green arrows, indicating that the image is up-to-date.

Figure 4-3. From the Image Preview dialog box, you can optimize and save a Web-ready image from a selected Photoshop file.
Select the image you placed in the preceding step list and locate the Original text field in the Property inspector — this field displays the location of the original Photoshop file. To edit the image, you can simply click the Edit in Photoshop button on the right side of the Property inspector to open the source file in Photoshop.
If you make changes to the original Photoshop file, the image you placed in the page displays a red-and-green arrow icon to let you know that it isn't up-to-date.

Warning
Moving the original PSD file connected to a page image displays an alert icon on the image and disables the link between the two. Keep original PSD files in a set location and be sure to revise the location of your source file by selecting the image and updating the original in the Property inspector.
Images and their adjacent text sit on the same baseline as a default, forcing text to run in one line to the right of the image. To control the wrapping of the text around the image, change the alignment of the image by selecting the image and then choosing an option from the Align drop-down list in the Property inspector.
The Align drop-down list provides these options:
Default: Baseline alignment is used (described in the second bullet).
Baseline (Default): The bottom of the image aligns with the baseline of the current line of text.
Top: The image aligns with the top of the tallest item in the line of text.
Middle: The baseline of the current line of text aligns with the middle of the image.
Bottom: The bottom of the image aligns with the baseline of the current line of text.
Text Top: The image aligns with the top of the tallest text in the line, usually (but not always) the same as
ALIGN=top.Absolute Middle: The middle of the current line aligns with the middle of the image.
Absolute Bottom: The bottom of the image aligns with the bottom of the current line of text.
Left: The image aligns to the left, and text flushes to the right of the image.
Right: The image aligns to the right, and text flushes to the left of the image.
You may want to add space around an image to keep the text from butting up to it. To create a space around an image, enter values into the H Space and V Space text fields in the Property inspector.
Tip
If you want to add space to only one side of the image, CSS (Cascading Style Sheets) provides the ability to add margins to only one side of an image. See Chapter 5 of this minibook for more information on using CSS to format text and page elements.
In addition, you can open the image in Photoshop and choose Image
Creating backgrounds for Web pages is fun and can be pursued in more ways than most people would imagine. You can create a repeating pattern with a single small image, create a watermark, or use a large image to fill an entire background. As a default, an HTML background repeats the selected image until it fills the screen. In conjunction with CSS properties, you can control or eliminate repeating behavior and even set precise positioning for a single background image.
If you're filling a background with a pattern, be sure to create a pattern image that has no discernable edges. (In Photoshop, choose Filter
To use to your advantage the default, repeated tiling for a background image, follow these steps:
In Photoshop, choose File
In the New dialog box that appears, create an image that's much wider than it is high, choose RGB, choose 72 dpi, and then click OK.
For example, enter 1000 in the Width text field and 20 in the Height text field.
Select a foreground and background color to create a blend; then use the Gradient tool to Shift+drag from the top to the bottom of the image area to create a gradient fill.
Choose File
See Book IV, Chapter 10 for more about the Save for Web & Devices feature.
In Dreamweaver, choose Modify
Tip
If the Page Properties button isn't visible, click the page — be sure not to select another element, such as an image.
In the Page Properties dialog box that appears, click the Browse button to the right of the background image, navigate to the location of your saved background image, and then click Choose/OK; click OK in the Page Properties dialog box.
The image appears in the background, repeating and creating a cool background gradient across the page!
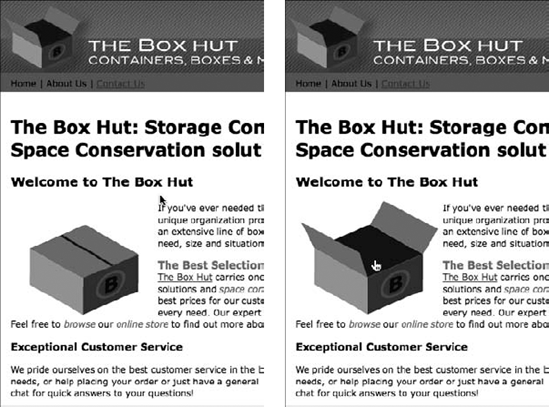
Depending on the size and resolution of a user's monitor, your background image may be forced to repeat. Repeating a background image can yield some creative results, as shown in Figure 4-5.

In Dreamweaver, you can insert image objects, including image placeholders, rollover images (images that change when a viewer rolls the mouse over the image), navigation bars, and Fireworks HTML. You access these image objects by choosing Insert
To create a rollover image, follow these steps:
Create the images to be used as the rollover.
You can generate these images in Fireworks, Illustrator, Photoshop, or any other application capable of saving images optimized for the Web.

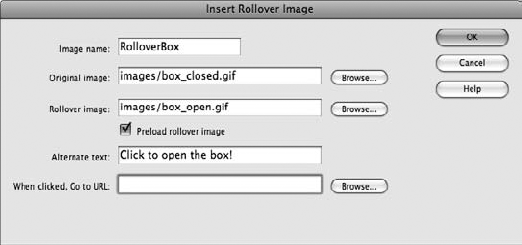
The Insert Rollover Image dialog box, shown in Figure 4-6, appears.
Type an image name without spaces in the Image Name text field.
This name is used in the script creating the rollover.
Click the Browse buttons to the right of the Original Image and Rollover Image text fields to locate the image that you want to appear as a default on the page and the image that appears only when someone hovers the mouse over the image.
Figure 4-7 shows an example of original and rollover images.
Leave the Preload Rollover Image check box selected.
This option downloads the rollover image when the page is downloaded to avoid delays in rollovers.
Type appropriately descriptive alt text in the Alt text field.
In the When Clicked, Go to URL text field, tell Dreamweaver where viewers are directed when they click your rollover image.
You can either click the Browse button to locate another page in your site or enter a URL. Note: If you are linking to a different Web site, you need to include the
http://prefix at the beginning of the URL.Click OK.
The rollover image is created on the page.
To preview the new rollover image, choose File
Tip
If you don't yet have a real link to use for a button or hyperlink, you can enter a pound sign (#) to create a dead link. The link or button appears clickable but doesn't go anywhere when clicked. This option is better than hitting the space bar to create an empty space as a link, as that will display a Page Not Found error when clicked.
Dreamweaver makes it easy to enhance Web pages by allowing you to insert interactive content such as Flash (SWF), Flash Video (FLV), and Shockwave files.
Follow these steps to place a Flash file on your Dreamweaver page:
Put the cursor on the page wherever you want to insert the Flash file.
Choose Insert
The Select File dialog box appears.
Navigate to the SWF file that you want to place and click OK (Windows) or Choose (Mac) to select the file.
In the Object Tag Accessibility Attributes dialog box, type a descriptive title for the movie in the Title field and click OK.
The Flash file is placed on the page.
On the Property inspector, click the Play button to preview your new Flash movie.
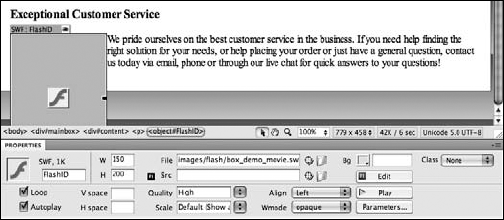
You can also adjust settings for your movie, as shown in Figure 4-8.