Creating a site
Adding pages to your site
Adding images to pages
Keeping track of your Web site files
Discovering HTML
In this chapter, you see the basic steps for putting a Web site together, from creating your first new, blank site to adding files to Web sites to playing (just a little) with HTML.
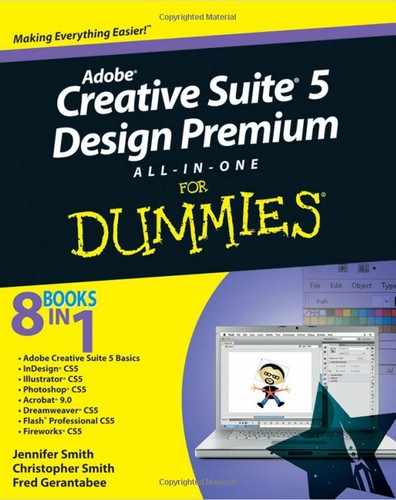
A Web site is a collection of related pages linked to one another, preferably in an organized manner. With the proper planning and a goal in sight, you can easily accomplish the task of creating an outstanding Web site. Figure 3-1 shows the general structure of a Web site. A Web site starts with a main page (or its home page), the central link to other pages in the site. The main page is also the page viewers see first when they type your URL in a browser. The main page is typically named index.html but may also be index.htm or even default.htm. Check with your service provider to find the correct name.
Pages are linked by hyperlinks, or references that take viewers from one point in an HTML document to another or from one document to another. (Read more about hyperlinks and how to create them in Chapter 6 of this minibook.)
Note
You should understand the following terms when you forge through the steps to create a Web site:
FTP (File Transfer Protocol): Allows a user on one computer to transfer files to and from another computer over a TCP/IP network. FTP is also the client program the user executes to transfer files. You can use FTP to transfer Web pages, images, and other types of files to a host Web server when you publish your site.
HTTP (Hypertext Transfer Protocol): The client-server TCP/IP protocol used on the Internet for the exchange of HTML documents.
TCP/IP (Transmission Control Protocol/Internet Protocol): Underlying protocols that make possible communication between computers on the Internet. TCP/IP ensures that information being exchanged goes to the right place, in a form that can be used, and arrives there intact.
URL (Universal Resource Locator): A standard for specifying the location of an object, such as a file, on the Internet. You type the URL, such as
www.dummies.com, into a Web browser to visit a Web page. A URL is also used in an HTML document (a Web page) to specify the target of a link, which is often another Web page.
Tip
Plan your site: How Web sites are organized is important. Typically, the purpose of a Web site is to sell something — a product, a service, or a thought, such as "Vote for me!" Without sound organization, a Web site may fail to sell to its visitors. You'll save an extraordinary amount of time if you just think ahead and plan your site's organization. Think about the topics you want to cover and then organize your site as you would a high school essay project, by planning the topic sentence, subtopics, and other elements. This plan can be a tremendous aid when you start mapping pages to be linked to others.
Even if you're creating only one page, be sure to create a site. A site gives you an organized method of keeping together images and other assets and offers additional options for managing those files.
To create a new site, follow these steps:
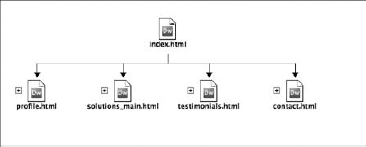
In Dreamweaver CS5, choose Site

You can also choose Dreamweaver Site from the Create New column of the Welcome screen. The Site Setup dialog box appears, as shown in Figure 3-2.
In the Site Name text box, enter a name for the site.
For example, if your site's focus is on bikes, you might name the site biking.
To change the local site folder, click the Folder icon to the right of the Local Site Folder field and select a new location or choose an existing folder.
The local site folder is the path where your new site folder will be created on your computer. It's where your site files and pages will be stored.
Click Save to create your new site.
As soon as you create a site, your site folder is waiting in the Files panel, as shown in Figure 3-3. Think of the Files panel as the control center for all your files, folders, and other assets, such as images, sound, and video that you use to create your Web site.

You can use the Files panel to view files and folders, whether they're related to your Dreamweaver site or not. You can use the Files panel to do typical file operations, such as open and move files.
After you create a site, you typically build a main page: the index.html or index.htm page. These reserved filenames are recognized by most every Web server as the starting page for a Web site. In addition, default.html and default.htm are also commonly recognized as starting pages. Check with your Web site hosting company or Internet service provider because in some instances your server may require a different name or may prefer one naming convention over another.
The following steps walk you through creating a new page and placing an image on it:
Choose File
The New Page dialog box appears.
You can create many types of new files, from blank pages to more advanced pages that include layouts already created in CSS.
To create a blank page, choose Blank Page
A blank, untitled HTML page appears.
Choose File
The Save As dialog box appears.
In the File Name text box, type index.html.
Note that the file is already mapped to your site folder. If you don't see the site's root directory (the main folder where all pages and assets are stored), click the Site Root button in the Save As dialog box to locate it.
Click Save.
Note that when you save a file, it appears in the Files panel.
After you have a blank page, you can add an image to it, including native Photoshop (PSD) files and Fireworks (PNG) images. You can find out more about images in Chapter 4 of this minibook, but in this section you can take a look at how placing images affects the Files panel.
To place an image on a page, follow these steps:

Alternatively, click the Common tab of the Insert panel and click the Insert Image button.
The Select Image Source dialog box appears.
Navigate to the location of your image and click Choose (Mac) or OK (Windows).
If you choose a native Photoshop (PSD) or Fireworks (PNG) file, the Image Preview dialog box appears, allowing you to optimize your image directly in Dreamweaver.
Tip
If you select a Web-ready image, such as GIF, JPG, or PNG and the image is outside your site folder, you see a warning. Dreamweaver alerts you that the image is outside the root folder, which causes issues when you copy pages to a Web server. Click Yes to copy the file to your site's root directory. Assign a new name there or just click Save to keep the same name and duplicate the image file into your site folder.
The Image Tag Accessibility Attributes dialog box appears.
All images should have Alt (alternate) text — text that appears before the image has downloaded or if the viewer has turned off the option to see images.
Add an appropriate description of the image in the Alternate Text text box.
If the image is a logo, the description should include the company name as the Alt text or, if it's a photo or an illustration, describe the image in a few words.
From an accessibility standpoint, alt text aids screen readers (such as those used by the visually impaired) in identifying image content to users. In addition, Alt text is a valuable tool in providing search engines a way of indexing image content included on your site.
Click OK.
The image is added to the page and to the Files panel, as shown in Figure 3-4.
Tip
You can edit an image by double-clicking it in the Files panel. You can also use the Property inspector to see details about the image, including its dimensions and file size. You can also modify image properties, including border, hyperlink, and vertical and horizontal padding.

Figure 3-4. Use the Property inspector to see information about your image and modify image properties.
When you create a larger site with multiple pages linked to each other, you may want to change the view of the Files panel. By clicking the drop-down list (on the top-left side of the Files panel) where your site is located, you can locate folders and other sites you've used recently. By clicking the View drop-down list to the right, you can change the appearance of the Files panel. Refer to Figure 3-4 for an example of how a site appears in Local view.
Tip
Open files from the Files panel by double-clicking them.
You can find out more about uploading your site to a Web server in Chapter 9 of this minibook, but for now, understand that you can go back and open the Site Setup dialog box at any time by choosing Site
The Web page itself is a collection of text, images, links, and possibly media and scripts. The Web page can be as complex or simple as you want — both types are equally effective if created properly. In this section, we show you how to create a page in Dreamweaver and then investigate the HTML that creates it.
To create a blank page, choose File
Dreamweaver works in the background to ensure that your page works in most all recent versions of common Web browsers, such as Firefox, Internet Explorer, and Safari. Lots of code is created to help the Web browser recognize that this is HTML and which version of HTML it uses.
Tip
By default, Dreamweaver uses the XHTML 1.0 Transitional standard every time you create a new HTML page. XHTML combines the strictness of XML (Extensible Markup Language) with HTML tags to create a language that works dependably and consistently across Web browsers and new devices (such as cellphones and PDAs) alike.
Select Split view by clicking the Split button on the Document toolbar; this action displays both Design and Code views simultaneously, as shown in Figure 3-5, so that you can see how your changes affect HTML behind the scenes. Select the text; then select the Text option from the Common drop-down list on the Insert panel. Suppose you then choose B (for bold) to bold the selected text. In the code view of your page, you would see that the <strong> tag was added before the text and the </strong> tag was added after the text.
Tip
You can change the orientation and arrangement of the views in Split View. To switch the Design view from the right to the left, choose View

Figure 3-5. Working in Split view helps you see how your page elements are created and formatted with HTML tags.
HTML code, though easy, is just like any other language, in that you must figure out the syntax (the proper sequence and formation of the code) and vocabulary (memorize lots of tags). You don't have to have gobs of tape on your glasses to build good, clean Web pages, but you do have to review the following HTML basics.
Tip
If you're an experienced user, you know that by copying and pasting code, you can figure out a lot about HTML code. If you're a new user, copying and pasting code can help you understand the code that others have implemented on their pages and perhaps give you some ideas. Working in Split view also helps you understand how the items you add from the toolbars and panels translate into code.
In general, HTML tags are composed of three parts:
Tag: The main part of the HTML information — for example,
<strong>for strong or bold,<font>for the font tag, or<table>for an HTML table. A tag is always constructed of a keyword enclosed in a set of brackets, such as<p>, or<blockquote>.Because most tags come in pairs, you must enter an opening tag (
<p>) and a closing tag (</p>). In XHTML 1.0 Transitional (the standard used for all new pages created in Dreamweaver), all tags must be closed. You can either close a tag or create a self-closing tag by including the slash before the closing bracket:<br/>.For example, if you make text bold by adding the tag
<strong>, tell the text where to stop applying boldface by inserting a closing tag</strong>. Otherwise, the text continues to appear bold throughout the remainder of the page.Attribute: Gives you a way to further fine-tune the appearance of a specific HTML tag. An attribute is always added to an opening tag and can take different values to control attributes such as the link color, size, and destination. For example,
alignis an attribute of the<p>(paragraph) tag that specifies how text inside of the paragraph should align. You may also see that many HTML tags share the same attributes.
Here's an example of a paragraph (<p>) tag with an attribute added:
<p align="center">This is centered text</p>
Value: The color, size, and link destination, for example, specified in an attribute. For example, you can specify a hexadecimal number as the value for a color attribute. An example of a value for the
bgcolorattribute of the<body>tag (which controls overall page appearance) could be"red"or"#CC0000".
One last thing: Nesting is the order in which tags appear. If a <strong> tag is applied, it looks like this: <strong>This text is bold</strong>. Add an italic tag and you see <strong><em>This text is bold and italic.</em></strong>. Notice the in-to-out placement of the tags: You work your way from the inside to the outside when closing tags.