Even after a fresh installation of Windows XP, a glance at your Start→All Programs menu reveals a rich array of preinstalled Windows XP applications—as an infomercial might put it, they’re your free bonus gift. This chapter offers a crash course in these programs, a few of which could probably merit Missing Manuals of their own.
Microsoft calls many of these built-in programs accessories. They have two things in common. First, they’re all smallish, single-purpose programs that you’ll probably use only occasionally. Second, you get to them from the Start→All Programs→Accessories menu.
If you have trouble using your keyboard or making out small text on the screen, the programs in the Start→All Programs→Accessories→Accessibility menu may be just what you need.
Windows XP is one of the most disability-friendly operating systems on earth. It includes a long list of features that enables the PC to magnify, speak, or otherwise boost the elements of the screen.
The Accessibility Wizard offers these features to you, one feature at a time. Its screens invite you to enlarge all kinds of things: the type in dialog boxes and menus, scroll bars and window borders, desktop icons, the arrow cursor itself, and so on.
Tip
Not all of these features are useful only to the disabled. If you have a flat-panel screen, for example, you may have noticed that everything on the screen is smaller than it might be on a traditional CRT screen. The result is that the cursor is sometimes hard to find and the text is sometimes hard to read.
Finally, the wizard offers specialized accessibility features for the hearing-impaired and people with trouble using the keyboard. All of these visibility options are duplicated in Windows XP’s various Control Panel programs (see Chapter 8). Microsoft just hoped that by putting them all in a single wizard, in interview format, these features would be easier to find.
Magnifier is like a software magnifying glass—a floating rectangular window that enlarges whatever your cursor touches (see Figure 6-1). Using the Magnifier Settings dialog box shown in Figure 6-1, you can specify how much magnification you want (1 to 9 times), which area of the screen gets magnified, and so on.
If you’re having trouble typing, keep the On-Screen Keyboard program in mind. It lets you type just by clicking the mouse (Figure 6-1)—an option you may find useful in a pinch.
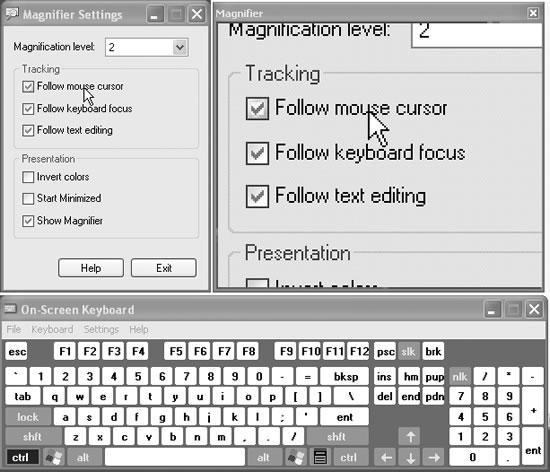
Figure 6-1. Top: Open Magnifier by choosing Start→All Programs→ Accessories→Accessibility→Magnifier. You can drag the large magnified window (top right) around to a more convenient spot on the screen, and even resize it by dragging the lower-right corner. If you like, use the Magnifier Settings dialog box (top left) to choose the Invert Colors option a color scheme with higher contrast. Bottom: The On-Screen Keyboard may be just the ticket if your keyboard keys (or your hands) aren’t fully functional.
As the little welcome screen tells you, Narrator is a program that reads aloud whatever text appears on the screen—dialog boxes, error messages, menus, text you’ve typed, and so on. Narrator doesn’t work in all programs, and it sounds a little bit like a Norwegian who’s had a few beers. Still, if you have trouble reading text on the screen, or if you just like to hear your email read back to you, it’s better than nothing.
Tip
By closing or moving the Welcome dialog box, you’ll discover a second dialog box hiding squarely behind it—one that lets you control what Narrator reads, and when. For example, you might want to turn on “Move mouse pointer to the active item,” so that Windows doesn’t read anything to you until you’ve actually pointed to it.
This strange little program is designed to control the three accessibility programs just described. The first time you open it, a strange little error message warns you that some of Utility Manager’s features are available only if you start and stop the program using its keyboard shortcut (Windows logo key+U). That’s good advice.
Once you’re in, you’ll find the same controls for Magnifier, Narrator, and On-Screen Keyboard: Start and Stop buttons, plus three checkboxes—one of which lets you start any of these accessibility programs automatically when you log into Windows XP.
The Start→All Programs→Accessories→Communications menu contains several shortcuts:
HyperTerminal is an old-time, text-only terminal program—the sort people once used to dial into BBS (bulletin board) systems in the pre-Web era. Even today, however, you may find this program useful for connecting to telnet systems—the text-only display system used by many public libraries.
You can also use HyperTerminal to set up a PC-to-PC, modem-to-modem link—a useful setup when somebody wants to shoot a file over to you directly, completely bypassing the Internet. The most important thing to remember is that both computers must use precisely the same HyperTerminal settings. (The world is full of programs that are designed for this kind of file transfer, but this one is free.) If you yearn for additional details, see “To receive a file from a remote computer” in HyperTerminal Help.
Network Connections is a shortcut to the Network Connections program in the Control Panel, a window that lists every connection you’ve established to the Internet or to an office network. See Chapter 18 for details.
Network Setup Wizard and New Connection Wizardare shortcuts to the setup programs described in Chapter 18.
Remote Desktop Connection. As described in the Introduction, one of the differences between the Professional and Home editions of Windows XP is something called Remote Desktop connection—a feature that lets you dial into your PC from the road, bringing to your screen everything you’d see if you were sitting in front of the home PC.
For this to work, only the machine you’re dialing into (the host computer) needs to be running XP Pro. The PC doing the actual dialing (the client computer) can be running Windows 95, 98, Me, NT 4.0, 2000 or, of course, XP. Section 21.4.1 has the details.
The truth is, you probably won’t find the programs in the Entertainment menu particularly entertaining (unless there’s very little going on in your life). A better name for this menu (Start→All Programs→Accessories→Entertainment) might be Multimedia, since all the programs in it relate to video and sound. They’re described in Chapter 7, which is, by happy coincidence, called “Pictures, Sounds, and Movies.”
This menu (Start→All Programs→Accessories→System Tools) is designed to be a toolbox for basic Windows administration, maintenance, and troubleshooting programs. These programs, including Disk Cleanup, Disk Defragmenter, Scheduled Tasks, System Information, and System Restore, are all described in Chapter 16.
Three of this submenu’s contents, however, have nothing to do with PC health and fitness, and were stashed here perhaps because Microsoft couldn’t find a more logical place to stash them. The items in question are Activate Windows, Character Map, and the Files and Settings Transfer Wizard.
Few Windows features are more controversial than the activation scheme, a form of copy protection that prevents the installation of a single copy of Windows XP onto more than one PC.
If you’re not ready to join the Windows XP generation, there’s no need to activate your copy when the installer prompts you. In fact, you have 30 days to evaluate Windows XP and decide whether you want to leave it in place.
During that time, reminder balloons appear at the lower-right corner of your screen with all the subtlety of a blinking neon sign. If you ultimately decide to activate your copy, either click that reminder balloon or open this little program, which will walk you through the activation process. (Once you’ve activated your copy, you won’t need this program anymore. Feel free to delete it from your Start menu.)
Your computer is capable of creating hundreds of different typographical symbols—the currency symbols for the yen and British pound, diacritical markings for French and Spanish, various scientific symbols, trademark and copyright signs, and so on. Obviously, these symbols don’t appear on your keyboard; to provide enough keys, your keyboard would have to be the width of Wyoming. You can type the symbols, but they’re hidden behind the keys you do see.
The treasure map that reveals their locations is the Character Map. When first opening this program, use the Font drop-down list to specify the font you want to use (because every font contains a different set of symbols). Now you see every single symbol in the font. As you hold your mouse down on each symbol, a magnified version of it appears to help you distinguish them. See Figure 6-2 for details on transferring a particular symbol to your document.
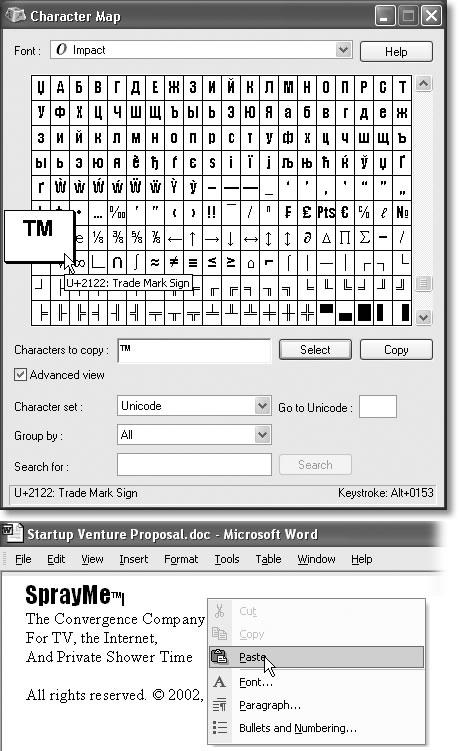
Figure 6-2. Top: Double-click a character to transfer it to the “Characters to copy” box, as shown here. (Double-click several in a row, if you want to capture a sequence of symbols.) You may have to scroll down quite a bit in some of today’s modern Unicode fonts, which contain hundreds of characters. Click Copy, then Close. Bottom: When you’ve returned to your document, choose Edit→Paste to insert the symbols.
This handy utility is designed to simplify the process of moving your life from an older PC to a new one. Appendix A.8.1 has instructions.
The Address Book (Start→All Programs→Accessories→Address Book) is a central Windows directory for phone numbers, email addresses, and mailing addresses.
Once you’ve launched the program (see Figure 6-3), choose File→New Contact. You’re shown a dialog box with seven tabbed panels for various categories of contact information. Now you’re supposed to type the name, email address, phone number, and other information for each person in your social or business circle. After you’ve gone to the trouble of typing in all of this information, Windows XP repays your efforts primarily in two places:
In Outlook or Outlook Express. As Chapter 12 makes clear, a well-informed address book is extremely useful when sending an email message. There’s no need to remember that Harold Higgenbottom’s email address is [email protected]; instead, you only need to type hhig. The program fills in the email address for you automatically.
In the Search dialog box. As noted in Chapter 1, you can quickly look up somebody’s number by choosing Start→Search→“Printers, computers or people.” (If you’re not part of a corporate domain, the command says “Computers or people” instead.) This function searches your address book and pulls up the requested name and number.
Tip
To import address book information from another program, choose File→Import→Address Book (WAB) or File→Import→Other Address Book. Windows can inhale the information from any of several popular address book programs.
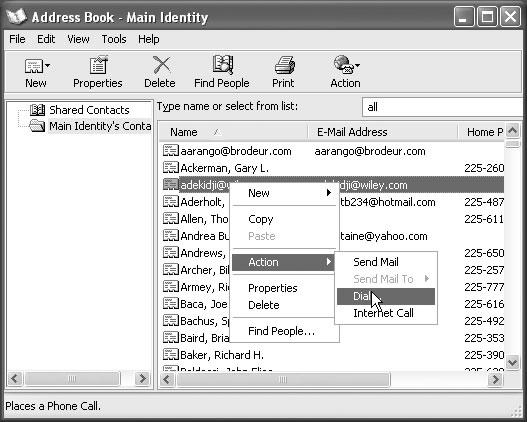
Figure 6-3. Left column: Generally you can ignore this business of identities, a system of separating the address books and email collections of several people who share the same PC. The Windows XP user accounts feature described in Chapter 17 is a far superior method of keeping everybody’s stuff separate. Lower right: Right-clicking a name in your address book produces a shortcut menu that offers such useful commands as Send Mail and Dial.
At first glance, this calculator (Start→All Programs→Accessories→Calculator) looks like nothing more than a thinner version of every pocket calculator you’ve ever seen (Figure 6-4). You can operate it either by clicking the buttons with your mouse or by pressing the corresponding keys on your keyboard.
Tip
Choosing View→Digit Grouping instructs the Calculator to display numbers with commas (123,456,789), making large numbers (123456789) a lot easier to read.
Most of the buttons look just like the ones on the plastic calculator that’s probably in your desk drawer at this very moment, but several require special explanation:
/. The slash means “divided by” in computerese.
*. The asterisk is the multiplication symbol.
sqrt. Click this button to find the square root of the currently displayed number.
%. Type in one number, click the * button, type a second number, and then click this button to calculate what percentage the first number is of the second.
Tip
This calculator may appear to have almost every feature you could desire, but, in fact, it lacks a paper-tape feature—and we all know how easy it is to get lost in the middle of long calculations.
The solution is simple: Type your calculation, such as 34+(56/3)+5676+(34*2)=, in a word processor. Highlight the calculation you’ve typed, choose Edit→Copy, switch to the Calculator, and then choose Edit→Paste. The previously typed numbers fly into the Calculator in sequence, finally producing the grand total on its screen. (You can then use the Edit→Copy command to copy the result back out of the Calculator, ready for pasting into another program.)
But by choosing View→Scientific, you turn this humble five-function calculator into a full-fledged scientific number cruncher, as shown in Figure 6-4.
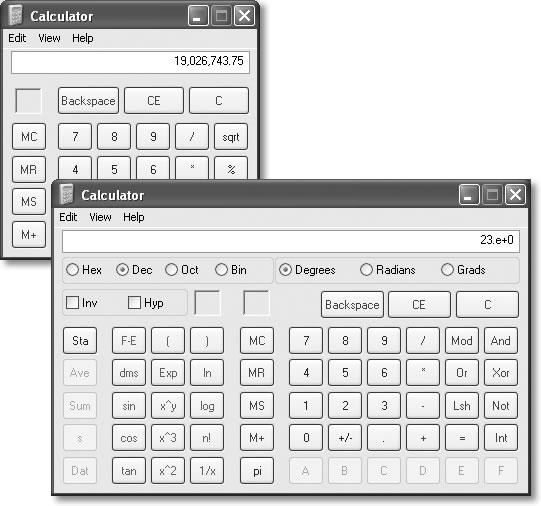
Figure 6-4. After ducking into a phone booth, the humble Calculator (left) emerges as Scientific Calculator (right), which contains a hexadecimal/decimal/octal/binary converter for programmers, mathematical functions for scientists, and enough other buttons to impress almost anyone. To learn a particular button’s function, right-click it and choose What’s This? from the shortcut menu. Don’t miss the online help, by the way, which reveals that you can control even the scientific mode from the keyboard.
This program summons the MS-DOS window—the black, empty screen that’s familiar to longtime PC users. At the C:> prompt, you can type any of hundreds of DOS commands; when you press Enter, the PC executes your typed instruction.
You may need to use this DOS mode to run certain older programs that aren’t Windows- compatible; masters of DOS also extol its ability to manipulate (rename, for example) many files at once, to poke and prod a network (using DOS utilities such as ping.exe and netstat.exe), and so on.
Tip
To learn a few of the hundreds of DOS commands at your disposal, consult the Internet, which is filled with excellent lists and explanations. To find them, visit a search page like http://www.google.com and search for DOS command reference. You’ll find numerous ready-to-study Web sites that tell you what to type at the MS-DOS prompt.
Notepad is a bargain-basement text editor, which means it lets you open, create, and edit files that contain plain, unformatted text, like the Read.txt files that often accompany new programs. You can also use Notepad to write short notes or edit text that you intend to paste into your email program after editing it.
Notepad opens automatically when you double-click text files (those with the file extension .txt, as described in the previous chapter). You can also open Notepad by choosing Start→All Programs→Accessories→Notepad.
You’ll quickly discover that Notepad is the world’s most frill-free application. Its list of limitations is almost longer than its list of features.
For example, Notepad can’t open large files. If you double-click a text file icon that contains more than about 50 KB of text, Windows XP automatically opens the file in WordPad (described next) instead of Notepad. Furthermore, the Notepad window has no toolbar and can only work with one file at a time.
What’s more, the Print command on the File menu doesn’t even open the Print dialog box. Instead, it sends the file directly to your printer, so you can’t specify which pages you want, or how many copies of them.
Above all, Notepad is a text processor, not a word processor. That means that you can’t use any formatting at all—no bold, italic, centered text, and so on. That’s not necessarily bad news, however. The beauty of text files is that any word processor on any kind of computer—Windows, Mac, Unix, whatever—can open plain text files like the ones Notepad creates.
In the old days, Notepad didn’t automatically wrap lines of text to make everything fit in its window. As a result, chunks of text often went on forever in a single line of text The Windows XP Accessories or got chopped off by the right side of the window, which could produce disastrous results when you were trying to follow, say, a soufflé recipe.
In Windows XP, lines of text wrap automatically, exactly as they do in a word processor. But you’re still seeing nothing more than the effects of the Format→Word Wrap command—an option you can turn off, if you like, by choosing the command again. (You can tell when Word Wrap is on by the presence of a checkmark next to the command in the Format menu.)
You can use Paint to “paint” simple artwork or to edit graphics files from other sources. You might say that Paint, in other words, is something like Adobe Photoshop (well, in the same way that you’d say that the local Cub Scout newsletter is like the New York Times). Common tasks for this program include making quick sketches, fixing dust specks on scanned photos, and entertaining kids for hours on end.
Launch Paint by choosing Start→All Programs→Accessories→Paint, and then:
Choose Image→Attributes to specify the dimensions of the graphic you want to create. Click OK.
GEM IN THE ROUGHNotepad Log Files
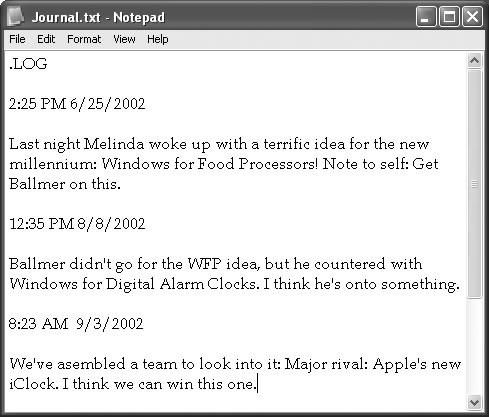
As stripped-down as it is, Notepad has one surprising feature not available in any other text processor or word processor: automated log files. Every time you open a certain file, Notepad can automatically insert the current date and time at the bottom of the file, creating a tidy record of when you last worked on it—a nifty way to keep any type of a log, like a record of expenditures or a secret diary.
To set this up, create a new Notepad document (choose File→New). Then type the phrase .LOG at the top of the new document. (Capitalize LOG, and put nothing, not even a space, before the period.)
Now save the document (File→Save) and give it a name. (Notepad adds the extension .txt automatically.)
When you next open the file, Notepad types out the date and time automatically, and puts your cursor on the next line. Now you’re ready to type the day’s entry.
To make your log file easier to read, press the Enter key to insert a blank line after each entry before saving the file.
Later in your life, you may want to peruse the other commands in this menu, which let you stretch or flip your graphic.
Click a tool on the palette at the left side.
If you need help identifying one of these tools, point to it without clicking. A tooltip identifies the icon by name, while a help message appears at the bottom of the window.
If you’ve selected a painting tool, like the paintbrush, pencil, or line tool, click a “paint” color from the palette at the bottom of the window.
You may also want to change the “brush” by choosing from the options located below the tool palette, like the three spray-paint splatter sizes shown in Figure 7-5.
If you’ve selected one of the enclosed-shape tools at the bottom of palette, right-click a swatch to specify the color you want to fill the inside of that shape.
These tools all produce enclosed shapes, like squares and circles. You can specify a different color for the border of these shapes and for the fill color inside.
Finally, drag your cursor in the image area (see Figure 6-5).
As you work, don’t forget that you can use the Edit→Undo command up to three times in a row, “taking back” the last three painting maneuvers you made. (Just don’t screw up four times in a row.)
For fine detail work, click the magnifying-glass icon and then click your painting. You’ve just enlarged it so that every dot becomes easily visible.
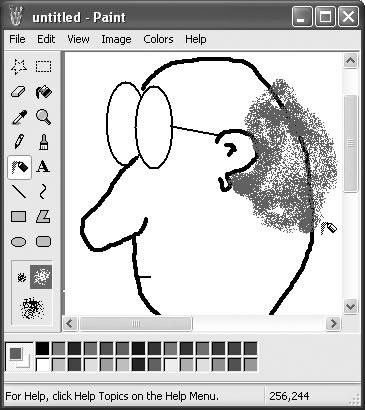
Figure 6-5. The Paint tools include shapes, pens for special uses (straight lines and curves), and coloring tools (including an airbrush). The top two tools don’t draw anything. Instead, they select portions of the image for cutting, copying, or dragging to a new location.
Paint can open and create several different file formats, including .bmp, .jpg, and .gif—every file format you need to save graphics for use on a Web site.
Tip
Paint also offers a nifty way to create wallpaper (see Section 8.9.2.1 ). After you create or edit a graphic, choose File→Set as Background (Tiled) or File→Set as Background (Centered) to transfer your masterpiece to your desktop immediately.
This program is nothing more than an interview-style version of the dialog box described in Section 3.2.2.5—the one that lets you trick an older, XP-incompatible program into believing that it’s actually safely nestled on an old Windows 95 computer, for example. Fire it up if some older program is giving you grief in XP.
Once your XP-compatible camera or scanner is turned on and hooked up, this command walks you through the process of downloading photos or triggering the scan. You’ll find more detail in Section 6.1.10.
You’re supposed to use this command in conjunction with the offline Web-page feature described in Section 20.8.5. It forces your machine to go download the latest versions of the Web sites you’ve “subscribed” to. (This feature is great for laptop owners who want to take work home from the office network, or network domain members want to keep working on documents even if the server that houses them goes down.)
This command gives you a multimedia advertisement for the new features of Windows XP. Try to contain your excitement.
See Section 3.1.4 for details on this navigational tool.
Chapter 7 has the details on this bare-bones video editor.
Think of WordPad as Microsoft Word Junior, since it looks much the same as Word (see Figure 6-6) and creates files in exactly the same file format. That’s a great feature if you don’t have Microsoft Word, because WordPad lets you open (and edit) Word files sent to you by other people. (WordPad can open only one file at a time, however.)
If Microsoft Word isn’t on your PC, then any icon with the file extension .doc opens into WordPad when double-clicked. (If you install Microsoft Word, however, it takes over the .doc extension.) WordPad can also open and create plain text files, Rich Text Format (RTF) documents, and Microsoft Write documents.
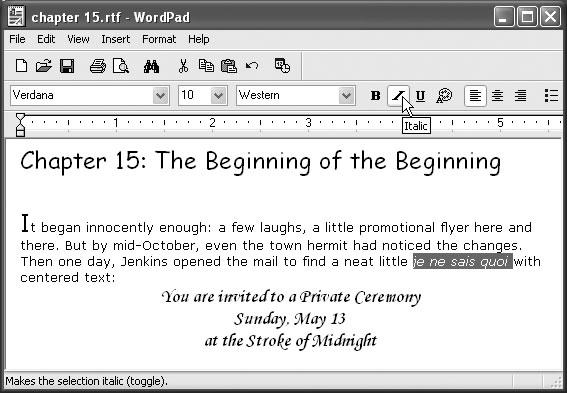
Figure 6-6. WordPad has menu bars, toolbars, rulers, and plenty of other familiar Windows features. Unlike Notepad, WordPad lets you use bold and italic formatting to enhance the appearance of your text. You can even insert graphics, sounds, movies, and other OLE objects (see Chapter 5).
When WordPad first opens, you see an empty sheet of electronic typing paper. Just above the ruler, you’ll find drop-down menus and buttons that affect the formatting of your text, as shown in Figure 6-6. As in any word processor, you can apply these formats (like bold, italic, or color) to two kinds of text:
Text you’ve highlighted by dragging the mouse across it.
Text you’re about to type. In other words, if you click the I button, the next characters you type will be italicized. Click the I button a second time to “turn off” the italics.
The rightmost formatting buttons affect entire paragraphs, as shown in Figure 6-7.
WordPad doesn’t offer big-gun features like spell checking, style sheets, or tables. But it does offer a surprisingly long list of core word processing features. For example:
Edit→Find, Edit→Replace. Using the Find command, you can locate a particular word or phrase instantly, even in a long document. The Replace command takes it a step further, replacing that found phrase with another one (a great way to change the name of your main character throughout an entire novel, for example).
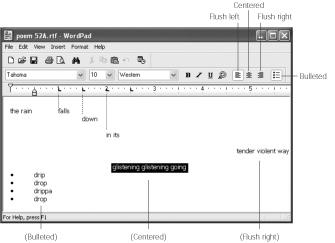
Figure 6-7. The rightmost buttons make paragraphs flush left, centered, flush right, or bulleted as a list. You can drag through several paragraphs before clicking these buttons, or you can click these buttons to affect just the paragraph where your insertion point is already. The dotted lines in this illustration indicate how each press of the Tab key lines up the text with one of the tab stops you click onto the ruler.
Indents and Tab stops. As shown in Figure 6-7, you click on the ruler to place Tab stops there. Each time you press the Tab key, your insertion point cursor jumps in line with the next tab stop.
Object Linking and Embedding. As described in the previous chapter, this feature (Insert→Object) lets you create or insert a picture, graph, chart, sound, movie, spreadsheet, or other kind of data into your WordPad document.
Drag-and-drop editing. Instead of using the three-step Copy and Paste routine for moving words and phrases around in your document, you can simply drag highlighted text from place to place on the screen. See Section 5.8.2 for details.