
Captions are labels that identify illustrations, tables, equations created by Microsoft Equation Editor, and other objects by number (see Figure 7-21).
Most people type in captions manually, but Word’s captioning feature has huge advantages over the manual method: It can number, renumber, and even insert captions automatically. Letting Word handle the captions not only saves you time, but could potentially save you from repeating a caption number or leaving out a caption entirely.
To caption an item—table, picture, text box, or some other object—first select it, then choose Insert → Caption. Instead of typing a caption, you build it using the Caption dialog box, as shown in Figure 7-21, top.
Caption, Label. You can’t directly edit the words in the Caption box (such as “Figure”), which is how the caption will appear in the document. Instead, this box reflects whatever you select from the Label pop-up menu. If none of the three labels provided (Figure, Equation, Table) strikes your fancy, click New Label and type your own— Illustration or Chart, for instance—and hit Return.
Position. This pop-up menu lets you choose one of the two most popular places for the location of your caption: above or below the captioned item.
Numbering. Word numbers your captions automatically; this feature, after all, is the whole point of the exercise. Use the Numbering dialog box, as shown in Figure 7-21, middle, to choose a number format (Roman numerals or whatever).
If you choose to include the chapter number in the captions (perhaps before the hyphen—”Figure 7-20,” as in this book, for example), you need to tell Word how to find the chapter numbers. A couple of conditions apply: All the chapters need to be within the same document, and you have to use one of Word’s built-in chapter-heading styles (see Styles) for the chapter headings.
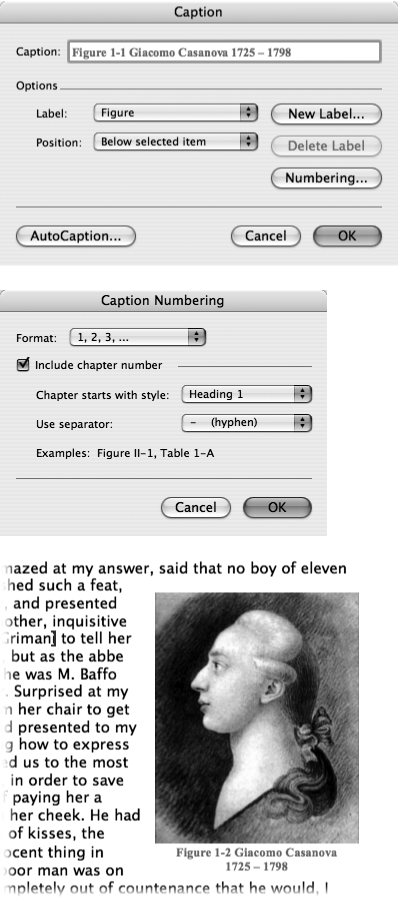
Figure 7-21. Top: Select a graphic and then choose Insert → Caption to call up the Caption dialog box. Word inserts the label and number; you type the rest of your caption text. Middle: If the chapter headings in your document use one of Word’s built-in heading styles, you can make Word automatically number your figures Figure 1-1, Figure 1-2, Figure 1-3, and so on by turning on the “Include chapter number” checkbox. The Examples line shows what the caption will look like on the page. Bottom: A caption in place. Note that if you’re planning to import your Word document into a desktop publishing program, you’ll probably lose your captions. The text of the captions may appear, but the numbering will likely be lost.
For instance, suppose you’ve formatted all your chapter headings using the Heading 1 style. Furthermore, suppose you’ve autonumbered them as described on Extra Features in the Bullets and Numbering Dialog Box: you chose Format → “Bullets and Numbering” → Outline Numbered tab and selected one of the numbering styles with Heading 1, Heading 2, and so on. Now, when you turn on the “Include chapter number” box and choose Heading 1 from the pop-up menu, your captions include the correct chapter number. (And your chapter headings are automatically numbered, to boot.)
When you finish creating the caption, click OK. The caption (numbered 1) appears in a separate paragraph above or below the selected object. As you insert more captions, Word will number them in order. (Deleting or rearranging captions is another matter, however, as described below.)
If the caption for your bird picture reads “Figure 1,” you can simply click after the 1 and type a description, such as Blue-footed Booby.
If you accidentally type over or delete the label or caption number, hit ⌘-Z (or choose Edit → Undo Typing) to restore order. If it’s too late to Undo, then your only alternative is to delete and reinsert the caption. The document’s captions may then need to be updated (see below).
To delete a caption, select it and press Delete. To change a single caption—for example, to change “Figure 1,” to Table 1 and leave all the other Figure captions untouched—you have to delete the caption and insert a new one as described above.
Word’s captioning feature makes it exceptionally easy to change all captions of the same label at once. For example, if your document has a series of captions labeled “Figure 1,” “Figure 2,” and so on, you can easily change them to the more descriptive Photo 1.1, Photo 1.2, and so on. Just select any of the captions (be sure to select the entire caption) and choose Insert → Caption to open the Caption dialog box. Now you can choose a different label, create a new label, pick a different numbering system, and so on. Any changes you make will apply to all captions under the original Figure label.
Note
Technically, captions are fields, which are described in full on Fields. So if you’ve used captions in your document, you may start to see strange-looking codes like { SEQ FIGURE *ROMAN } instead of the caption. Don’t be alarmed—and don’t delete them! What you’re seeing is Word’s field code—its own, internal geek instructions for creating the caption. You need to tell Word to display the field results—the caption itself—instead. To do that, Control-click the field code and choose Toggle Field Codes from the shortcut menu. Or, to return all caption field codes to normal, press ⌘-A (or choose Edit → Select All), Control-click any single field code, and then choose Toggle Field Codes. (Be sure to press Control before clicking, otherwise you’ll undo the Select All.)
When it comes to automatic caption numbering, Word’s fairly good at counting—but not infallible. When you delete a caption or drag one out of sequence, the others don’t get renumbered automatically. If you want your figures numbered sequentially, you have to update the captions after making such a change.
To update a single caption, select it by selecting all of its text; then press Shift-Option-⌘-U. (Alternatively, Control-click the caption and choose Update Field from the shortcut menu.) Updating all captions in a document at once couldn’t be easier: Just press ⌘-A (Select All), then Shift-Option-⌘-U.
Inserting captions is easy enough, but you can make it downright effortless. Word’s AutoCaptioning feature can automatically add a caption to any chart, equation, or table whenever you add one to your document. Here’s how it’s done:
Choose Insert → Caption; in the dialog box, click AutoCaption.
In the AutoCaption dialog box, you’re presented with a list of checkboxes for the kinds of objects Word can automatically create captions for—an equation, a table, a Microsoft Organization Chart, and so on.
Turn on the boxes—as many as you wish—for the kinds of graphics you want captioned.
You can have more than one kind of label in your document, and you can choose different object types for each one. For example, use “Table A” for tables and “Figure 1,” for pictures and charts. To do so, turn on the “Microsoft Word Table” box and go onto step 3; choose “Table” for the labels. Then repeat the procedure, turning on the boxes for the items you want the “Figure” label applied to. You can have as many kinds of labels AutoCaptioned at once as you like, provided you can keep them all straight in your head!
Using the pop-up menus, choose a label and a position for the captions.
When you check a box as described in step 2, you may notice that the Label menu changes. Word is suggesting a label for that type of object. You can override it by making a different choice from the Label menu.
The label and position choices here work as described on Merging onto labels; as always, you can create new labels by clicking the New Label button.
Choose a numbering style for the AutoCaptions.
If you’re using more than one type of caption label, each can have a different numbering style.
Click OK.
Now insert the pictures or tables in your document. The captions will appear automatically.