
Chapter 4
Importing and Exporting Files
IN THIS CHAPTER
![]() Importing and exporting audio files
Importing and exporting audio files
![]() Importing and exporting MIDI files
Importing and exporting MIDI files
![]() Importing and exporting session data
Importing and exporting session data
One of the most powerful aspects of Pro Tools is that it can import a variety of file types and formats into a session and then export them just as easily. You can record tracks in another session (or even another software program) and be able to edit, mix, and process them in Pro Tools.
For example, you can import and export audio files, MIDI files, and session tracks in formats from AIFF and WAV to Standard MIDI files (SMF) — and even import raw session data, the tracks, plug-in settings, and other session details. (Chapter 3 of this mini-book has more on Pro Tools sessions.) This chapter covers all these options. And if you have some files that use bit depths and sample rates different from the session you’re working on, I show you how to import them, too.
Importing into a Session
If you want to fancy up your Pro Tools session, you can import audio and other data not only from other Pro Tools sessions but also from other recording programs, such as Logic. So prepare to get fancy.
Importing audio files
Before Pro Tools can import an audio file into your session, it has to find the file on your hard drive. Then you can add the file directly, copy it first and then plunk it down in your session, or convert it to a different format before you import it. The following sections take a look at the types of files you can import, as well as the steps that make it all possible.
Figuring out file types
You can import the following audio files types into a Pro Tools session without converting them:
- WAV or BWF (Broadcast .WAV File): This file type is the standard for older, PC-based Pro Tools systems. Currently, it’s the most commonly used file type; for that matter, I normally work with it. BWFs are compatible with both Macs and PCs.
- AIFF (Audio Interchange File Format): This file format used to be native to Macs. You don’t have to convert AIFF files to any other format before importing them into a Pro Tools session, even if it’s on a PC.
The following files types can be imported into Pro Tools but first must be converted into either WAV or AIFF:
- AAC (Advanced Audio Coding): These files are the kind that iTunes sells. This file type, created by a group of companies, is said to offer a better sound than MP3s of the same size, and is playable on a wide range of devices.
- ACID: ACID files are Sony’s file format for its ACID program. These are loop files that contain tempo and pitch information as well as the audio itself.
- MPEG-1 Layer 3: This type — yep, it’s the famous MP3 — is a great format for putting music on the Internet (say, a demo track for your band), as you’ll find out when you check out Book 8, Chapter 2.
- MXF (Material eXchange Format) audio: An MXF file is a container for audio data most commonly used in video recorders and contains timecode data.
- QuickTime: Pro Tools offers no built-in support for it (even though it shows up here). The QuickTime format is useful if you want to send the file via e-mail. You play QuickTime files using the Apple QuickTime player — a nice bit of software supported by many multimedia applications — but you have to purchase and install that program separately.
- ReCycle (REX 1 and 2): ReCycle (REX 1 and 2) is Propellerhead’s proprietary file format, much Like Sony’s ACID. These files, like Sony’s, contain additional information about the audio.
- SDI and SDII (Sound Designer I and II): This was the native format for Pro Tools sessions on Macs many versions ago. However, this format isn’t supported anymore.
- Sound Resource (AIFL): The only time to use this Mac-only format (in my opinion) is if you want to play the music in an application that doesn’t support SDII or AIFF formats. If you end up with a file in this format, you can convert it easily via the Import Audio to Track command.
- Windows Media (WMA): This is a Windows-only format. As with other unsupported file formats, you can convert these files into something useable by accessing the Import Audio dialog box: Choose File ⇒ Import Audio to Track.
Importing audio
In the preceding section, I outline the different types of files Pro Tools can handle. In this section, I show how you can import those audio files into Pro Tools. The two most common ways of doing this are:
- From the keyboard: Press Shift+⌘ +I (Mac) or Shift+Ctrl+I (PC). This gets you to the same Import Audio dialog box.
- From the File menu: Choose File ⇒ Import Audio to Track to access the Import Audio dialog box, where you can place the audio directly into a track in your session.
Whichever of these methods you choose, you end up with the Import Audio dialog box, where you choose the file you want to import. See Figure 4-1.
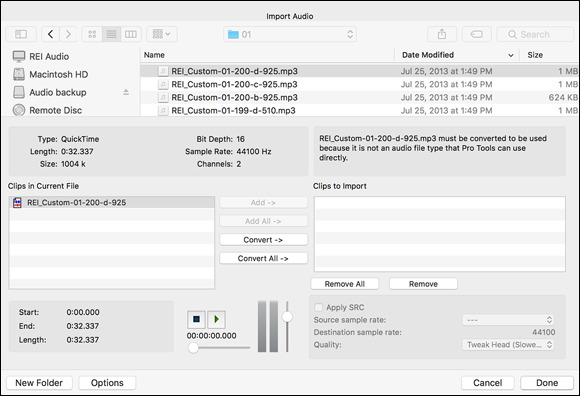
FIGURE 4-1: Use the Import Audio dialog box to choose and audition files to import into a session.
 The easiest way on a Mac to find the files you want to import is from the browser section, located under the From drop-down menu (located below the Enable drop down menu in the upper section of the window). You can use the scroll bar at the bottom to find the hard drive you want by moving it all the way to the left. From there, you can progress to the right by choosing the folders you want as you go until you get to the actual file you want to import.
You can limit the types of files that show up in the file browser by choosing to display only certain file types (WAV, for example) by selecting this file type in the Show drop-down menu.
To keep the Import process rolling along, follow these steps after the Import Audio dialog box opens:
From the file browser section of the Import Audio dialog box, click the file you want to import.
The properties of the selected file appear in the lower half of the dialog box.
Depending on the properties of the file you select — and the settings in your session — you have three options:
Add: If the audio files are the same file type and bit depth as your session, you can add the files directly into your session. When you do so, you’re telling Pro Tools to use the original file — not a copy — from its current place on your hard drive.
 If you do this, make sure that you don’t alter this original file if it’s also part of another session. Otherwise, it will be changed in that session, too.
 If you have to add files of different file types into your session, you can — SDII, AIFF, or WAV on a Mac; or, AIFF or WAV on a PC — but doing so slows down system performance.
Copy: If your file is of the same type and bit depth as your session, you can make a copy of the file to put into your session. Doing this allows you to place the copy directly in the folder with the other files in your session. If you destructively alter the copy, you won’t be altering how the original file plays in any other session.
The only drawback to choosing Copy when importing an audio file is that you’re adding more stuff that takes up space on your hard drive (not a big deal these days, given the low cost of huge hard drives).
Convert: If the file you choose to import is of a different file type, bit depth, or sample rate than your session, you need to convert it first before importing it into your session if you want it to play correctly.
When you choose to convert a file, your set preferences automatically determine the quality of the conversion process. You set the conversion preferences from the Processing tab of the Preferences window, as shown in Figure 4-2. Access this by choosing Setup ⇒ Preferences. The drop-down menu that controls conversion quality is located on the right and under the Import section of the Processing tab the Preferences dialog box. Options range from TweakHead (highest quality/slowest conversion) to Low (lowest quality/fastest conversion).
If you want to use a conversion quality other than the one your preferences are set to, you can use the conversion quality section in the Import Audio window (located in the lower-right corner). This setting will only apply to the files you import during this import operation.
Audition the selected file before importing it by clicking the Play and Stop buttons in the lower section of the Import Audio dialog box.
The vertical slider adjusts the volume of your audition; the horizontal slider adjusts your location in the auditioned file.
Click the Add, Copy, or Convert button to place the file in the Clips to Import list.
You can select more than one file by Shift-clicking to highlight the files you want to include in the list. You can also click the Add All or Convert All button to include all the files in the current directory on the Clips to Import list.
Click Done.
The Audio Import Options dialog box opens.
- Select the destination of the audio track(s). Your options are
- New Track: The New Track option creates a new track in your session for each of the audio files you select. If you choose this option, you must select (from the drop-down menu) where you want the audio file to go in the new track. Your options are:
- Session Start: This places your imported audio at the beginning of your session.
- Song Start: This places your imported audio at the Song Start Marker in your session. You can open the move Song Start window by choosing Event ⇒ Time ⇒ Move Song Start.
- Selection: Your audio will be placed in the specific location where your cursor is within your session.
- Spot: Choosing this option opens the Spot dialog box, where you want type where you want the audio to start.
- Clips List: The Clips List option simply puts your files in the Clips list on the right side of the Edit window where you can drag them into a track when you’re ready to include them in your song.
- New Track: The New Track option creates a new track in your session for each of the audio files you select. If you choose this option, you must select (from the drop-down menu) where you want the audio file to go in the new track. Your options are:
Click OK.
Your audio file(s) are imported into your session. This may take a minute if your audio file(s) need to be converted.
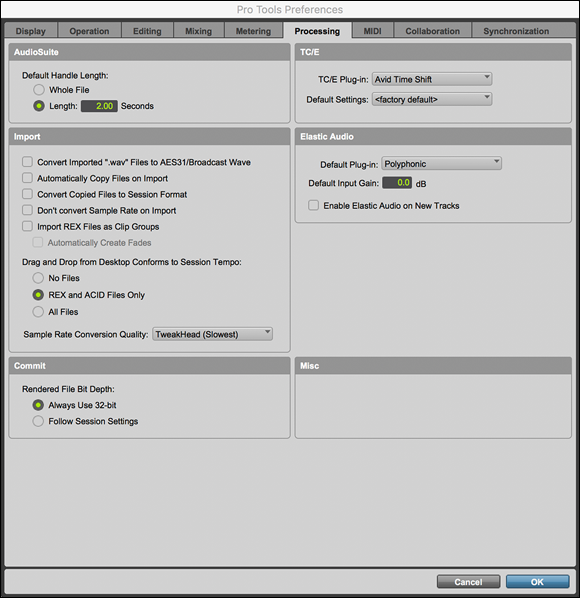
FIGURE 4-2: Select the quality of your file conversions here.
Importing MIDI files
MIDI data contains all the performance information for your MIDI instruments, but it doesn’t contain any actual sound. You need a sound source for that. Pro Tools lets you bring that data into a session where you can work with and add the sounds you want. This data is in the form of a Standard MIDI File. Standard MIDI files consist of data stored in a common format that can be read by nearly all MIDI devices. When you import a Standard MIDI file into Pro Tools, you get two choices:
- Import the file directly into a track.
- Import it into your session’s MIDI Clips list.
The following sections detail the types of MIDI files supported by Pro Tools and how to import them.
Figuring out file types
Pro Tools allows you to import the following two types of Standard MIDI files:
- Type 0: Type 0 Standard MIDI files contain all MIDI data on one track. When you import this type of file into a session, Pro Tools sorts data appropriate for each stereo channel and places the data in separate Clips and tracks.
- Type 1: Type 1 MIDI files contain multiple tracks of MIDI data. When you import this type of file into Pro Tools, each track’s data goes to a separate MIDI track or clip in Pro Tools.
Importing MIDI
You can import standard MIDI files into a Pro tools session one of two ways:
- From the File menu: Choose File ⇒ Import ⇒ MIDI to access the Choose a MIDI File navigation box (as shown in Figure 4-3).
- From the keyboard: Press Option+⌘ +I (Mac) or Ctrl+Alt+I (PC).
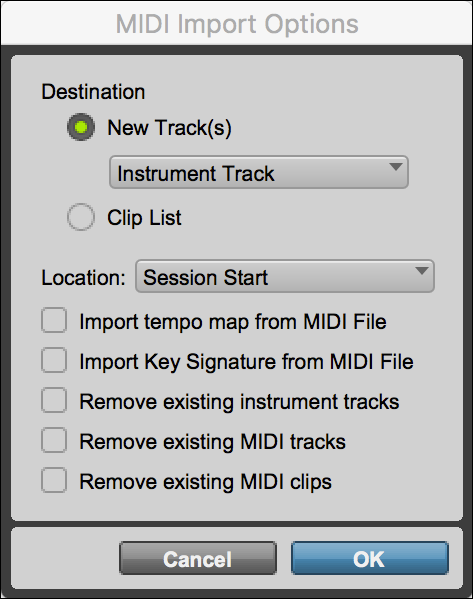
FIGURE 4-3: Select MIDI files to import into a session.
Whichever of these methods you choose, you end up at the Choose a MIDI File navigation box, where you choose the file you want to import.
The easiest way to find the files you want to import is from the browser section, located under the From drop-down menu located just beneath the Enable drop-down menu. To navigate this browser section, move the scroll bar at the bottom of the section all the way to the left to find the hard drive that contains your MIDI files. Click it to select it, and then click the folders you want from the boxes on the right until you get to the file you want to import.
Select the file using the browser and click Open. The MIDI Import Options dialog box opens (refer to Figure 4-3), where you can choose to place the MIDI file in a new track in your session or in the Clips list, where you can place it in a track later.
If you want to import your MIDI file into the Clips list, select the Clips List option in the Destination section and then click OK.
If you choose to import your MIDI file into a new track, you have some more decisions to make:
- Location: You can choose among three options from this drop-down menu:
- Session Start: Beginning of the session.
- Selection: Where your cursor is currently located.
- Spot: If you choose Spot, the Spot dialog box opens when you click OK to allow you to choose the exact spot in your session you want to MIDI file to begin.
- Import Tempo Map from MIDI File: If you want the tempo of the imported MIDI file to override the tempo of your present session, select this check box.
- Import Key Signature from MIDI File: As you can probably guess, selecting this check box imports the MIDI file’s current key signature data to travel along with the MIDI performance data. Select this check box if you want this information in your session.
- Remove Existing instrument Tracks: Select this check box to choose to keep or discard any existing Instrument tracks or clips in your session. If you already have instrument tracks that you want to use in the session, be sure to choose to keep them; if not, go ahead and discard them.
- Remove Existing MIDI Tracks: Select this check box to choose to keep or discard any existing MIDI tracks or clips in your session. If you already have MIDI tracks that you want to use in the session, be sure to choose to keep them; if not, go ahead and discard them.
- Remove Existing MIDI Clips: Select this check box to choose to keep or discard any existing MIDI clips that you have in your session.
Your successfully imported MIDI file is placed in your session one of two ways:
- If you imported by using the New Track option: Your file is placed in a newly created MIDI track in your session. If this is the case, select the MIDI channel and instrument you want to specify for your MIDI track’s output so that you can hear the performances when you play your session, as described in Chapter 3 of this mini-book.
- If you imported by using the MIDI Clips option: Your MIDI data is placed in the MIDI clips list. Click and drag the files from the MIDI clips list into an existing track to put them in your session.
Importing tracks
The Pro Tools Import Bag of Tricks isn’t limited to just audio and MIDI files. In fact, you can import entire tracks from another session into your current session just by using the Import Tracks command. Choose File ⇒ Import ⇒ Session Data to call up the Import Session Data dialog box, and you’re well on your way to getting that great track from last month’s session embedded in your present project.
Understanding the Import Session Data dialog box
The Import Session Data dialog box is where you select the various properties of the tracks you want to import. If you’re bringing in a track from a previous session, this is where you choose what aspects of your original track you want kept (say, keep the plug-in settings and lose the panning settings) when it gets imported into your present session.
As you can see in Figure 4-4, the Import Session Data dialog box gives you lots of properties to mull over. (“Do I import this? Don’t I import that? What parts of this stuff do I or don’t I import?” Ack… .) These properties include
- Source Properties: This includes the basics — session name, type, and start time; bit depth; sample rate — of the selected source file.
- Audio Media Options: From this drop-down menu, select how you copy and consolidate the source’s audio files. Its options include
- Link to Source Media (Where Possible): Use this option if you want to avoid duplicating files — it refers to your original files whenever possible. The files are copied only if they don’t reside on supported media (such as CD-ROM), or if they have a different sample rate or bit depth from the session you import into. This saves some space on your hard drives.
- Copy from Source Media: Choosing this option copies all the audio files, automatically converting any files that have bit depths or sample rates that differ from those of the target session. This uses up space on your hard drive, but with today’s super-cheap drives, it’s not as big a deal as it used to be (when drives were expensive).
- Consolidate from Source Media: This option copies and consolidates the audio in clips used in the source session, eliminating any unused audio from the parent files. When you choose this option, you also get to choose the handle length (the extra time before and after the clip start and end times). This keeps you from importing any unnecessary material if you’re sure that you won’t be using it in your session.
- Force to Target Session Format: This option copies — and converts — any files that don’t have the same bit depth and sample rate as the target session; it points to (but doesn’t copy) any files that do match these traits. Use this option if you don’t want any extra stuff taking up room on your hard drives.
- Video Media Options: The drop-down menu here gives you two options when importing video data into a session: You can copy the stuff, or you can refer to the source material. Which option you choose depends on how much hard drive space you have and whether you think you need more than one copy of the original file. If you have tons of space and think you’ll be editing the data, by all means copy it. However, if you know you won’t be making any changes, there’s no need to add to the clutter of your hard drive.
- Time Code Mapping Options: Every video file contains time code data (information that lets you know where you are in the video). You can choose from three ways to place imported material in the session:
- Maintain Absolute Time Code Values: This option puts your imported tracks at the same time location as the source session. This is a good choice if the session you import into uses the same start time as your source session and you want the imported session tracks to remain at the beginning of the session.
- Maintain Relative Time Code Values: This option places the imported material at the same time from the start of the session as their source session. This means that if you have tracks in a session that start 30 seconds from the beginning of the session, they will remain 30 seconds from the start of the session into which they’re imported regardless of the actual start time of both sessions.
- Map Start Time Code To: This option lets you choose a new start time for your imported files. When you select this option, you also select the start time for your imported file in the Time Value field. This option is useful when you have a different start time on the session data you want to import, and you want to place the imported data at a specific point in the new session. This start point is entered into the Handle Size field.
- Track Offset Options: The options in this section allow you to place the tracks relative to their original start times. For example, if you want to import session data into a track and have it start four measures (bars) after the session starts, you can select Bars:Beats from the drop-down menu and enter 4 in the text field.
- Sample Rate Conversion Options: If your source and target sessions have different sample rates (you select the sample rate of a session when you create it), you’re prompted to select whether sample rate conversion is applied and, if so, how it’s done. This area of the Import Session Data dialog box lets you do that, using the following options:
- Apply SRC: Select this check box to apply sample rate conversion to your imported session data. When you select this check box, you can choose from the following options:
- Source Sample Rate: This option lets you choose the sample rate from which your source files begin the sample rate process.
- Destination Sample Rate: This setting is always the same as that of your current session.
- Conversion Quality: This drop-down menu lets you choose the sound quality you get from the sample-rate conversion process. You have a choice among Low (fastest), Good, Better, Best, and TweakHead (slowest).
- Source Tracks: This section of the Import Session Data dialog box shows you all the source tracks in the session containing the tracks you want to import. Each track has a drop-down menu that allows you to either select it for import or not.
- Import: This section enables you to determine whether to import tempo/meter, key signature, and other configuration settings:
- Tempo/Meter Map: Select this check box to import tempo and meter maps (specified tempo and meter events throughout the session) from the source session. Select this option if your source session contains tempo and meter information that you want to use in the target session.
- Key Signature/Chord Map: You can import existing key signature data into your session by selecting this check box.
- Markers/Memory Locations: Selecting this check box includes markers and memory locations with your imported session data.
- Window Configurations: You can import window configurations (size and locations of open windows) into your session by selecting this check box. You can find out more about window configurations in Chapter 3 of this mini-book.
- Mic PRE Settings: You can include settings for any Pro Tools mic PRE links that may be present. Using this setting requires a Pro Tools PRE device.
- Track Data to Import: This menu contains a list of all the track data in a session. The list includes these options:
- Alternate Playlists: Checking this imports the alternate playlists from source track. These playlists appear in the playlist pop-up menu of the destination track.
- Clips and Media: This option imports the audio files from the source track and also places them in the Clip List.
- Clip Gain: This option imports the gain settings for any imported audio clips.
- Clip Effects: This option imports the effects settings for any imported audio clips.
- Main Volume Automation and Setting: This option imports volume-fader settings and any automation data on the source track’s volume-automation playlist, replacing the corresponding data on the destination track.
- Main Pan Automation and Setting: Selecting this imports panning dial and pan automation settings in a track. This replaces any data in the destination track.
- Main Mute Automation and Setting: This option imports any mute and mute-automation data settings and replaces any such data in the destination track.
- Main Output Assignments: Choosing this option imports any channel-output assignments from the source track, including any multiple output assignments, replacing any data in the destination track.
- Send Output Assignments: This imports send output assignments from the source track, replacing any in the destination track.
Plug-In Assignments: This setting imports all plug-in assignments from the source track. Any plug-ins in the destination track are replaced.
Note: If there is a plug-in from your source track that is not available in the destination system, the plug-in appears in the destination track but is listed as inactive.- Plug-In Settings and Automation: Choosing this option imports the track’s plug-in settings and any automation data associated with the plug-ins (if you choose the import the source track’s plug-in assignments). If you choose not to import plug-in assignments, this option does nothing.
- Elastic Audio Track State: Selecting this option imports the Elastic Audio track state from the source track, replacing any in the destination track.
- HW Insert Assignments: This option, when selected, imports any hardware Insert assignments from the source track, replacing any such assignments in the destination track.
- Voice Assignments: This option imports the source track’s voice assignment, replacing any voice assignments already in the destination track.
- Input Assignments: This option replaces the channel-input assignment of the destination track with that of the source track.
- Side-Chain Assignments: Selecting this option imports side-chain assignments associated with the plug-ins (as long as plug-in assignments are imported). If you choose not to include plug-in assignments, this option does nothing.
- Track Active State: This includes the active/inactive state of the source track.
- Track Comments: This setting imports any track comments associated with the source track, replacing any comment in the destination track.
- Track Colors: This imports the track color of the source track and replaces the destination track color.
- Record Safe/Solo Safe Settings: This setting imports the record-safe and solo-safe settings into your session, replacing any such settings in the destination track.
- Track View Settings: Includes the playlist view and track height of the track.
- Mix/Edit Groups: This imports groups from the session.
- ICON Custom Fader Groups: This imports custom fader groups for Pro Tools | Ultimate systems with ICON hardware).
- ICON Automation Snapshots: This imports automation snapshots from the Pro Tools | Ultimate systems with ICON hardware.
- HEAT Switch Settings: This imports any HEAT switch settings from the session (only available for sessions with the optional HEAT software).
- Object Assignment and Toggle Settings: This imports object output path assignment and Bus/Object settings from the session.
- Main Playlist Options: This menu lets you choose from the following options:
- Import – Replace existing playlists: This option replaces any existing playlists while importing the playlists from your source session.
- Import – Overlay new on existing playlists: This option also imports any playlist data, but instead of replacing items on an existing playlist, it adds to them.
- Do Not Import: This is self-explanatory. Choosing this option doesn’t import any playlist options.
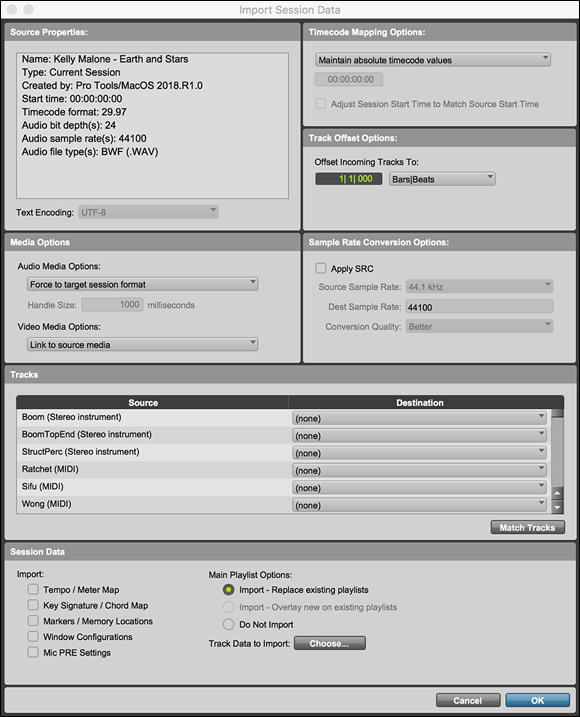
FIGURE 4-4: Use the Import Session Data dialog box to set parameters for imported tracks.
Importing tracks
After you have a chance to get comfortable with the Import Session Data dialog box, you can get some practical experience by using the following steps to import some actual tracks into a session:
- Choose File ⇒ New Session to create a new session or choose File ⇒ Open Session to open an existing one.
Choose File ⇒ Import Session Data from the main menu.
A dialog box appears, prompting you to choose a file from which to import session data.
Choose the Pro Tools file (
.ptssuffix) containing the track you want to import, and then click Open.The Import Session Data dialog box opens. (Refer to Figure 4-4.)
In the Import Session Data dialog box, go through the Source Tracks list and click the name of each track you want to import.
To select multiple noncontiguous tracks, press and hold ⌘ (Mac) or Ctrl (PC) while you click the track names. To select multiple contiguous tracks, press and hold Shift while you click the names.From the drop-down menus, choose your Audio Media, Video Media, Time Code Mapping, and Track Offset options.
See the previous section, “Understanding the Import Session Data dialog box,” for more on how to use these options.
(Session-dependent) If the sample rate of your new session is different from the sample rate of the session you’re importing from, you need to first convert it to the target session’s rate before you can import it. Do this by selecting the sample rate of the source session from the Source Sample Rate drop-down menu and then choosing an option from the Conversion Quality drop-down menu.
You find these drop-down menus in the Sample Rate Conversion Options section of the Import Session Data dialog box.
(Optional) If you want to import meter/tempo maps, key signature maps, markers or memory locations, or window configurations from the source session, select the appropriate check box(es) in the Import section of the dialog box.
Importing these maps ensures that the target session has the same maps, locations, and/or window configurations as the source session.
- Click OK.
- (Optional) If you chose to copy audio or video media — or consolidate data from them — select a location to place the media files.
Exporting from a Session
Pro Tools lets you export audio, MIDI, and clip data from one session to another. This is handy if you want to take parts of a song and add them to parts of another song, as in the case of an R&B remix of a pop tune. This section describes the process.
Exporting audio
Pro Tools gives you several ways to export audio — as clips, as stereo-interleaved files, or as clip definitions, depending on what you want to do with it. Here’s a rundown on these options (and what the heck these terms mean):
- Export Audio Clips as Files: This lets you take a clip in your track and export it as its own audio file that you can then use in another session. This is great for making separate audio files of drum loops: for example, if you’re ready to place them in your mix.
- Export as Stereo Interleaved Files: This lets you take the Clips from a stereo track or two Clips from two mono tracks and save them as a single, stereo-interleaved file. (Stereo-interleaved files are the type that many other programs create when doing a stereo mix.)
- Export Clip Definitions: This lets you export the information that defines the clip. Doing this keeps you from having to make a copy of the audio (which saves hard-drive space) — and you can still use the clip in a new session. (Pro Tools uses the original audio file so that you don’t have two in your system.)
Exporting Clips
Because Clips are only portions of the audio in an audio file, Pro Tools lets you take this portion and make a separate file containing just this audio data. Exporting clips allows you to take a lovingly crafted musical element (a killer drum loop, for example) and use it in another session or application without having to re-create it from the parent audio file.
To export a clip as a new audio file, follow these steps:
- Select the clip(s) by one of two ways:
- From the Audio Clips list (located on the right side of the Edit window): Select the clip(s) you want to export by clicking the clip’s name. To select more than one clip, hold the Shift key while you click each clip’s name. (If the list isn’t visible, click the double arrows at the bottom left of the Edit window to call it up.)
- From the Track playlist in the Edit window: Click anywhere on the clip to select it. To select more than one clip, hold the Shift key while you make your selections.
Choose Export Clips as Files from the Audio Clips drop-down menu (the menu you open by clicking and holding the Audio Clips name at the top of the Audio Clips list).
The Export Selected dialog box opens, as shown in Figure 4-5.
- Choose the export settings you want for your new file.
- File Type: Choose the file type of the session you want to use this file in. If you’re not sure where you’re going to use the file, choose BWF or AIFF. You can read about these file types earlier in this chapter.
- Format: Your choices here are (Multiple) Mono or Interealved (stereo). Choose the format appropriate for your file. If your drum loop, for example, is in stereo and has panning information, you’ll want to select Interleaved.
- Bit Depth: You can choose bit depths of 16 and 24 bits (plus 32-bit float if you’re using Pro Tools 10, HD, or HDX). I recommend selecting the same bit depth as your current session.
- Sample Rate: You choices include 8, 11.025, 16, 22.050, 32, 44.1, 48, 88.2, 96, 176.4, and 192 kHz. Choose the sample rate of the session you want to put this file into. If you’re not sure, select the same rate as your current session.
- Enforce Avid Compatibility: Choosing this option includes frame-accurate edits and limits your sample rate to either 44.1 or 48 kHz. This ensures that your files are compatible with Avid video editing equipment. Unless you’re dong music for film, skip this option.
- Select a destination for the file in the Destination Directory field by clicking the Choose button and following the prompt.
- Select from the Resolve Duplicate File Names By options:
- Prompting for Each Duplicate: This stops the exporting process and lets you know when Pro Tools finds a duplicate filename. You can then choose to either replace the original or create a new name.
- Auto Renaming: You authorize Pro Tools to automatically create a new name for these files. This is the best option to choose if you don’t want to have to answer a prompt for each duplicate filename and you want to make sure that your original files aren’t replaced.
- Replacing with New Files: This option replaces any existing files containing the same name with your newly exported ones. This is the option to take if you’re sure that you don’t ever want the original files bearing the same name.
- Click Export.Your new file is created and saved to the destination you chose in the Destination Directory field of the Export Selected dialog box.

FIGURE 4-5: Use the Export Selected dialog box to choose export settings for your new file.
Exporting stereo-interleaved files
A stereo-interleaved file is a single audio file with all the stereo data contained in them. These types of stereo files are different than the ones used in Pro Tools, which consist of two separate audio files for stereo. One contains the left channel data, and the other contains the right channel data. Although Pro Tools doesn’t support stereo-interleaved file types, you can export Clips from within your session as a single, stereo-interleaved file. This is an important feature because many other audio applications — such as mastering programs — use stereo-interleaved files instead of the separate ones that Pro Tools favors.
To export a clip as a stereo-interleaved file, do the following:
- Select either a stereo clip or two mono Clips one of two ways:
- From the Clips list (located on the right side of the Edit window): Click the name of the clip to highlight it. To select two mono Clips, hold the Shift key while you click each clip’s name.
- From the track playlist in the Edit window: Click anywhere on the clip within the track to highlight it. For more than one mono clip, hold the Shift key while you click each clip.
Choose Export Selected as Files from the Clips list drop-down menu — the menu you open by clicking and holding the Audio Clips name at the top of the Audio Clips list.
The Export Selected dialog box opens. (Refer to Figure 4-5.)
- Choose Interleaved from the Format drop-down menu.
Choose the rest of your settings for this file.
Check out the previous section, “Exporting Clips,” for tips on what settings to choose here.
Click Export.
Your file is created and saved on your hard drive so you can use it in an application that supports stereo-interleaved files.
Exporting clip definitions
Clip definitions are the information that Pro Tools uses to define the location, start, and end times of a clip within the parent audio file. If you’ve come up with some Pro Tools Clips that you want to use in another session (or some other application that supports Pro Tools Clips data), you can export clip definitions from your session without having to copy the clip as an audio file. In effect, all you save using this command are the pointers that make up the clip definition: The definition points to the parent file and not to the audio itself.
If you actually want to use a clip definition in another session or application, make sure that the clip’s parent audio file still exists on the hard drive. A definition that points to nothing is no help.
To export clip definitions, follow these steps:
- Select the Clips you want to export the clip definitions for:
- From the Audio Clips list (located in the right side of the Edit window): Select the clip(s) you want to export by clicking the clip’s name. To select more than one clip, hold the Shift key while you click each clip’s name. (If the list isn’t visible, click the double arrows at the bottom left of the Edit window.)
- From the Track playlist in the Edit window: Click anywhere on the clip to select it. To select more than one clip, hold the Shift key while you make your selections.
- Choose Export Clip Definitions from the Audio Clips list drop-down menu — the menu you opened by clicking and holding the Audio Clips name at the top of the Audio Clips list.
Click Export.
The pointing data for the selected Clips are exported.
Exporting MIDI
Ah, the miracle of MIDI — say you’ve laid down a kickin’ “keyboard” part on guitar synth. How do you get it out of the current session? To export MIDI data to another device or application, you need to save your MIDI tracks and Clips as a Standard MIDI file. You can save them as Type 0 files (a single multichannel track) or as Type 1 files (multiple tracks).
To export MIDI tracks, follow these steps:
(Optional) Mute any MIDI tracks you don’t want to include in the Export MIDI procedure by clicking the Mute button for these tracks.
Any muted tracks are excluded from the export function.
Choose File ⇒ Export ⇒ MIDI from the main menu.
The Export MIDI Settings dialog box appears, as shown on the top in Figure 4-6.
From the MIDI File Format drop-down list, select the format of your heart’s choosing:
- 0 (Single track)
- 1 (Multi-track)
You must also select the Apply Real-Time Properties check box as you want.Click OK.
The Save a MIDI File As dialog box appears, as shown in the bottom in Figure 4-6.
- Enter the name and location for this newly exported file in the Save As text field, and select a destination for the file from the Where drop-down menu.
Click Save.
Your new MIDI file is created from all the unmuted MIDI tracks in your session, in the location you designated. This file includes all notes; controller events; program changes; System Exclusive data (instructions exclusive to the device); and tempo, meter, and marker events. The Society of Motion Picture and Television Engineers (SMPTE) timecode start time is also included so that your MIDI files will start at their proper time when opened.

FIGURE 4-6: Use these dialog boxes to choose the settings, name, and location for your exported MIDI file.
Managing Files
As soon as you start to record and edit your music, you start filling your hard drive with data. Properly managing your data helps you keep your system stable, lets you maximize your hard space, and protects you from the worst disaster of them all — lost data. This section details three important file-management tasks — compacting files, deleting files, and backing up data — you should routinely do to keep everything running smoothly.
Compacting files
Editing means cutting a snippet from here and taking the best chunk from there and putting it altogether to make a (hopefully coherent) whole. It also means that, after you extract that great 15-second bit from that 75-second clip, you’re going to have a lot of stuff cluttering up the virtual cutting-room floor of your hard drive. What to do?
You can get rid of the clutter — the unused portions of the audio files in your session — by using the Audio Clips list Compact Selected command. This command deletes any audio from a file in your session where there are no Clips referencing the data. It helps conserve disk space.
Postpone using the Compact Selected command until after you finish all the editing in your session because it permanently deletes the unused audio data from the session. Don’t use this command until you’re sure that you don’t want to use any of your data leftovers.
Compacting your audio files consists of three basic steps:
- Select any unused clips in the session.
Clear these unused clips.
Steps 1 and 2 (ahem) clear the way to your final step:
- Compact the files by removing the data for those cleared clips from the parent files.
To compact an audio file, do the following:
Choose Select ⇒ Unused Clips from the Audio Clips list drop-down menu (the menu opened by clicking and holding the Audio Clips name at the top of the Audio Clips list).
Any clips not used in a track in the current session become highlighted in the Audio Clips list.
Choose Clear from the Audio Clips list (in the drop-down menu) to remove the unused clips.
The Clear Audio dialog box appears.
Click Remove.
This removes the unused clips from your session.
Select the clip(s) you want to compact from the Audio Clips list by clicking each clip’s name.
To select more than one clip, hold the Shift key while you click each clip’s name.
Choose Compact Selected from the Audio Clips list drop-down menu (the menu you open by clicking and holding the Audio Clips name at the top of the Audio Clips list).
The Compact dialog box appears. This box contains a warning about the consequences of compacting a file (read the Warning icon earlier in this section) as a reminder that this is an irreversible process.
(Optional) If you have crossfades in the selected clip(s), enter the amount of padding (in milliseconds) that you want to put around each selected clip.
See Book 5, Chapter 4 for more on crossfades.Padding adds space before and after your clips to account for any crossfades (see Book 5, Chapter 4). Choose a pad length equal to (at least) the longest crossfade length for your selected clips.
Click the Compact button, located at the bottom of the Compact Audio dialog box.
Your file is compacted, and the session is saved.
Deleting unwanted files
As with any creative process, you end up with (in addition to your knockout musical creation) leftover junk that just takes up space. You can delete unwanted files in your session from your hard drive by using the Clear Selected command located under the Audio Clips list drop-down menu (opened by clicking and holding the Audio Clips name at the top of the Audio Clips list). Less unused data on your hard drive means more space for the good stuff.
To delete an audio file, do the following:
Select the audio files you want to delete from the Audio Clips list.
The audio files are listed in bold letters in the Audio Clips list.
From the Audio Clips list’s drop-down menu (opened by clicking and holding the Audio Clips name at the top of the Audio Clips list), choose Clear Selected.
The Clear Audio dialog box appears. You have the options of Remove (which you use before compacting a file — see the previous section) and Delete. This is the one you want for this procedure.
Click the Delete button in the Clear Audio dialog box.
Your file is permanently deleted from your hard drive.
The Clear Selected command is irreversible. After you click Delete, your data is gone forever. If you think you may want the data someday, choose Remove from the Clear Audio dialog box. Your file is removed from the session but not from your hard drive.
Backing up data
There’s a saying in the computer world: If the data doesn’t exist in more than two places, it doesn’t exist. I know I said this elsewhere (Book 1, Chapter 2, to be precise), but I think it bears repeating. As someone who lost an entire project’s worth of data because I “forgot” to back up my files, I strongly encourage you to make a habit of backing up your sessions.
Backing up your files to the same hard drive does you no good if your drive shuts down (a common occurrence). Always back-up to a different hard drive or to another medium, such as the cloud, a USB flash drive, or a DVD-R. (Check out the manual for your DVD burner, if you have one, for steps on how to do this.) You can also pick up a copy of CD & DVD Recording For Dummies, 2nd Edition, by Mark Chambers (Wiley).
To back up your session files to another hard drive, do the following:
Choose File ⇒ Save Copy In from the main menu.
The Save Copy In dialog box appears (Figure 4-7).
Choose the format for your copy from the Format pop-up menu.
Your options include the following:
- Project: Projects are sessions that are stored on Avid’s cloud and mirrored on your computer in a local project cache. Though you must be logged into your Avid master account to create the project, you may work on it offline and it will automatically back up to your cloud account the next time you log in. Projects are generally used for collaborations, but they can be useful if you want to store your session on Avid’s cloud.
- Session: Sessions are all your song data including tracks, signal processing, plug-ins, and so on. Though media files are not located in a session, they are included in the items to copy for your Save Copy In process.
Click OK.
The Save Copy of Session In or Save Project Copy dialog box opens:
- Save Copy of Session: This dialog box asks you to choose the destination for your backup files.
- Save Project Copy: Your project files go directly into your Avid cloud account and don’t require a location.
Enter a name for your backup.
Because this copy exists in a different location from my hard drive, I can use the same name as that of my original session — and if it’s an exact duplicate, I do. This is important because if the original files are lost, all you have to do is drag the backed-up files onto your audio drive and get to work. Using a different name means you have to rename or import all your files before you can use them.Click Save (session) or OK (project) to back up your files.
The files you selected are backed up to the destination specified in Step 4.
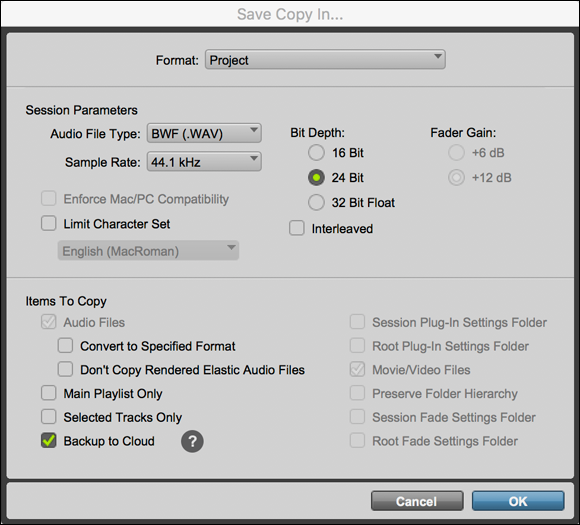
FIGURE 4-7: The Save Copy In dialog box lets you create a backup of your session or project.
You can also back up your files by clicking and dragging the folder containing your session and audio files from one hard drive to another on your computer’s desktop.