In theory, you can build a jumbo brick to just about any scale you like. In practice, some scales work better than others.
The smallest scale that works well is 4X. That’s one reason I’ve used it several times throughout this chapter. In fact, most even-numbered scales work well, because it’s much easier to center the studs on the tops of these elements. It’s more complicated to put studs on top of a brick that has odd lengths for sides.
You should also keep two other issues to keep in mind when you’re deciding what scale to build your jumbos. First, you’ll probably want to build some plates, not just standard height bricks. Scales such as 4X, 6X, 10X, and 12X all offer easy solutions for making jumbo plates. For example, at 10X, the jumbo model of a standard brick is ten real bricks high. Therefore, a 10X scale plate is three real bricks and one real plate high.
Note
A jumbo plate, regardless of which scale you choose, will always be one-third the height of a jumbo brick at the same scale.
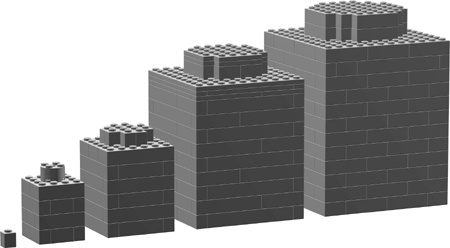
Similarly, at 12X, the jumbo model of a standard brick is twelve real bricks high, and a 12X scale plate is four real bricks high. You can see examples of the four scales I just mentioned, along with a standard 1x1 brick, in Figure 5-27.
The other tricky thing is dealing with the jumbo-sized studs that you’ll need to finish off your jumbo size elements. You’ve already seen that at 4X scale, you can easily use 2x2 cylinder bricks as studs. However, at 6X scale, the 4x4 cylinder brick is the right shape but not quite tall enough. For 10X and 12X scales you will almost certainly find yourself creating studs out of square bricks rather than cylindrical ones. Later in this chapter, I’ll discuss how best to handle studs scaled up to jumbo size.
For the first example in this chapter (Figure 5-1), you saw a 10X scale of a 1x1 brick. Then you learned how to scale some other pieces up by a factor of 4. Both of these scales worked just fine. In other words, the jumbo bricks you made looked just like the original regular-sized bricks, only bigger. Look carefully though at the detail needed to fashion the hole in the middle of the 10X Technic brick shown in Figure 5-28.
Would it be possible to have achieved this level of detail (Figure 5-28) if you tried it in 4X scale? No, probably not. The hole through the brick is a complex shape that benefits from being built to a larger scale where you can better define the curves.
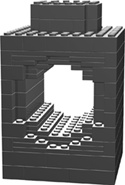
Figure 5-28. A 1x1 Technic brick offers an interesting challenge when you are building a jumbo version. Creating the hole in the middle is best achieved using larger scales.
Examine the way in which you were able to create a fairly realistic-looking stud on top of your 4X 1x1 brick in Figure 5-5. Would that same technique have worked for a 10X brick? No, not at all. The 2x2 cylinder brick simply wouldn’t be big enough to represent a stud at 10X scale. Instead, you need to build the stud out of several smaller elements to make it appear correctly sized.
Note
You can find complete instructions for building the 10X Technic brick shown in Figure 5-28 at www.apotome.com/instructions.html.
It’s easy to see that just as it is important to use the right parts for the right job, you must also choose the right scale at which to build. This idea applies to just about any LEGO model you may try to build. Trying to build a 6-inch-long Titanic might result in a ship so small it is hard to determine what inspired it. Starting with such a large inspiration can be hard, unless you are willing to work toward an equally large model. Looking at it another way, it is probably easier to build a 6-inch-long fire engine and have it contain a few essential details that help capture the feeling of the original than it is to do this for the Titanic. Think about matching your building scale with the item you are trying to build.
Building a model out of LEGO bricks requires you to make many decisions. You need to figure out how large a model to build, what color bricks to use and, very often, how to handle the tiny details that may not be possible to replicate exactly. To make your model look as realistic as possible, you will find that you need to approximate certain features to at least give you the look of the original. Sometimes just coming close is close enough. Where else in life do you get a great deal like that?
Jumbo bricks are no exception. Almost all have a tiny feature that can be hard to replicate. I’m talking about the studs on each element.
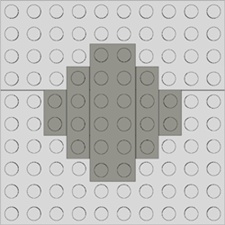
Let me use a 10X-scale stud to easily demonstrate this problem. First, refer to Appendix B of this book. There you will find information about printing out one of the model design grids you will use throughout this book. Print out a copy of Design Grid #1. It looks very similar to traditional graph paper. On that paper, draw a circle with the correct diameter to represent the stud. Imagine you’re looking down at the top of a 10X jumbo 1x1 brick, like the one shown in Figure 5-1.
Now start shading in squares until you almost fill the circle without really going outside of it. You should find that your drawing looks like Figure 5-29; the shaded squares don’t quite fill the circle. This means that this example of a jumbo stud will be just a bit smaller than if you could make it perfectly cylindrical.
Now shade in additional squares until your drawing looks like Figure 5-30. This version of the stud is slightly larger than if you could model it to be exactly cylindrical. Neither technique produces a perfect jumbo copy of the original. These are both examples of a shape being approximated with LEGO bricks.
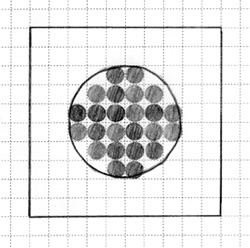
Figure 5-29. The small shaded circles within the larger circle represent the tops of actual bricks that will be used to re-create the jumbo stud.
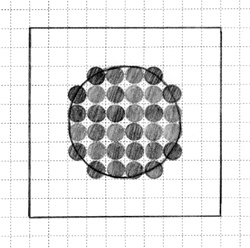
Figure 5-30. In the second example, shown here, more real bricks are added. This makes the jumbo stud appear larger than in Figure 5-29. You can use either version depending on your preference.
Figures Figure 5-31 and Figure 5-32 show how the two different studs appear when built of actual bricks.
Both techniques work, and two 10X macro bricks will connect together with either size, so it’s a matter of which one you like best. Approximation is as much about what you feel looks best for your particular model than it is about what is correct from the most technical point of view.