
Okay, you don’t really want to throw out every detail, but many smaller features on large objects are just not going to be included in your final work. In Chapter 5, I talked about a technique called approximation. This is the building method where you try to give things the look and feel of their real life counterpart without necessarily duplicating every last detail.
That same principle can also be applied to microscale models. The easiest way to do this is simply to look at the thing you are modeling and try to see only the characteristics that stand out the most. How does that work? To find out, let’s go back to the Empire State Building as an example of how to create a model at this scale. If you tried to create a minifig-scale version of that building, it would still have to be more than 26 feet tall! Remember that in Chapter 3 you discovered that minifig scale is about 1:48. Because the real building is 1,250 feet tall, you would divide that number by 48 and end up with 26.04 feet as the height of your model.
Most people don’t have enough LEGO bricks to tackle a project of that size. A microscale version of such a large building makes much more sense. But in choosing microscale, you need to recognize that smaller details such as window sills, decorative statues, or signs may have to be left out so that you can capture the essence of the building in something less than 26 feet.
The Empire State Building has a unique shape that is easily recognized. Bringing it to life in microscale involves trying to re-create that shape with as few elements as possible. All you are trying to achieve is the feeling that your model is this building not that it is an exact replica.
Start by sketching the shape of the building on some graph paper.
Note
For this next example, I’ve used one of the model Design Grids. This is special graph paper that has lines drawn to the same size and shape as real LEGO elements. Refer to Appendix B of this book for more information on the Design Grids. For now, just follow along with the example shown here.
I found some images of the actual building on the Internet and used them to come up with the drawing you see in Figure 6-2.
Notice that I’ve only drawn the outline of the building in this first illustration. The silhouette is the most important thing I want to achieve in making this model. As previously noted, I’ve essentially left out all the details at this point. Seeing only the shape of your subject helps you see the big picture of the model you are attempting to produce. Because microscale building is often about creating the illusion of a larger object, it’s very important that the model look right at first glance.
How did I know how big to draw it? I didn’t. I just guessed, though I obviously wanted to make it fit on a single page or less. You may find that your first few drawings are too large or too small or that they don’t capture the profile the way you want. Don’t give up. Making a second or third sketch doesn’t take that long, and your plan will likely improve each time. Note that at this point, I’m not even worrying about designing to a particular scale, I’m just focusing on finding a design that captures my subject.
Next, I begin to add the major details (see Figure 6-3).

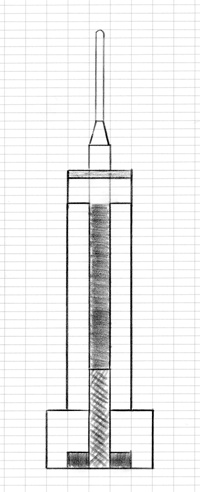
As you can see in Figure 6-3, I’ve drawn in the main entrance, shaded an indent near the top of the tower, and added the shape of the channel that runs vertically up the center of the building. Notice that in this drawing, I’ve tried to use different shades of pencil to represent different parts of the building. In some cases, this is to remind myself that even though this is a two-dimensional drawing, it is the plan for a three-dimensional model. By shading some areas darker, I’m leaving a visual clue for myself that these will be closer to the back of the model rather than right up front. The center channel, which runs most of the height of the building, is a perfect example of this technique. It is recessed from the face of the famous skyscraper, and I want to try and duplicate that look if I can.
It’s also worth pointing out that I’m not being too careful with how my lines meet or how each area is colored in. This is just a sketch and isn’t meant to be perfect. Perfection is boring; have fun with your design sessions!
Lastly (as shown in Figure 6-4), I’ve added some boxes to represent the windows. The key word in this last sentence is represent. As noted above, microscale models will never capture every last detail and often, with a very large subject, we can’t even depict things as large as windows. You can, however, add some plates of a different color to give the sense of where windows are located.

Interestingly, this is one model that really does look good in light and dark gray. Although many of the ideas presented in this book would benefit from a splash of color, this model is one that doesn’t. The simple two-tone effect, offered by the two shades of gray, is exactly what I’m looking for.