
In order to use the Pi as a Squeezebox client, we will use the open source software, squeezelite (https://code.google.com/p/squeezelite).
First, we need to install some prerequisites on the Pi which are required to run the squeezelite software, which can be done using the following command:
sudo apt-get install -y libflac-dev libfaad2 libmad0
Next, we will download the precompiled squeezelite binary from the Google Code page using wget. We will give it execute permissions to it and move it into the binary directory, allowing it to be executed like any other command-line application:
wget http://squeezelite-downloads.googlecode.com/git/squeezelite-armv6hf
sudo chmod a+x squeezelite-armv6hf
sudo mv squeezelite-armv6hf /usr/bin
Now that the client application is installed, we will do a little bit of testing to be sure that the setup is working properly. We will do this to determine the parameters that need to be passed to the client to get the best audio quality and performance.
To start, execute the following command:
squeezelite-armv6hf -n Pi -a 160
This command will start squeezelite in an auto-discovery mode in which it will search the network for a Logitech Media Server instance and connect to the first one it finds. If you have more than one instance and want to specify the server to connect to, then you can use the -s parameter:
squeezelite-armv6hf -s server_ip:port -n Pi -a 160
The -n parameter defines the name of the client and subsequently, what it will be called in Logitech Media Server; this is useful for identification when you are using more than one client on the same server. The -a parameter is used to specify additional ALSA parameters that are to be used while opening the output audio device; in this case, we will increase the default buffer size, which will help us to rectify some audio quality issues that may occur with the Pi.
Once squeezelite is running on the Pi, go back to the Logitech Media Server web interface and select the player from the drop-down list in the top-right corner of the page (you may need to refresh the page to display the player).
You can then browse your media library and queue the music to be played on the Pi using the add and play buttons, which can be seen when each media item is highlighted, as shown in the following screenshot:

Running an Ethernet cable through the Pi is a little bit unrealistic for this use. Hence, we will connect the Pi to a wireless network. Since not all Wi-Fi adapters work well with the Pi, it is a good idea to check the list of the supported devices (http://elinux.org/RPi_USB_Wi-Fi_Adapters) before purchasing one specifically for this project.
Firstly, we will make sure that we have all the Wi-Fi tools installed using the following command:
sudo apt-get install wpasupplicant wireless-tools
There is a good chance that these packages will already be installed on Raspbian, but it is a simple step to check beforehand.
It is likely that you already know the service set identifier (SSID) or name of the wireless network you want to connect to, but if not, or just to check whether it is being picked up by the Wi-Fi adapter, use the following command to get a list of all the Wi-Fi networks available in the range:
sudo iwlist wlan0 scan | grep ESSID
You will get output similar to the following:

Now that we know the name of the network we want to connect to, we can go ahead and add an entry in the wpa_supplicant configuration file, which contains the connection details for the network. This can be edited by the nano text editor, using the following command:
sudo nano /etc/wpa_supplicant/wpa_supplicant.conf
At the end of the file, add the following lines and replace SSID and PASSWORD with SSID and the password for your wireless network:
network={
  ssid="SSID"
  psk="PASSWORD"
  key_mgmt=WPA-PSK
}
Once the lines have been added to the file, save the changes, exit nano, and reboot the Pi using the following command:
sudo reboot
Once the Pi has booted, SSH back into it and make sure that the Pi has a Wi-Fi connection, using the following command:
ifconfig
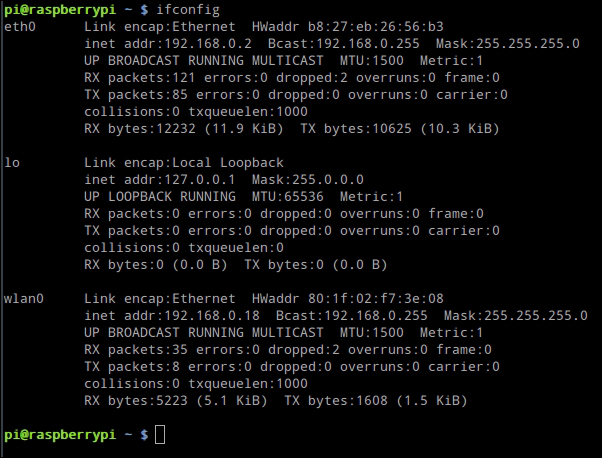
If the configuration is successful, you will see output similar to this, which shows an active Ethernet (on 192.168.0.2) and a Wi-Fi (on 192.168.0.18) connection:
After this, you should be able to SSH in the Pi via its Wi-Fi IP address and disconnect the Ethernet cable.
Since we want the Pi to be ready to stream music without having to do anything other than apply power to it, we need a way to launch squeezelite when the Pi boots; this time, we will look at another way of doing this, using a daemon.
A daemon is a program that runs in the background and is not directly visible to the user; because of this, it is often used for applications such as servers.
In our case, we will use the start-stop-daemon utility to create a daemon that will start squeezelite on boot. We will do this by writing a shell script and placing it in the /etc/inti.d directory:
#!/bin/bash

### BEGIN INIT INFO
# Provides:          squeezelite
# Required-Start:
# Required-Stop:
# Default-Start:     2 3 4 5
# Default-Stop:      0 1 6
# Short-Description: Squeezelite client
# Description:       Logitech media server client
### END INIT INFO

DAEMON_USER=pi
PIDFILE=/var/run/squeezelite.pid
DAEMON=/usr/bin/squeezelite-armv6hf

DAEMON_OPTS="-n Pi -a 160"

do_start()
{
  start-stop-daemon --start --background --pidfile $PIDFILE --make-pidfile --user $DAEMON_USER --chuid $DAEMON_USER --startas $DAEMON -- $DAEMON_OPTS
}

do_stop()
{
  start-stop-daemon --stop --pidfile $PIDFILE --retry 10
}

case $1 in
  start)
    do_start
    ;;
  stop)
    do_stop
    ;;
  restart)
    do_stop
    do_start
    ;;
  *)
    ;;
esac
Make the script executable and move it to the /etc/init/d directory:
sudo chmod a+x squeezelite
sudo mv squeezelite /etc/init.d/squeezelite
Finally, use the following command to update the list of daemons:
sudo update-rc.d squeezelite defaults
To ensure that the daemon is working properly, try to start squeezelite by executing:
sudo service squeezelite start
Check whether the process is running:
ps aux | grep squeeze
This should give you output similar to the following:

The preceding output shows that the squeezelite process is running; this can also be verified if you attempt to stream music in the player.