
The web application we will use for the mirror is essentially a framework built using Flask, which provides a common interface for individual widgets displayed on the mirror. In order to get the desired effect where the widgets are visible through the mirror, the page must have a black background with white text and graphics. For best results, the text should be as large as possible so that it allows maximum light to pass through the mirror's surface.
Each type of widget that can be shown on the mirror is comprised of four files:
- A server-side (Python) script file (
widgets/CLASSNAME.py) - A Jinja-style template file (
templates/widgets/CLASSNAME.html) - A CSS file (
static/widgets/CLASSNAME/style.css) - A client-side (JS/jQuery) script file (
static/widgets/CLASSNAME/script.js)
Here, CLASSNAME is the class name given to the widget that is used in the widget configuration files to create an instance of the widget on the mirror display. Templates for these files can be generated using the following script (assuming that you are currently in the mirror_webapp/ directory):
./make_new_widget CLASSNAME
We will now take a look at the demo widget to see what needs to be done if you want to implement your own widgets.
The first step to develop a new widget is to create a Python script that will provide the web application with the data it needs to operate. This will have access to the configuration options that are set under the [widget] section of the configuration file. The main part of the Python script is the get_data function which must return a dictionary that will be made accessible from the widget data web service and translated into JavaScript Object Notation (JSON):
from AbstractWidget import AbstractWidget
class DemoWidget(AbstractWidget):
    def get_data(self, config):
        self.logger.info('Getting data for demo widget')
        data = { 'greeting':'No Text Set!' }
        if 'text' in config:
            data['greeting'] = config['text']
        return data
Here, you can see the get_data function, which takes the widget configuration as a dictionary parameter and returns a dictionary. This is only a simple example that returns a text string taken from the configuration file. However, there is a lot of scope for the additional processing that can be done here (refer to the code for some of the other widgets, for example).
You will also notice that the first line of the function is used to log information. This can be very useful for debugging the application. The log is kept in the /home/pi/mirror_webapp/mirror_app.log file and contains the log output from the framework application and each configured widget.
Text can be output to the log at several levels, from least severe to most severe: debug, info, warning, error, and critical.
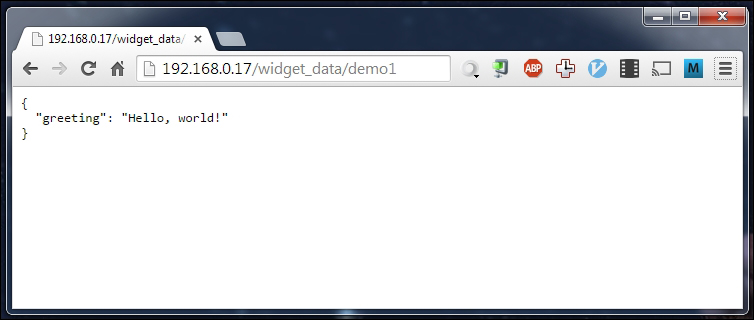
The data returned by the get_data function is made available on the widget data web service available at [PI_IP]/widget_data/[widget_id]. Here, PI_IP is the IP address of the Pi and widget_id is the widget ID that is given by the filename of the configuration file (that is, a widget with the configuration filename clock.conf will have the widget ID clock).
The web page for the application is generated by Flask using Jinja2 templates. This allows a very simple and clean way of building an HTML structure dynamically.
The first thing required in the file is the extends statement, which takes a common section of code used for each widget and adds the contents block to it based on the rest of the file:
{% extends "widget.html" %}The next section is the widget_contents block. This is where the actual contents of the widget should be written.
Here, you have access to a data variable that contains the data returned by the get_data function in the Python code for the widget:
{% block widget_contents %}
  <p>{{ data.greeting }}</p>
{% endblock %}
Typically, you will find that a lot of dynamic content is handled by JavaScript, as once the Pi has booted, the web page will never be refreshed under normal operation. Hence, this HTML generation step is only ever performed once.
Tip
For more information on the Jinja template language, refer to the documentation at http://jinja.pocoo.org/docs/dev/.
Since the demo widget does not have any dynamic content, the functions in the JavaScript file are just empty placeholders. However, the main point to be shown here is how the functions are called by the framework.
Firstly, there is a closure (a way of limiting scope in JavaScript to get something that behaves similar to a class in object-oriented languages) that defines the widget. This can be used to store instance-specific variables for the widget:
var DemoWidget = function() {
}
Next, there is a public function that is executed when the page first loads. This is used to get the widget into its initial state (for example, populating a list of RSS items before the next update or setting the time of a Date object):
DemoWidget.prototype.init = function(widgetDOM) {
  return;
};
The next function is called at intervals of the update_time variable set in the widget configuration file (refer to the Configuration section later in this chapter). This should be used to update the contents of the widget so that the mirror keeps displaying new information, for example, refreshing a list of news stories or incrementing the second hand of a clock:
DemoWidget.prototype.update = function(widgetDOM) {
  return;
};
The widgetDOM parameter given to both the functions is the Document Object Model (DOM) of the widget container element. This provides a safe and easy way to access the elements of your widget without having to rely on ID attributes in the HTML.
For instance, to access a certain paragraph element of the widget, you would first assign a class to the element in the HTML template, shown as follows:
<p class="news-story-title"></p>
Then, you can easily access the element and change its test using the following line of JavaScript:
widgetDOM.getELementsByClassName("news-story-title")[0].innerText = "Hello, World!"Tip
For more information on JavaScript development, refer to the w3schools reference pages at www.w3schools.com/jsref.