
While the ability to use GPIO inputs as input to emulators is planned for a future release of PiPlay, the current version does not support the use of switches connected via the GPIO port as input to game emulators. Hence, we need an additional piece of software to do this.
Fortunately, Adafruit has already written a driver that converts switch signals from the GPIO port to key presses (https://github.com/adafruit/Adafruit-Retrogame), which we will use for our arcade buttons and joystick.
First, we need to install some required programs and libraries that will allow us to recompile the retro game software when we make changes to it; these can be installed using:
sudo apt-get install git libexpat1 libexpat1-dev libncurses5 libncurses5-dev
Next, we will download the retro game software and move to the directory it was saved in by using the following two commands:
git clone https://github.com/adafruit/Adafruit-Retrogame.git
cd Adafruit-Retrogame
While there is already a precompiled version of the software available, it will not be suitable for the type of arcade system we have built. So, we need to make a few modifications to the code first. Use the following command to start editing the program:
nano retrogame.c
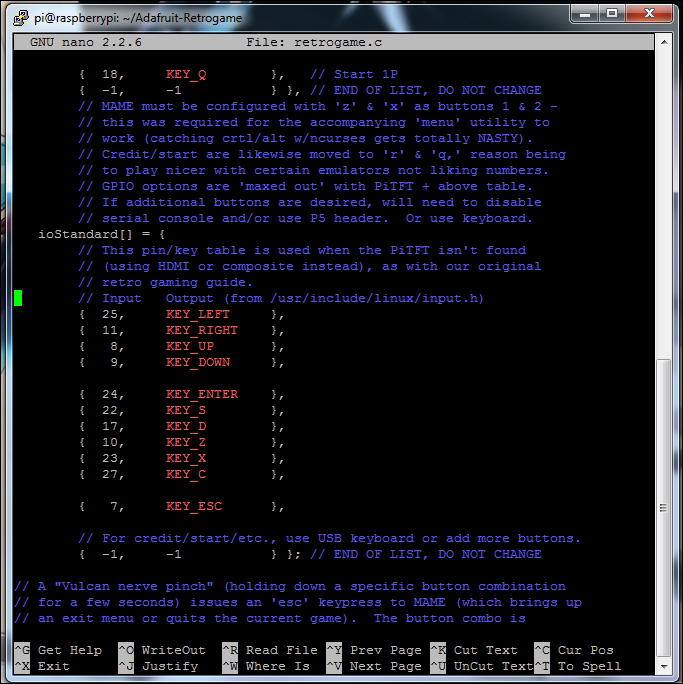
Next, look for the line that starts with ioStandard and replace the lines up to the END OF LIST marker with the following code. Note that if you are using a Pi B version 1, you need to replace 27 with 21 in this code:
ioStandard[] = {
  {  25,     KEY_LEFT     },
  {  11,     KEY_RIGHT    },
  {   8,     KEY_UP       },
  {   9,     KEY_DOWN     },
  {  24,     KEY_ENTER    },
  {  22,     KEY_S        },
  {  17,     KEY_D        },
  {  10,     KEY_Z        },
  {  23,     KEY_X        },
  {  27,     KEY_C        },
  {   7,     KEY_ESC      },
  {  -1,     -1           }
};
Once this is done, the code should look something like the following:
Once this is done, recompile the code using the following command:
make
This may take a couple of minutes and will output a message similar to the following:

If this is the case, then all is good and you can move on to the next step. If you get a message with the word Error in it anywhere, then you will likely have errors in the syntax of the program code. In this case, check whether the code you have matches what's shown in the preceding screenshot. You can also get an error when one of the libraries used by the code is not installed correctly; in which case, try updating the installed packages using the following commands:
sudo apt-get update
sudo apt-get upgrade
sudo apt-get install git libexpat1 libexpat1-dev libncurses5 libncurses5-dev
Once the retro game program is compiled successfully, we need to add a udev rule to ensure its compatibility with emulators using the latest SDL2 library. To do this, create a new rule file using the following command:
sudo nano /etc/udev/rules.d/10-retrogame.rules
On a single line, add the following code:
SUBSYSTEM=="input", ATTRS{name}=="retrogame", ENV{ID_INPUT_KEYBOARD}="1"Next, we want to ensure that the retro game program starts as soon as the OS boots in order to remove the need to attach a keyboard to the Pi. This can be done with an addition to the rc.local file:
sudo nano /etc/rc.local
Add the following line to the script just before the exit 0 line:
/home/pi/Adafruit-Retrogame/retrogame &
The script should now look similar to the following:
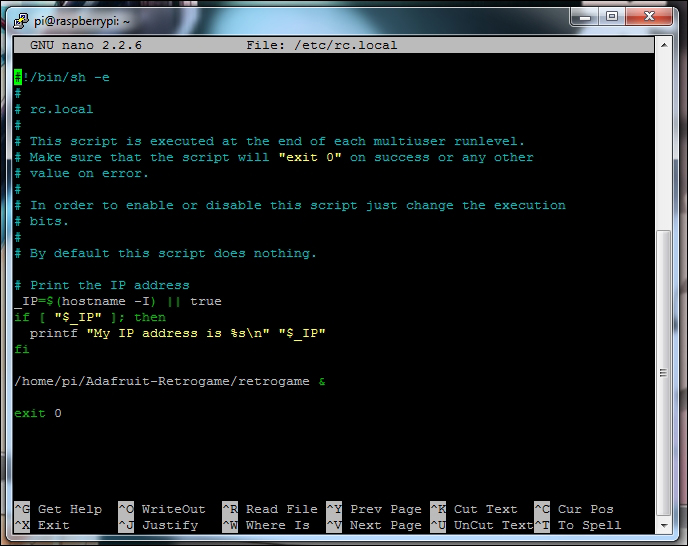
This script is run at the end of the Linux boot sequence, so it is a good place to add code that should be executed after the operating system has finished booting.
Finally, reboot the Pi and move on to configure the buttons within PiPlay:
sudo reboot
The next step is to wire up the buttons and joystick to the GPIO port. This must be done, as shown in the following diagram, to ensure that the button mapping is as expected and based on the code changed in retrogame.c. It would be worth doing this wiring with the power to the Pi turned off to reduce the chances of mistakes and permanent damage to the Pi.
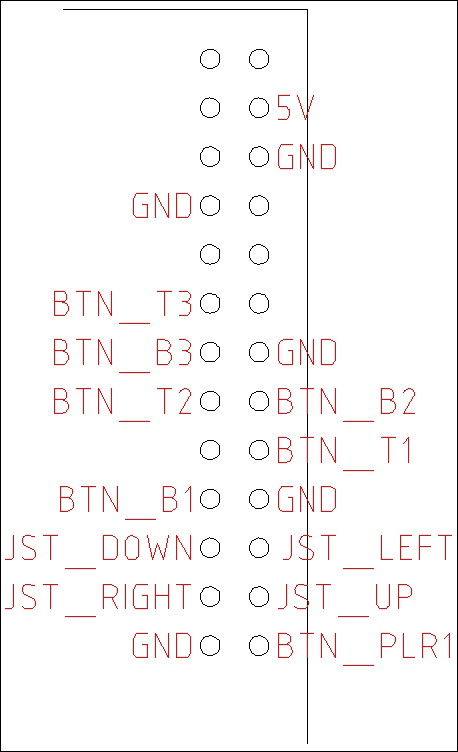
Note that PLR1 is the button on the front panel, B1-3 is the bottom row of buttons from left to right, and T1-3 is the top row of buttons from left to right.
Once all the connections have been made, the inside of the front of the cabinet should look something like what's shown in the following image. Also note that the white HDMI to VGA converter allows you to use an old PC monitor for this project.
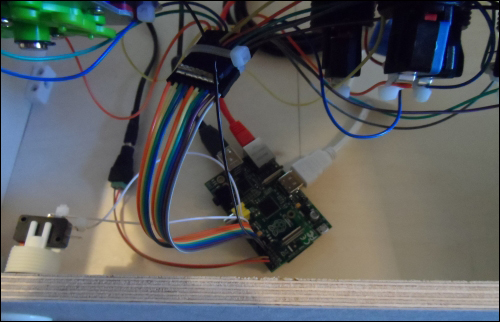
In the preceding image, you may notice that I am powering the Pi from a 5 V power supply, which is connected directly to the 5 V and ground pins on the GPIO port. This is not essential, but if you find that the Pi becomes unstable or has problems with USB devices or in maintaining a network connection, then this may be the case because the power supply cannot supply enough current. This can happen especially if you're using a HDMI to VGA converter, which requires a certain amount of power to operate.
Once this is done, repower the Pi. When the Pi boots back into PiPlay, you will notice that the joystick and button 1 will already be able to move the cursor and select emulators. However, you will need to configure the key mapping for the additional buttons used by each emulator.
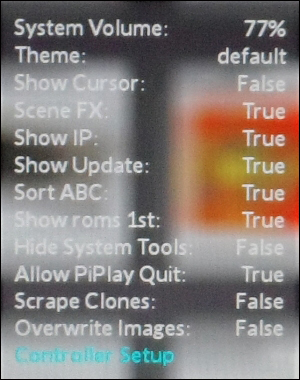
To configure the joystick and buttons for a certain emulator, press the Tab key on the keyboard. This should bring up a menu similar to the one shown in the following image. Use the arrow keys to scroll down to Controller Setup and press Enter.
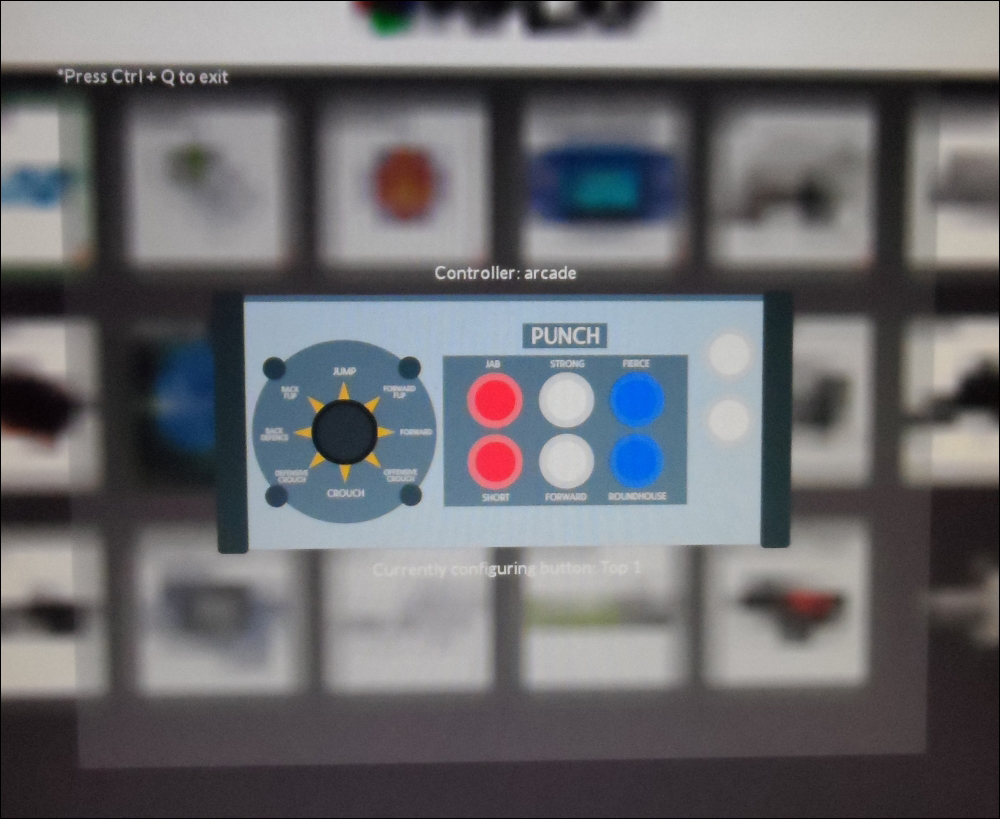
This will show another menu that shows all the emulators that PiPlay can control the key mapping of. Here, it is best to select a single emulator and assign its key mapping individually, for instance, select arcade from this menu.
This will then show a preview of the controller as shown in the following image and you will be prompted to press certain buttons to configure the key mapping. Certain emulators may have more buttons than what are available on the cabinet. In this case, they will have to be mapped to keys on the USB keyboard. (I have only found this to be the case with a couple of emulators, for example, the pause and credit buttons of MAME emulators have to be mapped to keys on the keyboard.)
Once this is done, you will be taken back to the main menu and can then select any of the emulators using the joystick and arcade buttons. Note that the top-left arcade button is used to select a menu option and the front, single-player button is used to return to the PiPlay main menu.