
The initial steps to set up the Pi are to get a copy of Raspbian installed on an SD card of at least 4 GB (although 8 GB or larger is preferable), as described in Chapter 1, Raspberry Pi Pirate Radio, and if desired, connect the Pi to your Wi-Fi network. This project will keep the Pi outside the display enclosure so that Wi-Fi is only really needed if a wired connection is not available.
You may wish to rotate the display to use the mirror in a portrait orientation, in which case the video output of the Pi will also need to be rotated. Fortunately, this is done by a simple change to a configuration file:
- Open the boot configuration file using:
sudo nano /boot/config.txt - Add the following line and replace
Nwith one of the options described in the next screenshot:display_rotate=N
The configuration file looks similar to the following screenshot:

- Save the file and reboot the Pi to see the changes:
sudo rebootThe possible options that can be given for
Nare:0: Normal display1: Rotate 90 degrees clockwise2: Rotate 180 degrees clockwise3: Rotate 270 degrees clockwise
Now that the Pi is set up, we can go ahead with the deployment of the web application on the Pi. Once again, this is a Flask application, so the procedure will be very similar to that used in the previous projects:
- First, start by copying the
config_filesandmirror_webappdirectories to the/home/pidirectory on the Raspberry Pi. - Now, we will ensure that the software on the Pi is up to date and install the required software to run the web application (note that the last lines here are Python libraries required by some of the widgets):
sudo apt-get update
sudo apt-get upgrade
sudo apt-get install python-pip git gunicorn supervisor nginx
sudo pip install requests pytz feedparser
- Next, we will download the Flask code repository and install it:
git clone https://github.com/mitsuhiko/flask.git
cd flask
sudo python setup.py install
cd
- Now, we will copy the Nginx configuration for the mirror web application, enable it, and restart Nginx so that it starts handling requests for the mirror web application:
sudo cp config_files/nginx/mirror.conf /etc/nginx/sites-available/mirror.conf
sudo ln -s /etc/nginx/sites-available/mirror.conf /etc/nginx/sites-enabled/
sudo rm /etc/nginx/sites-enabled/default
sudo nginx -t
sudo service nginx restart
- Next, we will copy the supervisor configuration for the application, which will allow the web application to be served by the Pi, as soon as it boots:
sudo cp config_files/supervisor/mirror_webapp.conf /etc/supervisor/conf.d/mirror_webapp.conf - Next, copy the default widget configuration files. For now, we will just use the defaults until the mirror is fully set up and go over the steps to configure widgets and styles later in the chapter:
cp config_files/mirror_app.conf ~
cp -r config_files/widgets/ widget_configs/
- Finally, update supervisor to enable the web application:
sudo supervisorctl reread
sudo supervisorctl update
sudo supervisorctl start mirror_webappp
Once this has been done, you should be able to browse the web application using the IP address of the Pi from any PC on the same network. On doing so, you should be greeted with a page similar to that shown in the following screenshot:
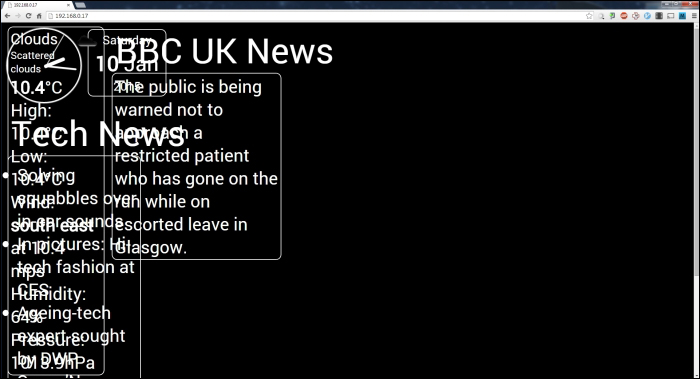
Don't worry if the page looks badly rendered, as the default widget configuration is designed to be shown on a portrait monitor and the font sizes are set relative to the width of the screen. When displayed on the Pi, this looks a lot better.
Now that we have the web application set up, we can move on to install the Chromium browser. We will use the browser in the kiosk mode to display the web application on the PI automatically, when it boots. To set up Chromium, perform the following steps:
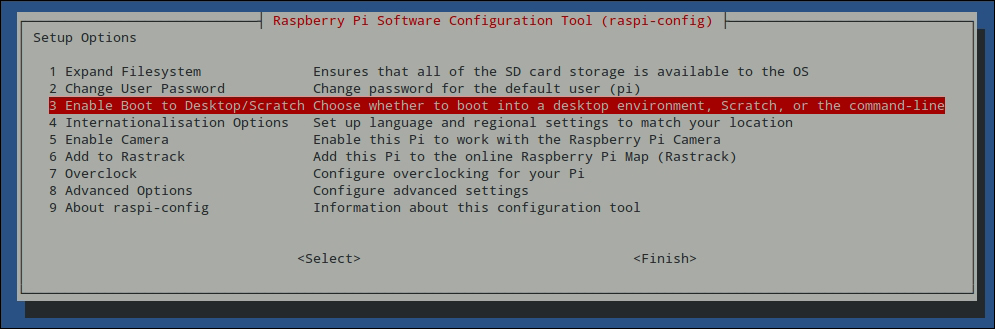
- Firstly, we must configure the Pi to boot straight into LXDE (the default window manager used on Raspbian) instead of a console. This can be done using the Pi configuration utility:
sudo raspi-config - Next, select the Enable Boot to Desktop/Scratch option and hit Enter.
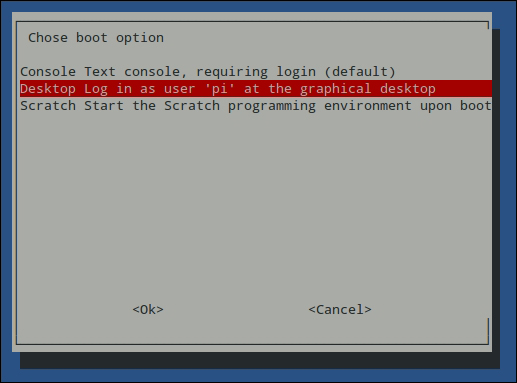
- Now, select the Desktop Log in as user 'pi' at the graphical desktop option and hit Enter.
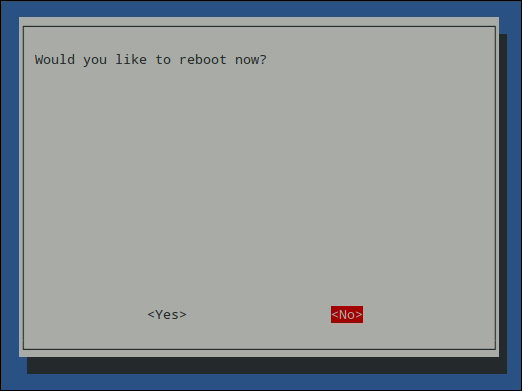
- Next, select the Finish option and when asked whether you would like to reboot now, select No.
- Once that is complete, we now need to install the Chromium browser:
sudo apt-get install chromium x11-xserver-utils unclutter - Next, we will modify the LXDE
autostartscript so that Chromium automatically starts and browses to the web application page when the Pi boots:sudo nano /etc/xdg/lxsession/LXDE/autostart - Comment out the following line. This will disable the default screensaver to ensure that the web application always remains visible:
@xscreensaver -no-splash
- Add the following lines at the end of the file. The first three disable the power saving features that would automatically turn the monitor blank and turn it off after a period of inactivity. The final line will start the Chromium browser in a fullscreen kiosk mode and browse to the web application:
@xset s off
@xset -dpms
@xset s noblank
@chromium --kiosk --incognito http://localhost
By this point, the
autostartfile should look similar to the following screenshot:
- Finally, reboot the Pi to test the setup:
sudo reboot
All being well, you should see the Pi boot into LXDE (indicated by the Raspberry Pi logo shown on a white background) and shortly after that, Chromium should start and browse to the web application.