
Now, we need to get the capture software installed on the Pi.
- First, copy the
recorderfolder onto the Pi using FileZilla and SFTP. - We need to install some packages and Python libraries that are used by the capture application. To do this, first install the Python setup tools that I have used to package the capture application:
sudo apt-get install python-setuptools git - Next, run the following commands to download and install the
pexiflibrary, which is used to save the GPS position from which each image was taken into the image EXIF data:git clone https://github.com/bennoleslie/pexif.git pexif cd pexif sudo python setup.py install
- Once this is done, SSH into the Pi can change directory to the
recorderfolder and run the following command:sudo python setup.py install - Now that the application is installed, we can take a look at the list of commands it accepts using:
gpstimelapse -hThis shows the list of commands, as shown in the following screenshot:
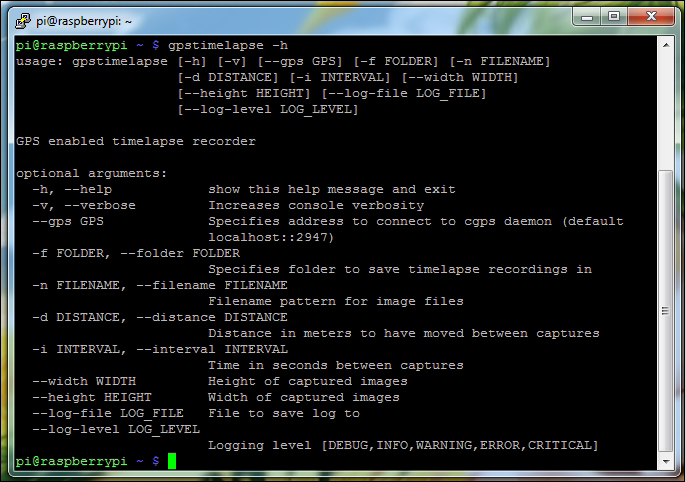
A few of the options here can be ignored; --log-file, --log-level, and --verbose were mainly added for debugging while I was writing the application. The --gps option will not need to be set, as it defaults to connect to the local gpsd instance, which if the application is running on the Pi, will always be correct.
The --width and --height options are simply used to set the resolution of the captured image. Without them, the capture software will default to capture 1248 x 1024 images.
The --interval option is used to specify how long, in seconds, to wait before it captures another time-lapse frame. It is recommended that you set this value at least 10 seconds in order to avoid filling the SD card too quickly (especially if the time lapse will run over a long period of time) and to ensure that any video created with the frames is of a reasonably length (that is, not too long).
The --distance option allows you to specify a minimum distance, in kilometers, that must be travelled since the last image was captured and before another image is captured. This can be useful to record a time lapse where, whatever holds the Pi, may stop in the same position for periods of time (for example, if the camera is in a car dashboard, this would prevent it from capturing several identical frames if the car is waiting in traffic).
This option can also be used to capture a set of images based alone on the distance travelled, disregarding the amount of time that has passed. This can be done by setting the --interval option to 1 (a value of 1 is used as data is only taken from the GPS module every second, so checking the distance travelled faster than this would be a waste of time).
The folder structure is used to store the frames. While being slightly complex at first sight, this is a good method that allows you to take multiple captures without ever having to SSH into the Pi.
Using the --folder option, you can set the folder under which all captures are saved. In this folder, the application looks for folders with a numerical name and creates a new folder that is one higher than the highest number it finds. This is where it will save the images for the current capture.
The filename for each image is given by the --filename option. This option specifies the filename of each image that will be captured. It must contain %d, which is used to indicate the frame number (for example, image_%d.jpg).
For example, if I pass --folder captures --filename image_%d.jpg to the program, the first frame will be saved as ./captures/0/image_0/jpg, and the second as ./captures/0/image_1.jpg.
Here are some examples of how the application can be used:
gpstimelapse --folder captures --filename i_%d.jpg --interval 30: This will capture a frame in every 30 secondsgpstimelapse --folder captures --filename i_%d.jpg --interval 30 --distance 0.05: This will capture a frame in every 30 seconds, provided that 50 meters have been travelledgpstimelapse --folder captures --filename i_%d.jpg --interval 1 --distance 0.05: This will capture a frame in every 50 meters that have been travelled
Now that you are able to run the time-lapse recorder application, you are ready to configure it to start as soon as the Pi boots. Removing the need for an active network connection and the ability to interface with the Pi to start the capture.
- To do this, we will add a command to the
/etc/rc.localfile. This can be edited using the following command:sudo nano /etc/rc.local - The line you will add will depend on how exactly you want the recorder to behave. In this case, I have set it to record an image at the default resolution every minute. As before, ensure that the command is placed just before the line containing
exit 0: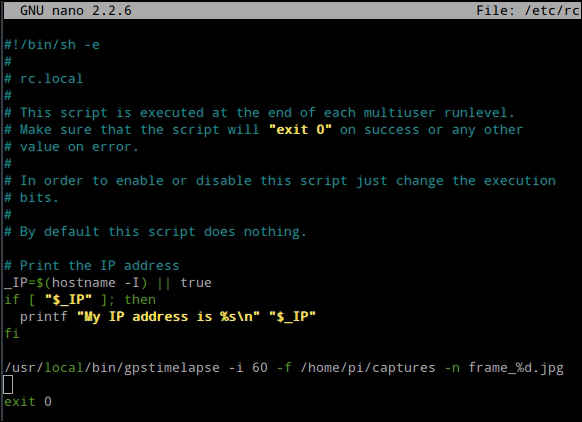
Now, you can reboot the Pi and test out the recorder. A good indication that the capture is working is the red LED on the camera board that lights up constantly. This shows that the camera preview is open, which should always be the case with this application.
Also note that, the capture will not begin until the GPS module has a fix. On the Adafruit module, this is indicated by a quick blink every 15 seconds on the fix LED (no fix is indicated by a steady blink once per second).
One issue you may have with this project is the amount of power required to power the camera and GPS module on top of the Pi. To power this while on the move, I recommend that you use one of the USB power banks that have a 2 A output (such power banks are readily available on Amazon).