
In this chapter, we will continue our implementation of the ShapeEditor application. We will start by implementing a "list" view to show the available Shapefiles, and then work through the details of importing and exporting Shapefiles via a web interface.
In this chapter, we will learn:
- How to display a list of records using a Django template
- How to deal with the complexities of Shapefile data, including issues with geometries and attribute data types
- How to import a Shapefile's data using a web interface
- How to export a Shapefile using a web interface
When the user first opens the ShapeEditor application, we want them to see a list of the previously-uploaded Shapefiles, with import, edit, export, and delete options. Let's build this list view, which acts as the starting point for the entire ShapeEditor application.
We'll start by tidying up the urls.py module so that we can add more URLs as we need them. Edit the urls.py file to look like this:
from django.conf.urls.defaults import *
from django.contrib.gis import admin
admin.autodiscover()

urlpatterns = patterns('geodjango.shapeEditor.views',
       (r'^shape-editor$', 'listShapefiles'),
)

urlpatterns += patterns('',
    (r'^admin/', include(admin.site.urls)),
)
Notice that we've now got two separate sets of URL patterns: one accessing functions within the geodjango.shapeEditor.views module, and the other for the admin interface. Splitting the URLs up like this is convenient as it lets us group the URLs logically by which module the views are defined in.
Let's take a closer look at the first URL pattern definition:
urlpatterns = patterns('geodjango.shapeEditor.views',
       (r'^shape-editor$', 'listShapefiles'),
)
This tells Django that any incoming URL that has a path name equal to / shape-editor should be mapped to the geodjango.shapeEditor.views.listShapefiles() function. This is the top-level URL for our entire application. Notice that we use regular expressions (and the r'...' syntax convention) to define the URL to match against.
Now that we've set up our URL, let's write the view to go with it. We'll start by creating a very simple implementation of the listShapefiles() view, just to make sure it works. Open the views.py module in the shapeEditor directory and edit the file to look like this:
from django.http import HttpResponse

def listShapefiles(request):
    return HttpResponse("in listShapefiles")
If it isn't already running, start up the GeoDjango web server. To do this, open a command-line window, cd into the geodjango project directory, and type:
python manage.py runserver
Then, open your web browser and navigate to the following URL:
http://127.0.0.1:8000/shape-editor
All going well, you should see in listShapefiles appear on the web page. This tells us that we've created the listShapefiles() view function and have successfully set up the URL mapping to point to this view.
We now want to create the view which will display the list of Shapefiles. To do so, we'll make use of a Django template. Start by editing the views.py module, and change the module's contents to look like this:
from django.http import HttpResponse
from django.shortcuts import render_to_response
from geodjango.shapeEditor.models import Shapefile

def listShapefiles(request):
    shapefiles = Shapefile.objects.all().order_by('filename')
    return render_to_response("listShapefiles.html",
                              {'shapefiles' : shapefiles})
The listShapefiles() view function now does two things:
- It loads the list of all Shapefile objects from the database into memory, sorted by filename.
- It passes this list to a Django template (in the file
listShapefiles.html), which is rendered into an HTML web page and returned back to the caller.
Let's go ahead and create the listShapefiles.html template. Create a directory called templates within the shapeEditor directory, and create a new file in this directory named listShapefiles.html. This file should have the following contents:
<html>
<head>
<title>ShapeEditor</title>
</head>
<body>
<h1>ShapeEditor</h1>
{% if shapefiles %}
<b>Available Shapefiles:</b>
<table border="0" cellspacing="0" cellpadding="5"
style="padding-left:20px">
{% for shapefile in shapefiles %}
<tr>
<td><font style="font-family:monospace">{{ shapefile.filename }}</font></td>
<td> </td>
<td>
<a href="http:///shape-editor/edit/{{ shapefile.id }}">
Edit
</a>
</td>
<td> </td>
<td>
<a href="http:///shape-editor/export/{{ shapefile.id }}">
Export
</a>
</td>
<td> </td>
<td>
<a href="http:///shape-editor/delete/{{ shapefile.id }}">
Delete
</a>
</td>
</tr>
{% endfor %}
</table>
{% endif %}
<button type="button"
onClick='window.location="/shape-editor/import";'>
Import New Shapefile
</button>
</body>
</html>
This template works as follows:
- If the
shapefileslist is not empty, it creates an HTML table to display the Shapefiles - For each entry in the
shapefileslist, a new row in the table is created - Each table row consists of the Shapefile's filename (in monospaced text), along with Edit, Export, and Delete hyperlinks
- Finally, an Import New Shapefile button is displayed at the bottom
We'll look at the hyperlinks used in this template shortly, but for now just create the file, make sure the Django server is running, and reload your web browser. You should see the following page:
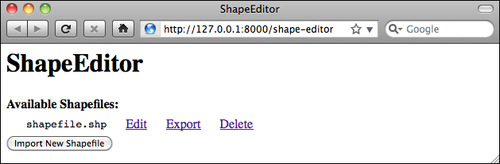
As you can see, the Shapefile we created earlier in the admin interface is shown, along with the relevant hyperlinks and buttons to access the rest of the ShapeEditor's functionality:
- The Edit hyperlink will take the user to the
/shape-editor/edit/1URL, which will let the user edit the Shapefile with the given record ID - The Export hyperlink will take the user to the
/shape-editor/export/1URL, which will let the user download a copy of the Shapefile with the given ID - The Delete hyperlink will take the user to the
/shape-editor/delete/1URL, which will let the user delete the given Shapefile - The Import New Shapefile button will take the user to the
/shape-editor/importURL, which will let the user upload a new Shapefile
You can explore these URLs by clicking on them if you want—they won't do anything other than display an error page, but you can see how the URLs link the various parts of the ShapeEditor's functionality together. You can also take a detailed look at the Django error page, which can be quite helpful in tracking down bugs.
Now that we have a working first page, let's start implementing the core functionality of the ShapeEditor application. We'll start with the logic required to import a Shapefile.