
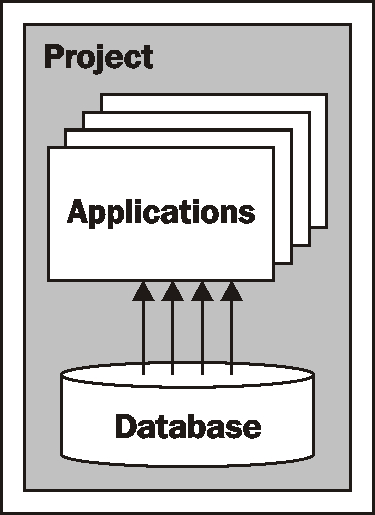
While a complete tutorial on Django is beyond the scope of this book, it is worth spending a few minutes becoming familiar with how Django works. In Django, you start by building a project that contains one or more applications. Each project has a single database that is shared by the applications within it:
Django comes with a large number of built-in applications that you can include as part of your project, including:
- An authentication system supporting user accounts, groups, permissions, and authenticated sessions
- An admin interface, allowing the user to view and edit data
- A markup application supporting lightweight text markup languages, including RestructuredText and Markdown
- A messages framework for sending and receiving messages
- A sessions system for keeping track of anonymous (non-authenticated) sessions
- A sitemaps framework for generating site maps
- A syndication system for generating RSS and ATOM feeds
The GeoDjango extension is implemented as another application within Django that you turn on when you wish to use it.
The project has a settings file that you to use to configure the project as a whole. These settings include a list of the applications you want to include in the project, which database to use, as well as various other project- and application-specific settings.
As we saw in the previous chapter, a Django application has three main components:
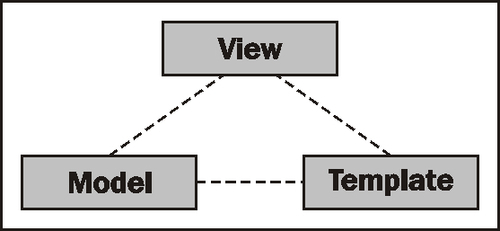
The models define your application's data structures, the views contain your application's business logic, and the templates are used to control how information is presented to the user. These correspond to the data, application, and presentation tiers within a traditional web application stack. Let's take a closer look at each of these in turn.
Because Django provides an object-relational mapper on top of the database, you don't have to deal with SQL directly. Instead, you define a model which describes the data you want to store, and Django will automatically map that model onto the database:

This high-level interface to the database is a major reason why working in Django is so efficient.
In Django, a view is a Python function which responds when a given URL is called. For example, the ShapeEditor application will respond to the /editFeature URL by allowing the user to edit a feature; the function which handles this URL is called the "edit feature" view, and will be defined like this:
def editFeature(request, shapefile_id, feature_id):
    ...
In general, an application's views will be defined in a Python module named, as you might expect, views.py. Not all of the application's views have to be defined in this file, but it is common to use this file to hold your application's views.
At its simplest, a view might return the HTML text to be displayed, such as:
def myView(request):
    return HttpResponse("Hello World")
Of course, views will generally be a lot more complicated, dealing with database objects and returning very sophisticated HTML pages. Views can also return other types of data, for example to display an image or download a file.
When an incoming request is sent to a URL within the web application, that request is forwarded to the view in the following way:
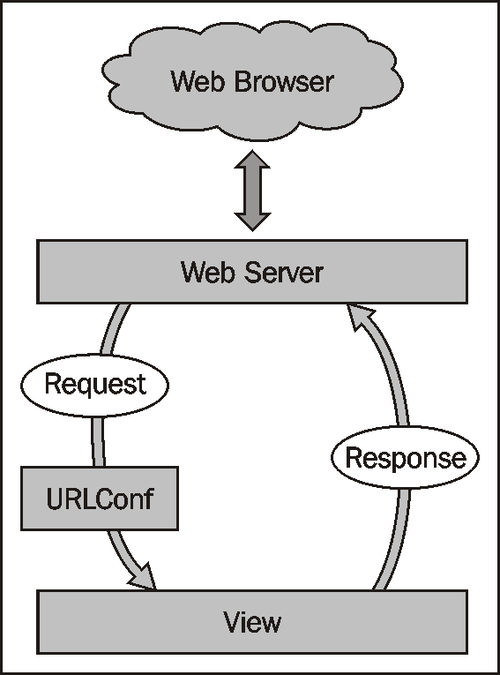
The web server receives the request and passes it on to a URL dispatcher, which in Django parlance is called a URLConf. This is a Python module that maps incoming URLs to views. The view function then processes the request and returns a response, which is passed to the web server so that it can be sent back to the user's web browser.
The URLConf module is normally named urls.py, and consists of a list of regular expression patterns and the views these patterns map to. For example, here is a copy of part of the ShapeEditor's urls.py file:
from django.conf.urls.defaults import *

urlpatterns = patterns('geodjango.shapeEditor.views',
       (r'^shape-editor$',
        'listShapefiles'),
    ...
)
This tells Django that any URL that matches the pattern ^shape-editor$ (that is, a URL consisting only of the text shape-editor) will be mapped to the listShapefiles function, which can be found in the geodjango.shapeEditor.views module.
Note
This is a slight simplification: the geodjango.shapeEditor.views entry in the above code example is actually a prefix that is applied to the view name. Prefixes can be anything you like; they don't have to be module names.
As well as simply mapping URLs to view functions, the URLConf module also lets you define parameters to be passed to the view function. Take, for example, the following URL mapping:
(r'^shape-editor/edit/(?P<shapefile_id>d+)$',
     'editShapefile'),
The syntax is a bit complicated thanks to the use of regular expression patterns, but the basic idea is that the URL mapping will accept any URL of the form
shape-editor/edit/NNNN
where NNNN is a sequence of one or more digits. The actual text used for NNNN will be passed to the editShapefile() view function as an extra keyword parameter named shapefile_id. This means that the view function would be defined like this:
def editShapefile(request, shapefile_id):
   ...
While the URL mapping does require you to be familiar with regular expressions, it is extremely flexible and allows you to define exactly which view will be called for any given incoming URL, as well as allowing you to include parts of the URL as parameters to the view function.
To simplify the creation of complex HTML pages, Django provides a sophisticated templating system. A template is a text file that is processed to generate a web page by taking variables from the view and processing them to generate the page dynamically. For example, here is a snippet from the listShapefiles.html template used by the ShapeEditor:
<b>Available Shapefiles:</b>
<table>
  {% for shapefile in shapefiles %}
  <tr>
    <td>{{ shapefile.filename }}</td>
    ...
  </tr>
  {% endfor %}
</table>
As you can see, most of the template is simply HTML, with a few programming constructs added. In this case, we loop through the shapefiles list, creating a table row for each Shapefile, and display (among other things) the Shapefile's file name.
To use this template, the view might look something like this:
def myView(request):
    shapefiles = ...
    return render_to_response("listShapefiles.html",
                              {'shapefiles' : shapefiles})
As you can see, the render_to_response() function takes the name of the template, and a dictionary containing the variables to use when processing the template. The result is an HTML page which will be displayed.
Note
All of the templates for an application are generally stored in a directory named templates within the application's directory.
Django also includes a library for working with data-entry forms. A form is a Python class defining the various fields to be entered, along with data-validation and other behaviors associated with the form. For example, here is the "import Shapefile" form used by the ShapeEditor:
class ImportShapefileForm(forms.Form):
    import_file = forms.FileField(label="Select a Shapefile")
    character_encoding = forms.ChoiceField(...)
forms.FileField is a standard Django form field for handling file uploads, while forms.ChoiceField is a standard form field for displaying a drop-down menu of available choices. It's easy to use a form within a Django view; for example:
def importShapefile(request):
    if request.method == "GET":
        form = ImportShapefileForm()
        return render_to_response("importShapefile.html",
                                  {'form' : form})
    elif request.method == "POST":
        form = ImportShapefileForm(request.POST,
                                   request.FILES)
        if form.is_valid():
            shapefile = request.FILES['import_file']
            encoding = request.POST['character_encoding']
            ...
        else:
            return render_to_response("importShapefile.html",
                                      {'form' : form})
    else:
        form = ImportShapefileForm()

    return render_to_response("importShapefile.html",
                              {'form' : form})
If the user is submitting the form (request.method == "POST"), we check that the form's contents are valid and process them. Otherwise, we build a new form from scratch. Notice that the render_to_response() function is called with the form object as a parameter to be passed to the template. This template will look something like the following:
<html>
  <head>
    <title>ShapeEditor</title>
  </head>
  <body>
    <h1>Import Shapefile</h1>
    <form enctype="multipart/form-data" method="post"
          action="import">
      {{ form.as_p }}
      <input type="submit" value="Submit"/>
    </form>
  </body>
</html>
The {{ form.as_p }} renders the form in HTML format (embedded within a<p> tag) and includes it in the template at that point.
Forms are especially important when working with GeoDjango because the map editor widgets are implemented as part of a form.
This completes our whirlwind tour of Django. It's certainly not comprehensive, and you are encouraged to follow the tutorials on the Django website to learn more, but we have covered enough of the core concepts for you to understand what is going on as we implement the ShapeEditor. Without further ado, let's start implementing the ShapeEditor by setting up a PostGIS database for our application to use.