
When discussing tools for developing geo-spatial web applications, it is worth remembering that all of the libraries and toolkits we have discussed in earlier chapters (SpatiaLite, MySQL, PostGIS, Mapnik, OGR, GDAL, Proj, Shapely, and so on) can also be used for web applications. In this section, we will add to this collection by examining some of the major Python libraries available for implementing tile caching and slippy maps. We will also look at some of the web application frameworks that support geo-spatial development.
There are three main tools for implementing tile caching within a Python geo-spatial web application: TileCache, mod_tile, and TileLite. Let's take a closer look at each of these.
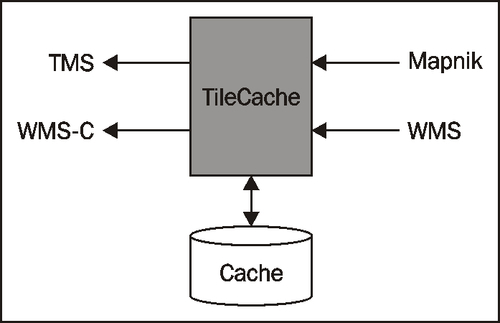
TileCache (http://tilecache.org) is a tile caching system written in Python. It supports both the Tile Map Service (TMS) protocol and the tiling-oriented extension to the Web Map Service (WMS) protocol called WMS-C. TileCache can accept rendered map images from Mapnik and from other servers that support the WMS protocol. Internally, TileCache can store the cached tiles on disk or in memory, as well as supporting other caching mechanisms such as Google Disk or Amazon S3.
TileCache is fast and versatile, while also being easy to set up. When configured appropriately and running on a fast server, TileCache is capable of handling more than 300 requests per second.
TileCache can be configured to work with a variety of web servers, including acting as a CGI script, running under Apache using mod_python, running a standalone FastCGI or WSGI server, and can even be configured to work with Microsoft's IIS web server.
To use TileCache with Mapnik, you need to create an XML-format map definition file as described in the Map Definition Files section in Chapter 8 of this book. You then refer to this map definition file in the TileCache configuration file, like this:
[mapLayer]
type=Mapnik
mapfile=/path/to/mapDefinition.xml
You can then access your map tiles using the standard TMS RESTful protocol, as described earlier in this chapter.
mod_tile (http://wiki.openstreetmap.org/wiki/Mod_tile) is an Apache module that implements tile caching for maps rendered using Mapnik. mod_tile is written in C, and so works extremely quickly. The mod_tile tiling system consists of two separate parts: a map rendering daemon called renderd, and the mod_tile module itself. The interaction between Mapnik, renderd, mod_tile, and Apache can be described in the following way:
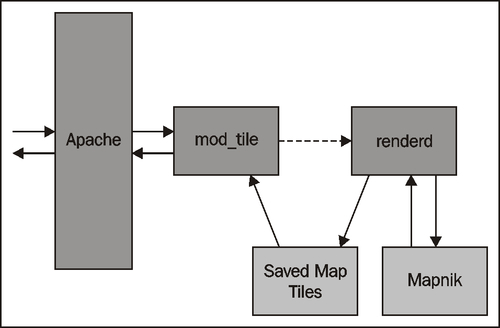
The renderd daemon sits in the background waiting for requests to generate map tiles. When the Apache web server receives an incoming request for a map tile, the mod_tile module checks the filesystem to see if that tile exists. If so, the tile is returned immediately. Otherwise, a request is sent to renderd to create the map tile. renderd listens for incoming tile-generation requests, calls Mapnik to create the tile, and saves it to the filesystem.
The mod_tile module uses a simple RESTful protocol to access map tiles:
http://myserver.com/tileserver/[zoom]/[X]/[Y].png
where [zoom] is the desired zoom level, and [X] and [Y] are the coordinates for the desired tile.
The renderd and mod_tile configuration files include important options for controlling how the mod_tile system works. This includes the relative URL used to access the tile cache, where on the filesystem the map tiles will be stored, and the name of the XML map definition file used by Mapnik to render the map images.
Because mod_tile has been written specifically for use by OpenStreetMap, it does have some quirks: it doesn't use a standard protocol for accessing map tiles, and it is limited to using Mapnik for map rendering. However, if this matches your particular application's requirements, mod_tile is a powerful and proven tile caching system that you may well wish to use in your own web application.
As the name suggests, TileLite (http://bitbucket.org/springmeyer/tilelite) is a lightweight tile server, written in Python. It serves tiles rendered using Mapnik, and uses WSGI for communicating with a web server. TileLite is easy to install and configure, and comes with its own server you can use for development purposes.
For deploying in a high-performance environment, you can combine TileLite with the mod_wsgi module to use TileLite within Apache. Because TileLite is a long-running process, it has a single Mapnik Map object that is held in memory to quickly produce map tiles on demand.
TileLite works with Mapnik, mod_wsgi and Apache in the following way:

TileLite is intended to be a plug-in replacement for mod_tile, and so uses mod_tile's URL scheme for accessing map tiles:
http://myserver.com/tileserver/[zoom]/[x]/[y].png
Because it is written in pure Python, it is easy to explore the TileLite source code and see how it works. It is fast and simple, and may well be suited to providing the tile caching needs of your geo-spatial web application.
JavaScript code running on the user's web browser, in conjunction with AJAX technology, has made it possible to include complex user interfaces previously only seen on desktop-based GUI systems. Because of the complexity of the JavaScript code needed to achieve commonly-used parts of a user interface, a number of large and powerful UI libraries have been developed to simplify the task of building a complex web interface. Dojo, script.aculo.us, Rico, and YUI are examples of some of the more popular JavaScript user interface libraries.
It is easy to forget that geo-spatial web applications are, first and foremost, ordinary web applications that also happen to work with geo-spatial data. Much of a geo-spatial web application's functionality is rather mundane: providing a consistent look and feel, implementing menus or toolbars to navigate between pages, user signup, login and logout, entry of ordinary (non-geo-spatial) data, reporting, and so on. All of this functionality can be handled by one of these general-purpose user interface libraries, and you are free to either choose one or more libraries of your liking, or make use of the UI library built into whatever web application framework you have chosen to use.
These general-purpose user interface libraries, and the process of using them to implement non-geo-spatial functionality, has been covered by many other books and websites. We will not look at them in depth here. Instead, we will look at the UI libraries specifically aimed at viewing or editing geo-spatial data, usually via a slippy map interface.
Let's take a closer look at two of these libraries: the fully-featured OpenLayers, and the simpler Mapiator library.
OpenLayers (http://openlayers.org) is a sophisticated JavaScript library for building mapping applications. It includes a JavaScript API for building slippy maps, combining data from multiple layers, and including various widgets for manipulating maps as well as viewing and editing vector-format data.
To use OpenLayers in your web application, you first need to create an HTML file to be loaded into the user's web browser, and write some JavaScript code that uses the OpenLayers API to build the desired map. OpenLayers then builds your map and allows the user to interact with it, loading map data from the various datasource(s) you have specified. OpenLayers can read from a variety of geo-spatial datasources, including TMS, WMS, and WFS servers. All these various parts work together to produce the user interface for your web application in the following way:

Tip
To use OpenLayers, you have to be comfortable writing JavaScript code. This is almost a necessity when creating your own web applications. Fortunately, the OpenLayers API is very high level, and makes map-creation relatively simple.
Here is an example HTML page that displays a slippy map using OpenLayers:
<html>
  <head>
    <script src="http://openlayers.org/api/OpenLayers.js">
    </script>
    <script type="text/javascript">
      function initMap() {
        var map = new OpenLayers.Map("map");
        var layer = new OpenLayers.Layer.WMS("Layer",
                      "http://labs.metacarta.com/wms/vmap0",
                      {layers: 'basic'} );
        map.addLayer(layer);
        map.zoomToMaxExtent();
      }
    </script>
  </head>
  <body onload="initMap()">
    <div style="width:100%; height:100%" id="map"></div>
  </body>
</html>
As you can see, the map uses a block-level element, in this case a<div> element, to hold the map. Initializing the map involves a short JavaScript function that defines the map object, adds a layer, and prepares the map for display.
Internally, the OpenLayers API uses a Map object to represent the slippy map itself, and one or more Layer objects which represent the map's datasources.
As with Mapnik layers, multiple OpenLayers layers can be laid on top of each other to produce the overall map image, and layers can be shown or hidden depending on the map's current scale factor.
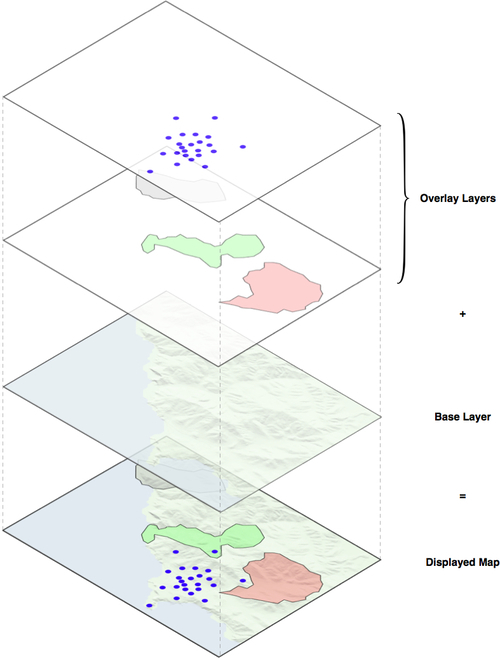
There are two types of layers supported by OpenLayers: Base Layers and Overlay Layers. Base layers sit behind the overlay layers, and are generally used to display raster format data (images, generated map tiles, and so on). Overlay layers, on the other hand, sit in front of the base layers, and are generally used to display vector format data, including points, lines, polygons, bounding boxes, text, markers, and so on:
Different Layer subclasses represent different types of datasources: OpenLayers.Layer.TMS, OpenLayers.Layer.WMS, OpenLayers.Layer.Google, and so on. In addition, the OpenLayers.Layer.Vector class represents vector-format data that can be loaded from a variety of sources, and optionally edited by the user. To have the vector layer read features from the server, you set up a Protocol object that tells OpenLayers how to communicate with the server. The most common protocol is HTTP, though several other protocols, including WFS, are also supported. The Protocol object usually includes the URL used to access the server.
As well as setting the protocol, you also supply the Format used to read and write data. Supported formats include GML, GeoJSON, GeoRSS, OSM, and WKT, among others. Format objects also support on-the-fly reprojection of vector data so that data from different sources, using different map projections, can be combined onto a single map.
In addition to the map itself, OpenLayers allows you to use various Control objects, either embedded within the map or shown elsewhere on the web page. Control objects include simple push-buttons, controls for panning and zooming the map, controls that display the map's current scale, controls for showing and hiding layers, and various controls for selecting, adding, and editing vector features. There are also invisible controls that change the behavior of the map itself. For example, the Navigation control allows the user to pan and zoom by clicking-and-dragging on the map, and the ArgParser control tells OpenLayers to scan the URL's query string during page load for arguments that adjust how the map is initially displayed.
OpenLayers is a very powerful tool for building geo-spatial web interfaces. Even if you don't use it directly in your own code, many of the web application frameworks that support geo-spatial web development (including TurboGears, Mapfish, and GeoDjango) use OpenLayers internally to display and edit map data.
Mapiator (http://pdietrich.github.com/mapiator) is a simple JavaScript library for including slippy maps within a web application. The main benefits of Mapiator are that it is small and easy to use: simply load the Mapiator.js library into your web page and add a few lines of JavaScript code to set up and display your map. For example, the following HTML page:
<html>
  <head>
    <title>My Map</title>
    <script type="text/javascript" src="Mapiator.js"></script>
    <script type="text/javascript">
        function onLoad() {
            var map = new Mapiator.Map("mapID");
            map.setZoomLevel(3);
            map.setCenter(48.0, 10.0);
            map.redraw();
        }
    </script>
  </head>
  <body onload="onLoad()">
      <div id="mapID" style="width:800px; height:500px">
      </div>
  </body>
</html>
will result in the following slippy map being displayed:
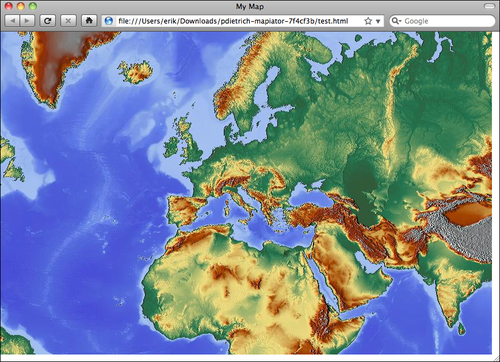
By default, Mapiator displays relief map tiles downloaded from http://maps-for-free.com when zoomed out, and street maps taken from http://openstreetmap.org when zoomed in beyond level 11. This is easy to change to use your own map tiles if you wish; you simply implement your own getTileUrl() function that returns the URL to use for a given zoom level and X/Y coordinate value.
Mapiator includes functions for creating vector data that is overlaid onto the map. These vector elements can be created programmatically, or loaded from a WKT format string. You can also add DOM elements directly to the map image, for example to display buttons or other controls within the map.
While there is no built-in functionality for editing and saving vector data, the Mapiator.js library is relatively small and easy to understand; if your geo-spatial application includes the need to display a slippy map using read-only raster and vector data, Mapiator is an excellent choice.
In this section, we will examine three of the major Python-based web application frameworks that also support geo-spatial web application development.
Django (http://djangoproject.org) is a rapid application development (RAD) framework for building database-oriented web applications using Python. GeoDjango is a set of extensions to Django that add geo-spatial capabilities to the Django framework.
To understand how GeoDjango works, it is first necessary to understand a little about Django itself. Let's start by taking a closer look at Django.
The Django framework is highly respected, and used to power thousands of web applications currently deployed across the Internet. The major parts of Django include an object-relational mapper, an automatically-generated admin interface, a flexible URL mapper, a web templating system, a caching framework, and internationalization logic. Putting these elements together, Django allows you to quickly build sophisticated web applications to implement a wide variety of database-oriented systems.
A Django project consists of a number of apps, where each app implements a standalone set of functionality:
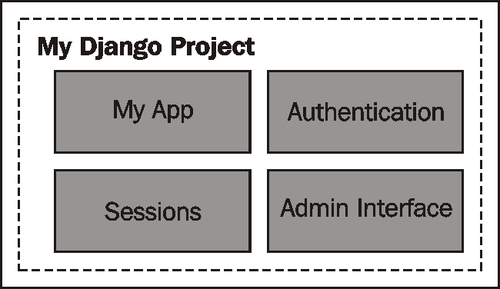
When creating a web application, you define your own app, and will typically make use of one or more predefined apps that come with Django. One of the most important predefined apps is the admin interface, which allows you to administer your web application, view and edit data, and so on. Other useful predefined apps implement persistent sessions, user authentication, site maps, user comments, sending e-mails, and viewing paginated data. A large number of user-contributed apps are also available.
Internally, each app consists of three main parts:
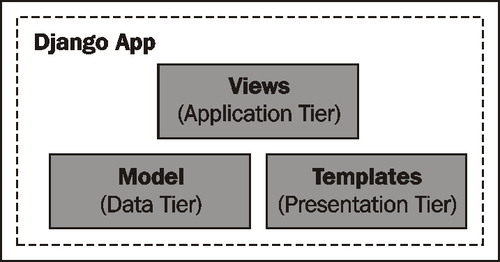
The Model is the app's data tier. This contains everything related to the application's data, how it is structured, how to import it, how to access it, how data is validated, and so on.
The Templates make up the app's presentation tier. These describe how information will be presented to the user.
The Views make up the application tier, and hold the application's business logic. A view is a Python function responsible for accepting incoming requests and sending out the appropriate response. Views typically make use of the model and template to produce their output.
Note
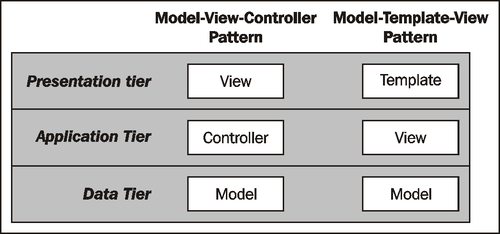
Make sure that you don't confuse Django's model-template-view architecture with the model-view-controller(MVC) pattern commonly used in software development. The two are quite distinct, and describe the different tiers in the web application stack in very different ways. While the model in both Django and MVC represents the data tier, Django uses the view to hold the application logic, and separates out the presentation using templates. MVC, on the other hand, allows the view to directly specify the presentation of the data, and uses a controller to represent the application's business logic. The differences between the two above-mentioned design patterns can be summarized as follows:
There is a lot more to Django than can be covered in this brief introduction, but this is enough to understand how GeoDjango extends the Django framework.
The GeoDjango extension builds on Django's capabilities to add complete support for building geo-spatial web applications. In particular, it extends the following parts of the Django system:
- The Model
- The Django model is extended to support geo-spatial data types and spatial queries.
- As geo-spatial features are read from the database, the object-relational mapper automatically converts them into GEOS objects, providing methods for querying and manipulating these features in a sophisticated way similar to the interface provided by Shapely.
- The Model can import data from any OGR-supported vector datasource into the GeoDjango database.
- GeoDjango can use introspection to see which attributes are available in a given OGR datasource, and automatically set up the model to store and import these attributes.
- The Template
- The Admin Interface
All told, the GeoDjango extension makes Django an excellent choice for developing geo-spatial web applications. We will be working with GeoDjango in much more detail in the remaining chapters of this book.
MapFish (http://mapfish.org) is an extension to the Pylons web application framework in much the same way as GeoDjango is an extension to Django. Pylons is a lightweight web application framework modeled after the popular Ruby on Rails framework. Using the WSGI (Web Server Gateway Interface) standard, Pylons brings together a number of third-party tools to implement a complete web development framework, supporting features such as a model-view-controller architecture, URL mapping, form handling, sessions, user accounts, and various options for deploying your web application, as well as internationalization, testing, logging, and debugging tools.
Pylons supports a variety of HTML templating engines and database toolkits. The default Pylons project uses a standard set of tools, for example the Mako templating system and the SQLAlchemy object-relational mapper. But, these are just defaults, and you can easily replace them with whatever set of tools you wish to use. Pylons acts as the glue between the tools you choose, rather than requiring a particular toolset.
MapFish builds on Pylons to create a complete geo-spatial web application framework. MapFish itself is broken into two portions: a server portion and a client portion:
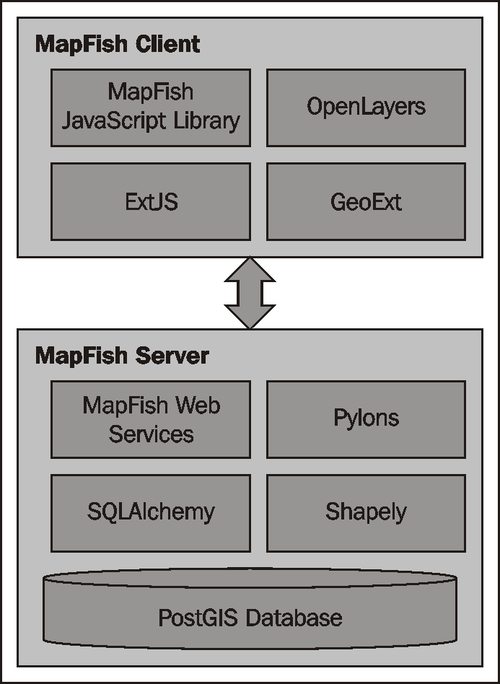
The MapFish Server uses PostGIS, SQLAlchemy, and Shapely to provide an object-oriented layer on top of your geo-spatial data as part of a Pylons application. The server also implements a number of RESTful web services, using a custom protocol known as the MapFish Protocol. These allow the client software to view and make changes to the underlying geo-spatial data.
The MapFish Client software consists of a JavaScript library that provides the user interface for a MapFish application. The MapFish JavaScript library builds on OpenLayers to produce a slippy map, along with the ExtJS and GeoExt libraries to provide user-interface widgets and common behaviors such as feature selection and editing, searching, enabling and disabling layers, and so on.
Putting all this together, MapFish allows developers to build complex user interfaces for geo-spatial web applications, along with server-side components to implement features such as geocoding, spatial analysis, and editing geo-spatial features.
Just like GeoDjango is an extension to the existing Django web framework and MapFish is an extension to Pylons, the TurboGears web framework (http://turbogears.org) also has an extension designed to make it easy to implement your own geo-spatial web applications. This extension is named tgext.geo, and comes bundled with TurboGears.
TurboGears is a sophisticated and extremely popular web application framework built upon Pylons and using a number of standard components, including the SQLAlchemy object-relational mapper, the Genshi templating system, and the ToscaWidgets user interface library. TurboGears also uses the MVC architecture to separate the application's data, business logic, and presentation.
The tgext.geo extension to TurboGears makes use of several existing third-party libraries rather than trying to implement its own functionality. As with MapFish, tgext.geo consists of both client and server components:

tgext.geo uses the ToscaWidgets tw.openlayers wrapper around the OpenLayers library to make it easy to embed a slippy map into your TurboGears application. Alternatively, you can use OpenLayers directly, or use the MapFish client libraries if you prefer.
On the server side, tgext.geo consists of four parts:
- TileCache is used to serve externally-generated map tiles and display them as a background for your own map data, without wasting bandwidth or time regenerating the map tiles every time they are needed.
- GeoAlchemy (http://geoalchemy.org) provides an object-relational mapper for geo-spatial data stored in a PostGIS, MySQL, or SpatialLite database. As the name suggests, GeoAlchemy is built on top of SQLAlchemy.
- The MapFish RESTful protocol provides a simple way for the client code to read and update the geo-spatial data held in the database.
- FeatureServer (http://featureserver.org) provides a more feature-complete interface to the application's geo-spatial data. FeatureServer implements the WFS protocol, as well as providing a RESTful interface to geo-spatial data in a number of different formats, including JSON, GML, GeoRSS, KML, and OSM.
The tgext.geo extension to TurboGears makes it possible to quickly build complete and complex geo-spatial applications on top of these components using the TurboGears framework.